
Making a Poppy Seed Layer Cake is the best way to enjoy your weekend. This Poppy Seed Layer Cake recipe is loved by children and adults alike. Don’t forget to share your Poppy Seed Layer Cake photos with us
Poppy Seed Layer Cake
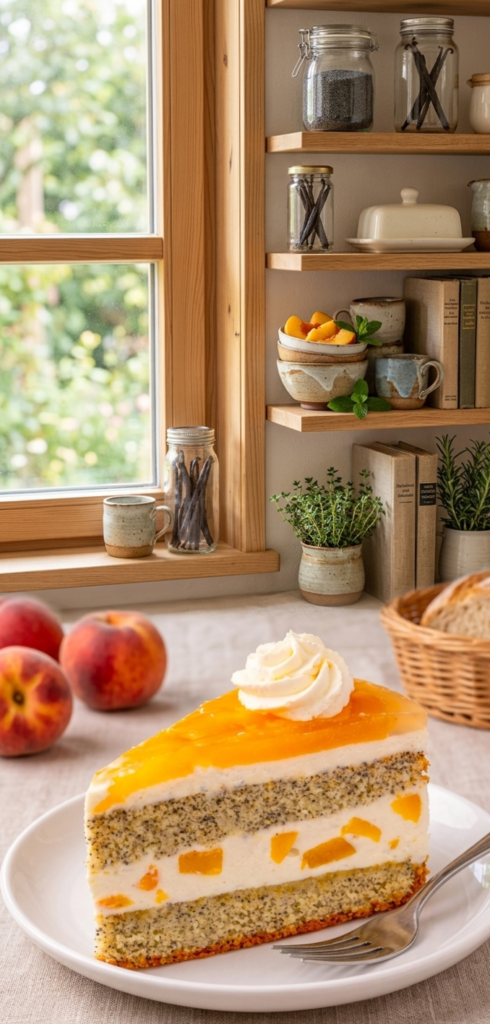
Poppy Seed Cake
Peach and Poppy Seed Layer Cake Recipe
This cake is a delightful blend of textures: the crunch of poppy seeds, the fluffiness of the sponge, and the refreshing sweetness of peaches.
Ingredients
1. For the Poppy Seed Sponge:
- All-purpose flour (Maida): 1.5 cups
- Poppy seeds: 4 tbsp
- Sugar: 1 cup (powdered)
- Eggs: 3 large (or 1 cup yogurt for eggless version)
- Unsalted butter/Oil: 1/2 cup
- Baking powder: 1 tsp
- Vanilla extract: 1 tsp
- Milk: 1/4 cup (as needed)
2. For the Cream Filling:
- Whipping cream: 2 cups (chilled)
- Fresh Peaches: 3-4 (diced) or canned peaches
- Icing sugar: 4 tbsp
3. For the Peach Glaze (Top Layer):
- Peach puree: 1 cup
- Gelatin or Agar-agar: 1 tsp
- Sugar: 2 tbsp
Instructions
Step 1: Bake the Sponge
- Preheat your oven to 180°C (350°F). Grease a round cake tin with butter and dust with flour.
- Sift the flour and baking powder together. Stir in the poppy seeds and set aside.
- In a large bowl, cream the butter and sugar until light and fluffy. Add eggs one at a time, beating well after each addition. Mix in the vanilla extract.
- Gradually fold in the dry ingredients. Add milk if the batter is too thick.
- Pour the batter into the tin and bake for 30-35 minutes. Once done, let it cool completely on a wire rack.
Step 2: Prepare the Filling & Topping
- Whip the chilled cream with icing sugar until it forms stiff peaks.
- For the glaze: Heat the peach puree with sugar. Dissolve the gelatin/agar-agar in a little water and mix it into the warm puree. Let it cool slightly (it should be pourable but not hot).
Step 3: Assembly
- Slice the cooled sponge cake horizontally into two layers.
- Place the bottom layer on a plate. Spread a generous layer of whipped cream and scatter the diced peach chunks evenly.
- Place the second sponge layer on top. Cover the sides and the top of the cake with a thin layer of cream to create a smooth surface.
- Carefully pour the peach glaze over the top layer, spreading it to the edges.
- Refrigerate the cake for at least 4 hours (or overnight) to allow the layers and glaze to set perfectly.
Step 4: Garnish
- Before serving, pipe a swirl of whipped cream in the center or around the edges as shown in your image.
Quick Tips:
- Soaking: For an extra moist cake, lightly brush the sponge layers with peach juice or simple syrup before adding the cream.
- Storage: Keep the cake refrigerated. It tastes best when served cold!
Peach and Poppy Seed Layer Cake: A Sweet Experience
ಈ ಸುಂದರವಾದ ಚಿತ್ರದಲ್ಲಿ ಕಾಣುತ್ತಿರುವ ಕೇಕ್ ನೋಡುವುದಕ್ಕೆ ಎಷ್ಟು ಆಕರ್ಷಕವಾಗಿದೆಯೋ, ತಿನ್ನಲು ಅಷ್ಟೇ ರುಚಿಯಾಗಿರುತ್ತದೆ. ಇದು ಪೀಚ್ ಮತ್ತು ಗಸಗಸೆ (Peach and Poppy Seed) ಮಿಶ್ರಿತ ಒಂದು ಅದ್ಭುತವಾದ ಲೇಯರ್ ಕೇಕ್. ಇದರ ಮೃದುವಾದ ಸ್ಪಂಜ್, ಅದರಲ್ಲಿನ ಗಸಗಸೆಯ ಕುರುಕುಲುತನ ಮತ್ತು ಪೀಚ್ ಹಣ್ಣಿನ ಸಿಹಿ-ಹುಳಿ ರುಚಿಯ ಸಂಗಮ ಅದ್ಭುತ.
ಈ ಕೇಕ್ ಅನ್ನು ಮನೆಯಲ್ಲೇ ತಯಾರಿಸಲು ಬೇಕಾಗುವ ಸಾಮಗ್ರಿಗಳು ಮತ್ತು ಹಂತ-ಹಂತದ ವಿಧಾನ ಇಲ್ಲಿದೆ.
ಪೀಚ್ ಮತ್ತು ಗಸಗಸೆ ಲೇಯರ್ ಕೇಕ್ ರೆಸಿಪಿ
ಅಗತ್ಯವಿರುವ ಸಾಮಗ್ರಿಗಳು:
1. ಗಸಗಸೆ ಸ್ಪಂಜ್ ಕೇಕ್ ತಯಾರಿಸಲು:
- ಮೈದಾ ಹಿಟ್ಟು: 1.5 ಕಪ್ (ಸುಮಾರು 200 ಗ್ರಾಂ)
- ಗಸಗಸೆ (Poppy Seeds): 4 ದೊಡ್ಡ ಚಮಚ
- ಸಕ್ಕರೆ: 1 ಕಪ್ (ಪುಡಿ ಮಾಡಿದ್ದು)
- ಮೊಟ್ಟೆ: 3 ದೊಡ್ಡದಾದವು (ಸಸ್ಯಾಹಾರಿಗಳಾದರೆ 1 ಕಪ್ ಮೊಸರು ಬಳಸಬಹುದು)
- ಬೆಣ್ಣೆ ಅಥವಾ ಎಣ್ಣೆ: 1/2 ಕಪ್
- ಬೇಕಿಂಗ್ ಪೌಡರ್: 1 ಟೀಚಮಚ
- ವೆನಿಲ್ಲಾ ಎಸೆನ್ಸ್: 1 ಟೀಚಮಚ
- ಹಾಲು: 1/2 ಕಪ್ (ಅಗತ್ಯವಿದ್ದರೆ)
2. ಕ್ರೀಮ್ ಲೇಯರ್ ಮತ್ತು ಫಿಲ್ಲಿಂಗ್ಗಾಗಿ:
- ವಿಪ್ಪಿಂಗ್ ಕ್ರೀಮ್ (Whipping Cream): 2 ಕಪ್ (ತಣ್ಣಗಿರಲಿ)
- ಪೀಚ್ ಹಣ್ಣುಗಳು: 3-4 (ಸಣ್ಣದಾಗಿ ಹೆಚ್ಚಿದ್ದು) ಅಥವಾ ಕ್ಯಾನ್ ಮಾಡಲಾದ ಪೀಚ್
- ಐಸಿಂಗ್ ಸಕ್ಕರೆ: 4 ದೊಡ್ಡ ಚಮಚ
3. ಮೇಲಿನ ಪೀಚ್ ಗ್ಲೇಜ್ (Peach Topping):
- ಪೀಚ್ ಪ್ಯೂರಿ (Peach Puree): 1 ಕಪ್
- ಜೆಲಾಟಿನ್ ಅಥವಾ ಅಗರ್ ಅಗರ್: 1 ಟೀಚಮಚ
- ಸಕ್ಕರೆ: 2 ಚಮಚ (ರುಚಿಗೆ ತಕ್ಕಂತೆ)
ತಯಾರಿಸುವ ವಿಧಾನ:
ಹಂತ 1: ಸ್ಪಂಜ್ ಕೇಕ್ ಸಿದ್ಧಪಡಿಸುವುದು
- ಮೊದಲು ಓವನ್ ಅನ್ನು 180°C ಗೆ ಪ್ರೀಹೀಟ್ ಮಾಡಿ. ಕೇಕ್ ಟಿನ್ ಗೆ ಬೆಣ್ಣೆ ಹಚ್ಚಿ ಸ್ವಲ್ಪ ಮೈದಾ ಉದುರಿಸಿ ಸಿದ್ಧಪಡಿಸಿಟ್ಟುಕೊಳ್ಳಿ.
- ಒಂದು ಪಾತ್ರೆಯಲ್ಲಿ ಮೈದಾ, ಬೇಕಿಂಗ್ ಪೌಡರ್ ಮತ್ತು ಗಸಗಸೆಯನ್ನು ಹಾಕಿ ಚೆನ್ನಾಗಿ ಜರಡಿ ಹಿಡಿದು ಮಿಶ್ರಣ ಮಾಡಿ.
- ಮತ್ತೊಂದು ಪಾತ್ರೆಯಲ್ಲಿ ಬೆಣ್ಣೆ ಮತ್ತು ಸಕ್ಕರೆಯನ್ನು ಹಾಕಿ ಅದು ನಯವಾಗುವವರೆಗೆ (Fluffy) ಚೆನ್ನಾಗಿ ಮಿಕ್ಸ್ ಮಾಡಿ. ಇದಕ್ಕೆ ಮೊಟ್ಟೆಗಳನ್ನು ಒಂದೊಂದಾಗಿ ಸೇರಿಸಿ ಚೆನ್ನಾಗಿ ಫೆಟ್ ಮಾಡಿ.
- ಈಗ ಒಣ ಸಾಮಗ್ರಿಗಳ ಮಿಶ್ರಣವನ್ನು (ಮೈದಾ ಮಿಶ್ರಣ) ಸ್ವಲ್ಪ ಸ್ವಲ್ಪವೇ ಸೇರಿಸುತ್ತಾ ವೆನಿಲ್ಲಾ ಎಸೆನ್ಸ್ ಹಾಕಿ ನಿಧಾನವಾಗಿ ಕಲಸಿ. ಹಿಟ್ಟು ತುಂಬಾ ಗಟ್ಟಿಯಾದಲ್ಲಿ ಸ್ವಲ್ಪ ಹಾಲು ಸೇರಿಸಿ.
- ಈ ಮಿಶ್ರಣವನ್ನು ಕೇಕ್ ಟಿನ್ಗೆ ಹಾಕಿ 30-35 ನಿಮಿಷಗಳ ಕಾಲ ಓವನ್ನಲ್ಲಿ ಬೇಯಿಸಿ. ಕೇಕ್ ಬೆಂದ ನಂತರ ಅದನ್ನು ಸಂಪೂರ್ಣವಾಗಿ ತಣ್ಣಗಾಗಲು ಬಿಡಿ.
ಹಂತ 2: ಕ್ರೀಮ್ ಮತ್ತು ಪೀಚ್ ತಯಾರಿ
- ಪೀಚ್ ಹಣ್ಣುಗಳ ಸಿಪ್ಪೆ ತೆಗೆದು ಸಣ್ಣ ಚೌಕಾಕಾರದ ತುಂಡುಗಳನ್ನಾಗಿ ಮಾಡಿಟ್ಟುಕೊಳ್ಳಿ.
- ಒಂದು ತಣ್ಣನೆಯ ಪಾತ್ರೆಯಲ್ಲಿ ವಿಪ್ಪಿಂಗ್ ಕ್ರೀಮ್ ಮತ್ತು ಐಸಿಂಗ್ ಸಕ್ಕರೆ ಸೇರಿಸಿ, ಅದು ಗಟ್ಟಿಯಾದ ಶಿಖರದಂತೆ (Stiff Peaks) ಬರುವವರೆಗೆ ಎಲೆಕ್ಟ್ರಿಕ್ ಬೀಟರ್ನಿಂದ ಬೀಟ್ ಮಾಡಿ.
ಹಂತ 3: ಕೇಕ್ ಜೋಡಣೆ (Assembling)
- ತಣ್ಣಗಾದ ಸ್ಪಂಜ್ ಕೇಕ್ ಅನ್ನು ಅಡ್ಡಲಾಗಿ ಎರಡು ಭಾಗಗಳಾಗಿ ಕತ್ತರಿಸಿ.
- ಮೊದಲ ಲೇಯರ್ ಮೇಲೆ ಸ್ವಲ್ಪ ಪೀಚ್ ಸಿರಪ್ ಅಥವಾ ಸಕ್ಕರೆ ನೀರನ್ನು ಸವರಿ (ಇದು ಕೇಕ್ ಅನ್ನು ತೇವವಾಗಿಡುತ್ತದೆ).
- ಇದರ ಮೇಲೆ ತಯಾರಿಸಿದ ವಿಪ್ಪಿಂಗ್ ಕ್ರೀಮ್ ಅನ್ನು ದಪ್ಪವಾಗಿ ಹರಡಿ. ಅದರ ಮೇಲೆ ಸಣ್ಣದಾಗಿ ಹೆಚ್ಚಿದ ಪೀಚ್ ತುಂಡುಗಳನ್ನು ಸಮನಾಗಿ ಹರಡಿ.
- ಈಗ ಕೇಕ್ನ ಎರಡನೇ ಲೇಯರ್ ಅನ್ನು ಅದರ ಮೇಲಿಡಿ. ಈಗ ಕೇಕ್ನ ಮೇಲ್ಭಾಗ ಮತ್ತು ಸುತ್ತಲೂ ಕ್ರೀಮ್ನಿಂದ ನಯವಾಗಿ ಫಿನಿಶಿಂಗ್ ನೀಡಿ.
ಹಂತ 4: ಪೀಚ್ ಗ್ಲೇಜ್ ಟಾಪಿಂಗ್
- ಪೀಚ್ ಹಣ್ಣುಗಳನ್ನು ರುಬ್ಬಿ ಸೋಸಿ ಪ್ಯೂರಿ ಮಾಡಿ. ಅದನ್ನು ಸ್ವಲ್ಪ ಬಿಸಿ ಮಾಡಿ ಅದಕ್ಕೆ ಕರಗಿಸಿದ ಜೆಲಾಟಿನ್ ಅಥವಾ ಅಗರ್ ಅಗರ್ ಸೇರಿಸಿ.
- ಈ ಮಿಶ್ರಣ ಸ್ವಲ್ಪ ಉಗುರು ಬೆಚ್ಚಗಾದಾಗ, ಕೇಕ್ನ ಮೇಲ್ಭಾಗದಲ್ಲಿ ಚಿತ್ರದಲ್ಲಿರುವಂತೆ ಸಮನಾಗಿ ಸುರಿಯಿರಿ.
- ಇದನ್ನು ಫ್ರಿಜ್ನಲ್ಲಿ ಕನಿಷ್ಠ 4-5 ಗಂಟೆಗಳ ಕಾಲ ಸೆಟ್ ಆಗಲು ಬಿಡಿ.
ಹಂತ 5: ಅಲಂಕಾರ
- ಕೇಕ್ ಚೆನ್ನಾಗಿ ಸೆಟ್ ಆದ ಮೇಲೆ, ಅದರ ಮೇಲೆ ಸ್ವಲ್ಪ ವಿಪ್ಪಿಂಗ್ ಕ್ರೀಮ್ನಿಂದ ಡಿಸೈನ್ ಮಾಡಿ.
- ಚಿತ್ರದಲ್ಲಿರುವಂತೆ ಒಂದು ಸುಂದರವಾದ ಸ್ಲೈಸ್ ಕತ್ತರಿಸಿ ಸರ್ವ್ ಮಾಡಿ!
ಕೆಲವು ಪ್ರಮುಖ ಸಲಹೆಗಳು:
- ಪೀಚ್ ಆಯ್ಕೆ: ತಾಜಾ ಪೀಚ್ ಹಣ್ಣುಗಳು ಲಭ್ಯವಿಲ್ಲದಿದ್ದರೆ ನೀವು ಮಾರುಕಟ್ಟೆಯಲ್ಲಿ ಸಿಗುವ ‘Canned Peaches’ ಬಳಸಬಹುದು.
- ಗಸಗಸೆ: ಗಸಗಸೆಯನ್ನು ಹಾಕುವುದರಿಂದ ಕೇಕ್ ತಿನ್ನುವಾಗ ಒಂದು ವಿಶಿಷ್ಟವಾದ ಕುರುಕುಲು ಅನುಭವ ನೀಡುತ್ತದೆ, ಇದನ್ನು ಸ್ಕಿಪ್ ಮಾಡಬೇಡಿ.
- ಸೇವನೆ: ಈ ಕೇಕ್ ತಣ್ಣಗಿದ್ದಾಗಲೇ ತಿನ್ನಲು ಹೆಚ್ಚು ರುಚಿ. ಇದನ್ನು ಫ್ರಿಜ್ನಲ್ಲಿಟ್ಟರೆ 2-3 ದಿನಗಳ ಕಾಲ ತಾಜಾವಾಗಿರುತ್ತದೆ.
ಈ ರೆಸಿಪಿ ಅನುಸರಿಸಿ ನೀವು ಕೂಡ ಮನೆಯಲ್ಲೇ ಇಂತಹ ಬೇಕರಿ ಶೈಲಿಯ ಅದ್ಭುತ ಕೇಕ್ ತಯಾರಿಸಬಹುದು!