
Chocolate Raspberry Mousse Cake”
Heart shaped chocolate mousse cake with fresh raspberries and chocolate curls on a white plate.”
Chocolate Raspberry Mousse Cake
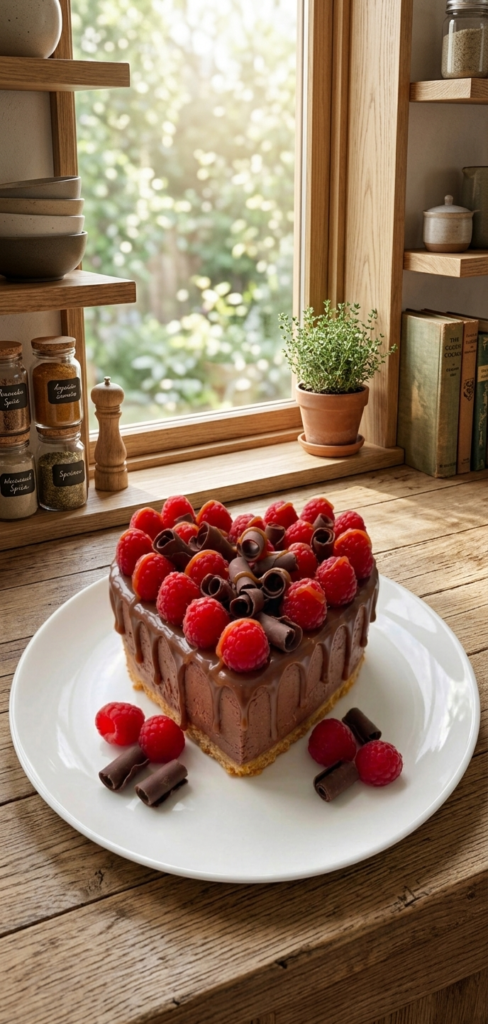
Decadent No-Bake Heart-Shaped Chocolate Raspberry Mousse Cake
Celebrate love and sweetness with this stunning dessert. This recipe combines a crunchy biscuit base with a silky-smooth chocolate mousse, topped with the tart freshness of raspberries. The best part? No oven required!
Ingredients
1. For the Crust (Base):
- Digestive Biscuits: 15-20 biscuits (crushed into fine crumbs)
- Unsalted Butter: 1/2 cup (melted)
2. For the Chocolate Mousse Layer:
- Dark Chocolate: 300g (chopped into small pieces)
- Heavy Whipping Cream: 2 cups (kept very cold)
- Powdered Sugar: 1/4 cup (optional, adjust based on the sweetness of your chocolate)
- Vanilla Extract: 1 tsp
3. For the Garnish (The “Wow” Factor):
- Fresh Raspberries: 1 cup
- Chocolate Curls/Shavings: For that professional bakery look
- Caramel or Chocolate Ganache: For the side drips
Step-by-Step Instructions
Step 1: Create the Foundation
Mix the biscuit crumbs with melted butter until it feels like wet sand. Press this mixture firmly into the bottom of a heart-shaped springform pan. Use the back of a spoon to make it even. Chill in the fridge for 30 minutes.
Step 2: Melt the Chocolate
Melt the dark chocolate using a double boiler or in short bursts in the microwave. Stir until smooth and let it cool down to room temperature (it shouldn’t be hot when added to the cream).
Step 3: Whip the Mousse
In a large chilled bowl, whip the heavy cream (and powdered sugar) until stiff peaks form. Gently fold the cooled melted chocolate and vanilla extract into the whipped cream using a spatula. Do this slowly so you don’t lose the airiness of the mousse.
Step 4: Set the Cake
Pour the mousse over the chilled biscuit base. Smooth the top with a spatula. Place it in the refrigerator for at least 4 to 6 hours, or preferably overnight, to set completely.
Step 5: Decorate Like a Pro
Once set, carefully remove the cake from the mold. Create the “drip” effect on the edges with chocolate sauce. Arrange the fresh raspberries in a heart pattern on top and sprinkle the chocolate curls in the center.
Success Tips for Your Blog Post
- The “Clean Cut”: Tell your readers to dip their knife in hot water and wipe it dry before slicing the cake to get those perfect, sharp mousse layers.
- Aesthetic Background: Since you love natural light and wooden shelves, mention that this cake looks best photographed against a rustic kitchen backdrop.
- Fruit Variations: Suggest that readers can swap raspberries for strawberries if they prefer a sweeter profile.
Easy raspberry chocolate cake
ಪ್ರೀತಿಪಾತ್ರರಿಗಾಗಿ ವಿಶೇಷ ಚಾಕೊಲೇಟ್ ರಾಸ್ಬೆರಿ ಮೌಸ್ ಕೇಕ್”
Heart-Shaped Chocolate Raspberry Mousse Cake Recipe
ಈ ಕೇಕ್ ಪ್ರೀತಿಪಾತ್ರರಿಗೆ ಉಡುಗೊರೆ ನೀಡಲು ಅಥವಾ ವಿಶೇಷ ದಿನಗಳನ್ನು ಆಚರಿಸಲು ಹೇಳಿ ಮಾಡಿಸಿದಂತಿದೆ. ಇದು ಬೇಯಿಸುವ ಅಗತ್ಯವಿಲ್ಲದ (No-Bake) ರೆಸಿಪಿಯಾಗಿದ್ದು, ಮನೆಯಲ್ಲೇ ಸುಲಭವಾಗಿ ತಯಾರಿಸಬಹುದು.
ಬೇಕಾಗುವ ಪದಾರ್ಥಗಳು (Ingredients):
1. ಕೇಕ್ ಬೇಸ್ (Base):
- ಡೈಜೆಸ್ಟಿವ್ ಬಿಸ್ಕತ್ತುಗಳು: 15-20
- ಕರಗಿಸಿದ ಬೆಣ್ಣೆ: 1/2 ಕಪ್
2. ಚಾಕೊಲೇಟ್ ಮೌಸ್ (Mousse Layer):
- ಡಾರ್ಕ್ ಚಾಕೊಲೇಟ್: 300 ಗ್ರಾಂ
- ವಿಪ್ಪಿಂಗ್ ಕ್ರೀಮ್ (Whipping Cream): 2 ಕಪ್
- ಸಕ್ಕರೆ ಪುಡಿ: 1/4 ಕಪ್ (ಅಗತ್ಯವಿದ್ದರೆ)
- ವೆನಿಲ್ಲಾ ಎಸೆನ್ಸ್: 1 ಟೀಚಮಚ
3. ಅಲಂಕಾರಕ್ಕಾಗಿ (Decoration):
- ತಾಜಾ ರಾಸ್ಬೆರಿಗಳು (Raspberries)
- ಚಾಕೊಲೇಟ್ ಸುರುಳಿಗಳು (Chocolate Curls)
- ಕ್ಯಾರಮೆಲ್ ಅಥವಾ ಚಾಕೊಲೇಟ್ ಸಾಸ್ (Drizzle ಗಾಗಿ)
ತಯಾರಿಸುವ ವಿಧಾನ (Step-by-Step Instructions):
ಹಂತ 1: ಬೇಸ್ ಸಿದ್ಧಪಡಿಸುವುದು
ಬಿಸ್ಕತ್ತುಗಳನ್ನು ಮಿಕ್ಸಿಯಲ್ಲಿ ನುಣ್ಣಗೆ ಪುಡಿ ಮಾಡಿ. ಅದಕ್ಕೆ ಕರಗಿಸಿದ ಬೆಣ್ಣೆ ಸೇರಿಸಿ ಚೆನ್ನಾಗಿ ಬೆರೆಸಿ. ಈ ಮಿಶ್ರಣವನ್ನು ಹೃದಯಾಕಾರದ ಕೇಕ್ ಮೋಲ್ಡ್ನ ತಳಭಾಗಕ್ಕೆ ಹಾಕಿ ಸಮವಾಗಿ ಒತ್ತಿ. ಇದನ್ನು 30 ನಿಮಿಷಗಳ ಕಾಲ ಫ್ರಿಡ್ಜ್ನಲ್ಲಿಡಿ.
ಹಂತ 2: ಚಾಕೊಲೇಟ್ ಕರಗಿಸುವುದು
ಡಾರ್ಕ್ ಚಾಕೊಲೇಟ್ ಅನ್ನು ಸಣ್ಣ ತುಂಡುಗಳಾಗಿ ಕತ್ತರಿಸಿ. ಡಬಲ್ ಬಾಯ್ಲರ್ ವಿಧಾನದಲ್ಲಿ ಅಥವಾ ಮೈಕ್ರೋವೇವ್ನಲ್ಲಿ ಕರಗಿಸಿ. ಇದು ಪೂರ್ತಿ ತಣ್ಣಗಾಗಲಿ.
ಹಂತ 3: ಮೌಸ್ ತಯಾರಿಕೆ
ಒಂದು ಬೌಲ್ನಲ್ಲಿ ತಣ್ಣಗಿರುವ ವಿಪ್ಪಿಂಗ್ ಕ್ರೀಮ್ ತೆಗೆದುಕೊಂಡು ಅದು ಗಟ್ಟಿಯಾಗುವವರೆಗೆ (stiff peaks) ವಿಸ್ಕ್ ಮಾಡಿ. ಈಗ ಇದಕ್ಕೆ ತಣ್ಣಗಾದ ಚಾಕೊಲೇಟ್ ಮತ್ತು ವೆನಿಲ್ಲಾ ಎಸೆನ್ಸ್ ಸೇರಿಸಿ ನಿಧಾನವಾಗಿ ಬೆರೆಸಿ (Fold ಮಾಡಿ).
ಹಂತ 4: ಸೆಟ್ ಮಾಡುವುದು
ಫ್ರಿಡ್ಜ್ನಿಂದ ಮೋಲ್ಡ್ ಹೊರತೆಗೆದು, ಬಿಸ್ಕತ್ತು ಪದರದ ಮೇಲೆ ಈ ಚಾಕೊಲೇಟ್ ಮೌಸ್ ಮಿಶ್ರಣವನ್ನು ಸುರಿಯಿರಿ. ಮೇಲ್ಭಾಗವನ್ನು ಚಪ್ಪಟೆಯಾಗಿ ಮಾಡಿ. ಇದನ್ನು ಕನಿಷ್ಠ 4-6 ಗಂಟೆಗಳ ಕಾಲ (ಅಥವಾ ಇಡೀ ರಾತ್ರಿ) ಫ್ರಿಡ್ಜ್ನಲ್ಲಿ ಸೆಟ್ ಆಗಲು ಬಿಡಿ.
ಹಂತ 5: ಫೈನಲ್ ಟಚ್ ಮತ್ತು ಅಲಂಕಾರ
ಕೇಕ್ ಸೆಟ್ ಆದ ಮೇಲೆ ಮೋಲ್ಡ್ನಿಂದ ಹೊರತೆಗೆಯಿರಿ. ಚಿತ್ರದಲ್ಲಿರುವಂತೆ ಕೇಕ್ನ ಸುತ್ತಲೂ ಚಾಕೊಲೇಟ್ ಸಾಸ್ ಅನ್ನು ಡ್ರಿಪ್ ಮಾಡಿ. ಕೇಕ್ನ ಮೇಲ್ಭಾಗದಲ್ಲಿ ತಾಜಾ ರಾಸ್ಬೆರಿಗಳನ್ನು ಮತ್ತು ಚಾಕೊಲೇಟ್ ಸುರುಳಿಗಳನ್ನು ಕಲಾತ್ಮಕವಾಗಿ ಜೋಡಿಸಿ.