
Pistachio Raspberry Chocolate Tart
Learn how to make a premium Pistachio Raspberry Chocolate Tart at home. An easy step-by-step recipe with a perfect balance of chocolate and tangy berry layers
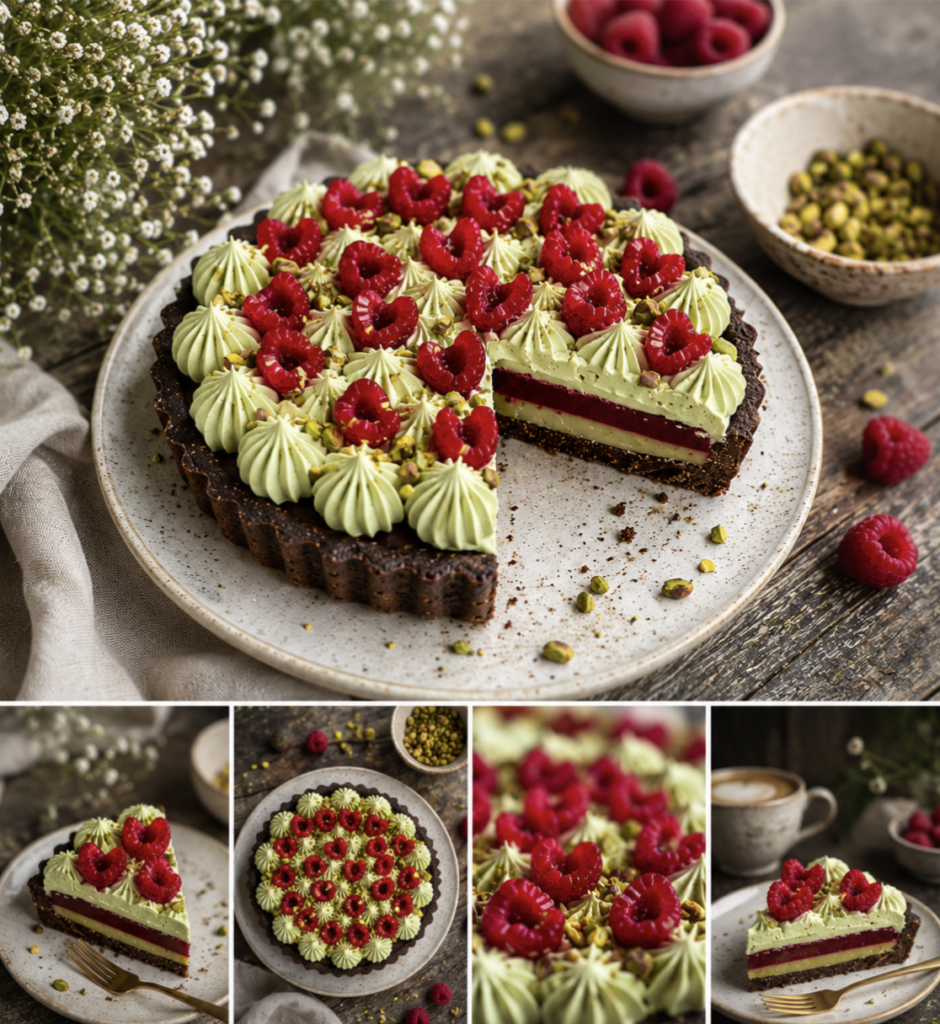
Premium Pistachio Raspberry Chocolate Tart Recipe
Pistachio Raspberry Https://my-dessertkitchen.com/nuts-and-seeds-cookies/ Chocolate Tart
This stunning Pistachio Raspberry Chocolate Tart tastes as heavenly as it looks. With its crunchy chocolate crust, a vibrant, tangy raspberry layer, and a rich, velvety pistachio cream topping, this dessert is perfect for special occasions, dinner parties, or festive celebrations.
📋 Recipe Profile
- Prep Time: 30 minutes
- Chill Time: 2 to 3 hours
- Total Time: ~3.5 hours
- Servings: 8 slices
🛒 Ingredients Required
Pistachio Raspberry Chocolate Tart
1. The Chocolate Crust (Base Layer)
- Chocolate Biscuits (e.g., Oreo): 200g
- Unsalted Butter (Melted): 4–5 tbsp
- Cocoa Powder: 1 tbsp (optional, for a deeper chocolate flavor)
2. The Raspberry Filling (Middle Layer)
- Fresh or Frozen Raspberries: 250g
- Sugar: 3–4 tbsp (adjust based on the tartness of the berries)
- Lemon Juice: 1 tsp
- Cornstarch: 1 tbsp (dissolved in 2 tbsp of cold water to thicken)
3. The Pistachio Cream (Top Piping Layer)
- Heavy Whipping Cream: 1 cup (cold)
- Pistachio Paste: 3 tbsp (To make at home: blanch pistachios, remove skins, and blend into a smooth paste)
- Icing Sugar: 2–3 tbsp
- Vanilla Extract: 1/2 tsp
4. For Garnish
- Fresh Raspberries: 15–20 pieces
- Finely Chopped Pistachios: 2 tbsp
👩🍳 Step-by-Step Instructions
Pistachio Raspberry Chocolate https://my-dessertkitchen.com/homemade-raspberry-truffles/ Tart
Step 1: Prepare the Chocolate Crust
- Place the chocolate biscuits into a food processor and pulse until they turn into fine crumbs.
- Pour the fine crumbs into a bowl, add the melted butter (and cocoa powder if using), and mix thoroughly until it resembles wet sand.
- Press the mixture firmly into the bottom and up the sides of a 9-inch loose-bottom tart pan. Use the flat bottom of a glass to ensure it is evenly packed.
- Place the tart pan in the refrigerator for 20–30 minutes to firm up.
Step 2: Make the Raspberry Layer
Pistachio Raspberry Chocolate Tart
- In a saucepan over medium heat, combine the raspberries, sugar, and lemon juice.
- As the raspberries break down and release their juices, gently mash them with a spoon.
- Stir in the cornstarch slurry. Bring the mixture to a gentle simmer, stirring constantly, until it thickens into a glossy, jam-like consistency.
- Remove from heat and let it cool completely. Once cooled, pour it over the chilled chocolate crust, spread it evenly, and pop it back into the fridge for another 30 minutes.
Step 3: Whip Up the Pistachio Cream
- In a chilled large bowl, pour the cold heavy whipping cream and icing sugar.
- Using an electric hand mixer, whip the cream until it reaches stiff peaks.
- Add the pistachio paste and vanilla extract to the whipped cream. Gently fold everything together using a spatula until completely smooth and a beautiful pastel green color is formed.
- Transfer the cream into a piping bag fitted with a star nozzle tip.
Step 4: Assemble and Garnish
- Take the tart out of the fridge (the raspberry layer should be set).
- Pipe small, neat decorative swirls of pistachio cream over the entire surface of the tart, covering the raspberry layer.
- Place a single fresh raspberry in the center of each piped cream swirl.
- Sprinkle the finely chopped pistachios across the top for an elegant, professional finish.
Chill the tart in the refrigerator for at least 1 hour before slicing. Serve cold!
💡 Chef Tips for Success
Pistachio Raspberry Chocolate Tart
- Vibrant Green Cream: To get that bright green color naturally, soak your pistachios in hot water for 10 minutes to easily peel off their dark skins before blending them into a paste.
- Storage: Store any leftovers in an airtight container in the fridge for up to 3–4 days.
ಪಿಸ್ತಾ ರಾಸ್ಪ್ಬೆರಿ ಚಾಕೊಲೇಟ್ ಟಾರ್ಟ್ ರೆಸಿಪಿ | Pistachio Raspberry Chocolate ತರ್ತೀನಿ
Pistachio Raspberry Chocolate Tart
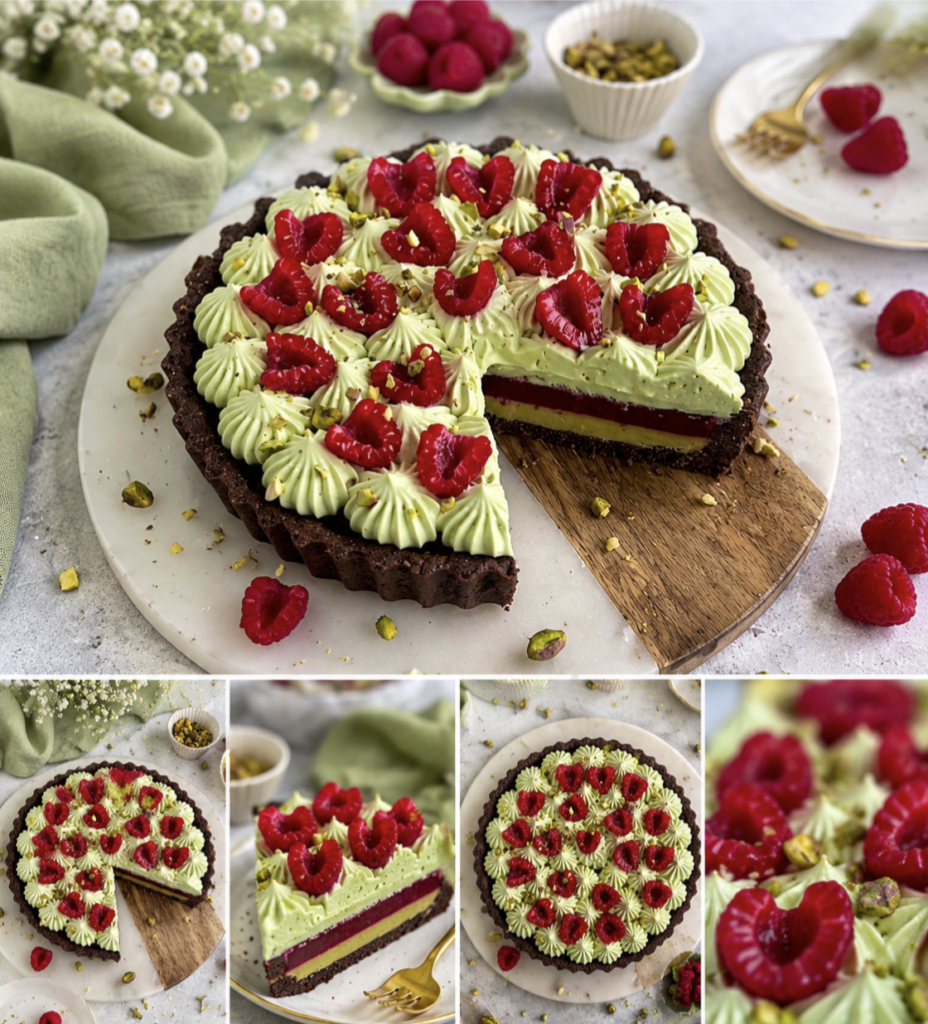
ಈ ಅದ್ಭುತವಾದ ಪಿಸ್ತಾ ಮತ್ತು ರಾಸ್ಪ್ಬೆರಿ ಚಾಕೊಲೇಟ್ ಟಾರ್ಟ್ (Pistachio Raspberry Chocolate Tart) ನೋಡಲು ಎಷ್ಟು ಆಕರ್ಷಕವಾಗಿದೆಯೋ, ತಿನ್ನಲು ಅಷ್ಟೇ ರುಚಿಕರವಾಗಿರುತ್ತದೆ. ಗರಿಗರಿಯಾದ ಚಾಕೊಲೇಟ್ ಕ್ರಸ್ಟ್, ಅದರ ಮೇಲೆ ತಿಳಿ ಹಸಿರು ಬಣ್ಣದ ಪಿಸ್ತಾ ಕ್ರೀಮ್ ಮತ್ತು ಮಧ್ಯದಲ್ಲಿ ಹುಳಿ-ಸಿಹಿಯಾದ ರಾಸ್ಪ್ಬೆರಿ ಜೆಲ್ಲಿಯ ಲೇಯರ್ ಯಾವುದೇ ಪಾರ್ಟಿ ಅಥವಾ ಹಬ್ಬದ ದಿನಗಳಿಗೆ ಪರಿಪೂರ್ಣ ಡೆಸರ್ಟ್ ಆಗಿದೆ.
ಈ ಲೇಖನದಲ್ಲಿ, ಬೇಯಿಸುವ ಅಗತ್ಯವಿಲ್ಲದ (No-Bake) ಅಥವಾ ಬೇಕ್ ಮಾಡಬಹುದಾದ ಈ ಪ್ರೀಮಿಯಂ ಟಾರ್ಟ್ ರೆಸಿಪಿಯನ್ನು ಹಂತ-ಹಂತವಾಗಿ ಸುಲಭವಾಗಿ ಹೇಗೆ ಮಾಡುವುದು ಎಂದು ತಿಳಿಸಿಕೊಡಲಾಗಿದೆ.
📋 ರೆಸಿಪಿ ಪ್ರೊಫೈಲ್ (Recipe Profile)
- ಸಿದ್ಧತಾ ಸಮಯ (Prep Time): 30 ನಿಮಿಷಗಳು
- ಅಡುಗೆ ಸಮಯ (Cook/Chill Time): 2 ರಿಂದ 3 ಗಂಟೆಗಳು
- ಒಟ್ಟು ಸಮಯ: 3.5 ಗಂಟೆಗಳು
- ಸರ್ವಿಂಗ್ಸ್: 8 ಜನರಿಗೆ
🛒 ಅಗತ್ಯವಿರುವ ಪದಾರ್ಥಗಳು (Ingredients Required)
Pistachio Raspberry Chocolate Tart
ಒಂದು ಪರಿಪೂರ್ಣವಾದ ಲೇಯರ್ಡ್ ಟಾರ್ಟ್ ಮಾಡಲು ಪದಾರ್ಥಗಳನ್ನು ಮೂರು ಭಾಗಗಳಾಗಿ ವಿಂಗಡಿಸಬಹುದು:
1. ಚಾಕೊಲೇಟ್ ಕ್ರಸ್ಟ್ (Base Layer):
- ಚಾಕೊಲೇಟ್ ಬಿಸ್ಕತ್ತುಗಳು (ಅಥವಾ ಓರಿಯೊ): 200 ಗ್ರಾಂ
- ಕರಗಿಸಿದ ಬೆಣ್ಣೆ (Unsalted Butter): 4-5 ಟೇಬಲ್ ಚಮಚ
- ಕೋಕೋ ಪೌಡರ್: 1 ಟೇಬಲ್ ಚಮಚ (ಹೆಚ್ಚಿನ ಚಾಕೊಲೇಟ್ ಫ್ಲೇವರ್ಗಾಗಿ)
2. ರಾಸ್ಪ್ಬೆರಿ ಫಿಲ್ಲಿಂಗ್/ಜೆಲ್ಲಿ (Middle Layer):
- ತಾಜಾ ಅಥವಾ ಹೆಪ್ಪುಗಟ್ಟಿದ ರಾಸ್ಪ್ಬೆರಿ: 250 ಗ್ರಾಂ
- ಸಕ್ಕರೆ: 3-4 ಟೇಬಲ್ ಚಮಚ
- ನಿಂಬೆ ರಸ: 1 ಟೀಚಮಚ
- ಕಾರ್ನ್ ಫ್ಲೋರ್ (ಅಥವಾ ಅಗರ್-ಅಗರ್): 1 ಟೇಬಲ್ ಚಮಚ (2 ಚಮಚ ನೀರಿನಲ್ಲಿ ಕರಗಿಸಿದ್ದು)
3. ಪಿಸ್ತಾ ಮೌಸ್ಸ್/ಕ್ರೀಮ್ (Top Piping Layer):
- ಹೆವಿ ವಿಪ್ಪಿಂಗ್ ಕ್ರೀಮ್ (Whipping Cream): 1 ಕಪ್
- ಪಿಸ್ತಾ ಪೇಸ್ಟ್ (Pistachio Paste): 3 ಟೇಬಲ್ ಚಮಚ (ಹುರಿದ ಪಿಸ್ತಾವನ್ನು ನುಣ್ಣಗೆ ರುಬ್ಬಿದ್ದು)
- ಐಸಿಂಗ್ ಸಕ್ಕರೆ: 2-3 ಟೇಬಲ್ ಚಮಚ
- ವැනිಲಾ ಎಸೆನ್ಸ್: 1/2 ಟೀಚಮಚ
4. ಅಲಂಕಾರಕ್ಕಾಗಿ (Garnishing):
- ತಾಜಾ ರಾಸ್ಪ್ಬೆರಿ ಹಣ್ಣುಗಳು
- ಸಣ್ಣದಾಗಿ ಕತ್ತರಿಸಿದ ಪಿಸ್ತಾ ಚೂರುಗಳು
👩🍳 ತಯಾರಿಸುವ ವಿಧಾನ (Step-by-Step Instructions)
Pistachio Raspberry Chocolate TartHttps://my-dessertkitchen.com/strawberry-shooters-recipe/
ಹಂತ 1: ಚಾಕೊಲೇಟ್ ಬೇಸ್ ತಯಾರಿಕೆ
- ಮೊದಲು ಬಿಸ್ಕತ್ತುಗಳನ್ನು ಮಿಕ್ಸಿ ಜಾರ್ಗೆ ಹಾಕಿ ನುಣ್ಣಗೆ ಪುಡಿ ಮಾಡಿಕೊಳ್ಳಿ.
- ಈ ಪುಡಿಗೆ ಕರಗಿಸಿದ ಬೆಣ್ಣೆ ಮತ್ತು ಕೋಕೋ ಪೌಡರ್ ಸೇರಿಸಿ ಚೆನ್ನಾಗಿ ಮಿಶ್ರಣ ಮಾಡಿ. ಮಿಶ್ರಣವು ಒದ್ದೆ ಮರಳಿನ ಹದಕ್ಕೆ ಬರಬೇಕು.
- ಈಗ ಈ ಮಿಶ್ರಣವನ್ನು ಒಂದು ಟಾರ್ಟ್ ಪ್ಯಾನ್ (Tart Pan with removable bottom) ಗೆ ಹಾಕಿ, ಕೈಯಿಂದ ಅಥವಾ ಲೋಟದ ತಳಭಾಗದಿಂದ ಒತ್ತಿ ಸಮನಾಗಿ ಹರಡಿ. ಅಂಚುಗಳಿಗೂ ಸರಿಯಾಗಿ ಒತ್ತುವುದನ್ನು ಮರೆಯಬೇಡಿ.
- ಈ ಪ್ಯಾನ್ ಅನ್ನು 20-30 ನಿಮಿಷಗಳ ಕಾಲ ರೆಫ್ರಿಜರೇಟರ್ನಲ್ಲಿ ಸೆಟ್ ಆಗಲು ಇಡಿ.
ಹಂತ 2: ರಾಸ್ಪ್ಬೆರಿ ಕಾಂಪೋಟ್/ಜೆಲ್ಲಿ ತಯಾರಿಕೆ
Pistachio https://en.wikipedia.org/wiki/BlueberryRaspberry Chocolate Tart
- ಒಂದು ಪಾತ್ರೆಯಲ್ಲಿ ರಾಸ್ಪ್ಬೆರಿ, ಸಕ್ಕರೆ ಮತ್ತು ನಿಂಬೆ ರಸವನ್ನು ಹಾಕಿ ಮಧ್ಯಮ ಉರಿಯಲ್ಲಿ ಕಾಯಿಸಿ.
- ಹಣ್ಣುಗಳು ಮೆತ್ತಗಾಗಿ ಜ್ಯೂಸ್ ಬಿಡಲಾರಂಭಿಸಿದಾಗ, ಕರಗಿಸಿದ ಕಾರ್ನ್ ಫ್ಲೋರ್ ಮಿಶ್ರಣವನ್ನು ಇದಕ್ಕೆ ಸೇರಿಸಿ.
- ಮಿಶ್ರಣವು ಗಟ್ಟಿಯಾಗುವವರೆಗೆ (ಜೆಲ್ಲಿ ಹದಕ್ಕೆ ಬರುವವರೆಗೆ) ಸತತವಾಗಿ ಕೈಯಾಡಿಸುತ್ತಾ ಬೇಯಿಸಿ.
- ನಂತರ ಉರಿ ಆರಿಸಿ, ಇದನ್ನು ಸಂಪೂರ್ಣವಾಗಿ ತಣ್ಣಗಾಗಲು ಬಿಡಿ. ತಣ್ಣಗಾದ ಮೇಲೆ, ಇದನ್ನು ಮೊದಲೇ ಸಿದ್ಧಪಡಿಸಿದ ಚಾಕೊಲೇಟ್ ಕ್ರಸ್ಟ್ ಮೇಲಿನ ಮೊದಲ ಲೇಯರ್ ಆಗಿ ಹರಡಿ, ಮತ್ತೆ 30 ನಿಮಿಷ ಫ್ರಿಡ್ಜ್ನಲ್ಲಿ ಇಡಿ.
ಹಂತ 3: ಪಿಸ್ತಾ ಕ್ರೀಮ್ (Pistachio Cream) ಸಿದ್ಧತೆ
- ಒಂದು ತಣ್ಣಗಿನ ಬೌಲ್ನಲ್ಲಿ ಹೆವಿ ವಿಪ್ಪಿಂಗ್ ಕ್ರೀಮ್ ಮತ್ತು ಐಸಿಂಗ್ ಸಕ್ಕರೆ ಸೇರಿಸಿ.
- ಎಲೆಕ್ಟ್ರಿಕ್ ಬೀಟರ್ ಬಳಸಿ ಕ್ರೀಮ್ ಗಟ್ಟಿಯಾಗುವವರೆಗೆ (Stiff Peaks ಬರುವವರೆಗೆ) ಚೆನ್ನಾಗಿ ವೀಪ್ ಮಾಡಿ.
- ಈಗ ಇದಕ್ಕೆ ಪಿಸ್ತಾ ಪೇಸ್ಟ್ ಮತ್ತು ವැනිಲಾ ಎಸೆನ್ಸ್ ಸೇರಿಸಿ, ಸ್ಪಾಟುಲಾದಿಂದ ಹಗುರವಾಗಿ ಮಿಕ್ಸ್ ಮಾಡಿ (Fold ಮಾಡಿ). ಇದರಿಂದ ಕ್ರೀಮ್ಗೆ ಸುಂದರವಾದ ತಿಳಿ ಹಸಿರು ಬಣ್ಣ ಬರುತ್ತದೆ.
- ಈ ಪಿಸ್ತಾ ಕ್ರೀಮ್ ಅನ್ನು ಸ್ಟಾರ್ ನಾಚ್ ಇರುವ ಪೈಪಿಂಗ್ ಬ್ಯಾಗ್ಗೆ ತುಂಬಿಸಿಕೊಳ್ಳಿ.
ಹಂತ 4: ಜೋಡಣೆ ಮತ್ತು ಅಲಂಕಾರ (Assembling)
- ಫ್ರಿಡ್ಜ್ನಿಂದ ಟಾರ್ಟ್ ಪ್ಯಾನ್ ಹೊರಗೆ ತೆಗೆಯಿರಿ. ರಾಸ್ಪ್ಬೆರಿ ಲೇಯರ್ ಈಗ ಗಟ್ಟಿಯಾಗಿರುತ್ತದೆ.
- ಚಿತ್ರದಲ್ಲಿ ತೋರಿಸಿರುವಂತೆ ಪೈಪಿಂಗ್ ಬ್ಯಾಗ್ ಬಳಸಿ ಸಣ್ಣ ಸಣ್ಣ ಹೂವುಗಳ ಆಕಾರದಲ್ಲಿ (Swirls) ಪಿಸ್ತಾ ಕ್ರೀಮ್ ಅನ್ನು ಟಾರ್ಟ್ನ ಮೇಲ್ಭಾಗದಲ್ಲಿ ಅಲಂಕರಿಸಿ.
- ಪ್ರತಿ ಕ್ರೀಮ್ನ ಮಧ್ಯದಲ್ಲಿ ಒಂದೊಂದು ತಾಜಾ ರಾಸ್ಪ್ಬೆರಿ ಹಣ್ಣನ್ನು ಇಡಿ.
- ಕೊನೆಯದಾಗಿ, ಕತ್ತರಿಸಿದ ಪಿಸ್ತಾ ಚೂರುಗಳನ್ನು ಮೇಲಿಂದ ಉದುರಿಸಿ.
ನಿಮ್ಮ ರಾಯಲ್ ಲುಕ್ನ ಪಿಸ್ತಾ ರಾಸ್ಪ್ಬೆರಿ ಚಾಕೊಲೇಟ್ ಟಾರ್ಟ್ ಸಿದ್ಧವಾಗಿದೆ! ಇದನ್ನು ಕತ್ತರಿಸುವ ಮುನ್ನ ಕನಿಷ್ಠ 1 ಗಂಟೆಗಳ ಕಾಲ ಫ್ರಿಡ್ಜ್ನಲ್ಲಿ ಇಟ್ಟು, ತಣ್ಣಗಿರುವಾಗಲೇ ಸರ್ವ್ ಮಾಡಿ.
💡 ಯಶಸ್ವಿ ರೆಸಿಪಿಗಾಗಿ ಕೆಲವು ಸಲಹೆಗಳು (Chef Tips)
- ಪಿಸ್ತಾ ಪೇಸ್ಟ್: ಮನೆಯಲ್ಲೇ ಪಿಸ್ತಾ ಪೇಸ್ಟ್ ಮಾಡುವಾಗ, ಪಿಸ್ತಾವನ್ನು 5 ನಿಮಿಷ ಬಿಸಿ ನೀರಿನಲ್ಲಿ ನೆನೆಸಿ, ಸಿಪ್ಪೆ ತೆಗೆದು, ಒಣಗಿಸಿ ನಂತರ ಮಿಕ್ಸಿಯಲ್ಲಿ ಸ್ವಲ್ಪವೇ ಹಾಲು ಅಥವಾ ಎಣ್ಣೆ ಸೇರಿಸಿ ನುಣ್ಣಗೆ ರುಬ್ಬಿಕೊಳ್ಳಿ. ಇದರಿಂದ ಉತ್ತಮ ಹಸಿರು ಬಣ್ಣ ಸಿಗುತ್ತದೆ.
- ಶೇಖರಣೆ: ಈ ಟಾರ್ಟ್ ಅನ್ನು ಏರ್ಟೈಟ್ ಕಂಟೇನರ್ನಲ್ಲಿ ಇಟ್ಟು ಫ್ರಿಡ್ಜ್ನಲ್ಲಿ 3-4 ದಿನಗಳ ಕಾಲ ತಾಜಾವಾಗಿಡಬಹುದು.
Pistachio Raspberry Chocolate https://en.wikipedia.org/wiki/Pistachio Tart
Pistachio Raspberry Chocolate Tart
ಹಿ ರೆಸಿಪಿ ಇಷ್ಟವಾದಲ್ಲಿ ನಿಮ್ಮ ಫ್ರೆಂಡ್ಸ್ ಅಂಡ್ ಫ್ಯಾಮಿಲಿಗೆ ಶೇರ್ ಮಾಡಿ ಸಪೋರ್ಟ್ ಮಾಡಿ ಈ ರೆಸಿಪಿನ ಟ್ರೈ ಮಾಡಿ. ಥ್ಯಾಂಕ್ಯು ❤️