
Lemon Layer Cake
“Learn how to make a moist and tangy bakery-style Lemon Layer Cake at home with this easy step-by-step recipe. Perfect for any special occasion!”
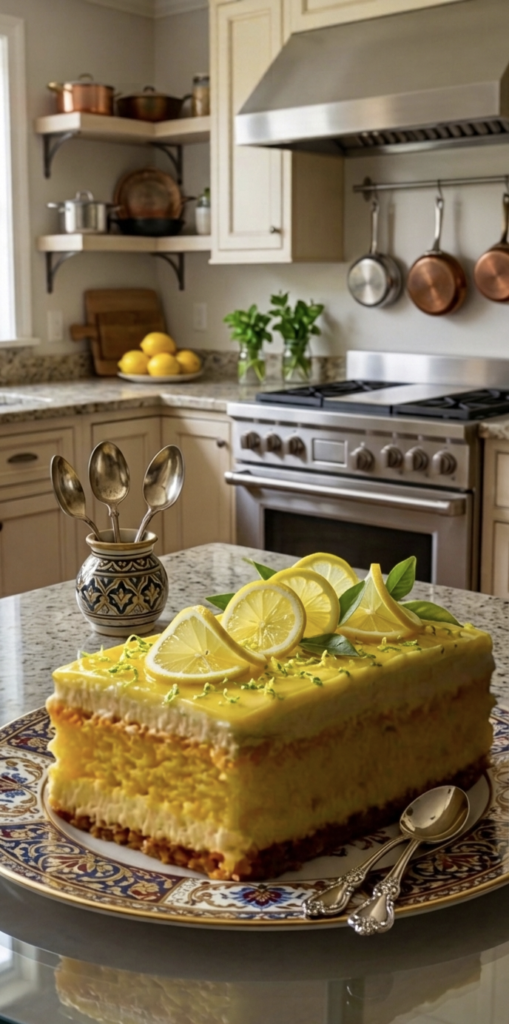
Lemon Layer Cake Recipe
This Lemon Layer Cake is as delightful to look at as it is to eat. It features a perfect balance of tangy lemon flavor and sweet, moist sponge cake. Perfect for birthdays, parties, or any special occasion.
Lemon Layer Cake Https://my-dessertkitchen.com/pistachio-lemon-cake/
Ingredients
The recipe is divided into three main components: the sponge cake, the tangy lemon curd filling, and the creamy frosting.
1. For the Sponge Cake:
- All-Purpose Flour (Maida): 2 cups
- Powdered Sugar: 1.5 cups
- Butter (at room temperature): 1 cup
- Eggs: 4 (For an eggless version, use 1 cup of thick yogurt/curd)
- Baking Powder: 1.5 teaspoons
- Baking Soda: 1/2 teaspoon
- Salt: A pinch
- Fresh Lemon Juice: 3 tablespoons
- Lemon Zest (finely grated): 1 tablespoon
- Milk: 1/2 cup
- Vanilla Essence: 1 teaspoon
2. For the Lemon Curd (Middle Layer):
- Fresh Lemon Juice: 1/2 cup
- Sugar: 3/4 cup
- Butter: 4 tablespoons
- Egg Yolks: 3 (For eggless, use 2 tablespoons of cornstarch dissolved in a little milk)
- Lemon Zest: 1 teaspoon
3. For the Frosting & Decoration:
- Whipping Cream (or Cream Cheese): 2 cups
- Powdered Sugar: 1/2 cup
- For Garnish: Thinly sliced lemon wheels and fresh mint/lemon leaves.
Step-by-Step Instructions
Lemon Layer Cake
Step 1: Preparing the Cake Batter
- In a large bowl, sift together the all-purpose flour, baking powder, baking soda, and salt 2-3 times to ensure a light texture. Set aside.
- In another mixing bowl, beat the softened butter and powdered sugar together until the mixture becomes pale, light, and fluffy.
- Add the eggs one at a time, beating well after each addition. (If making it eggless, whisk in the yogurt at this stage).
- Stir in the vanilla essence, fresh lemon juice, and lemon zest.
- Gradually add the sifted dry ingredients and milk alternately to the wet mixture. Use the ‘cut and fold’ method to combine gently. Do not overmix; ensure there are no lumps.
Step 2: Baking the Cake
- Take a rectangular cake tin (as seen in the picture), grease it with butter, and line it with parchment/butter paper.
- Preheat your oven to 180°C for 10 minutes.
- Pour the smooth batter into the prepared tin and level the top with a spatula.
- Bake at 180°C for 30 to 35 minutes. To check if it is done, insert a toothpick into the center. If it comes out clean, your cake is ready.
- Remove from the oven and let it cool completely on a wire rack.
Step 3: Making the Lemon Curd
- In a small saucepan, combine the lemon juice, sugar, lemon zest, and butter. Cook over low heat until the butter and sugar melt.
- Slowly whisk in the egg yolks (or cornstarch mixture), stirring continuously to prevent lumps or curdling.
- Cook until the mixture thickens enough to coat the back of a spoon. Remove from heat, strain through a sieve, and let it chill in the refrigerator.
Step 4: Whipping the Frosting
- In a chilled bowl, add the whipping cream and powdered sugar.
- Using an electric mixer, beat on high speed until stiff peaks form.
Assembling and Decorating the Cake
- Slice the completely cooled rectangular sponge cake horizontally into two or three equal layers.
- Place the first layer on your serving platter. Lightly brush it with a bit of sugar syrup to keep it moist.
- Spread a smooth layer of whipped cream over it, followed by a generous layer of the chilled lemon curd.
- Place the second cake layer on top and repeat the process.
- Coat the top and sides of the cake with the remaining cream. Pour the bright yellow lemon curd glaze over the top surface as shown in the picture, smoothing it out gently.
- Garnish: Recreate the look in the photo by arranging thin lemon slices down the center, accented with fresh green leaves. Sprinkle a little extra lemon zest on top for a pop of color.
Chill the cake in the refrigerator for at least 2 hours before slicing so the layers set beautifully. Enjoy your homemade, bakery-style Lemon Layer Cake!
Lemon Layer Https://my-dessertkitchen.com/3-layer-chocolate-mousse-cake-recipe/ Cake
This Lemon Layer Cake is truly a showstopper dessert that brings a burst of sunshine to any table. With its soft sponge, tangy curd, and velvety frosting, it is bound to become a favorite for your family and guests alike.
Give this recipe a try for your next celebration, and don’t forget to share your beautiful cake pictures with me in the comments below! Happy baking!”
ಬಾಯಲ್ಲಿ ನೀರೂರಿಸುವ ಲೆಮನ್ ಲೇಯರ್ ಕೇಕ್ ಮಾಡುವ ವಿಧಾನ
Lemon Layer Cake
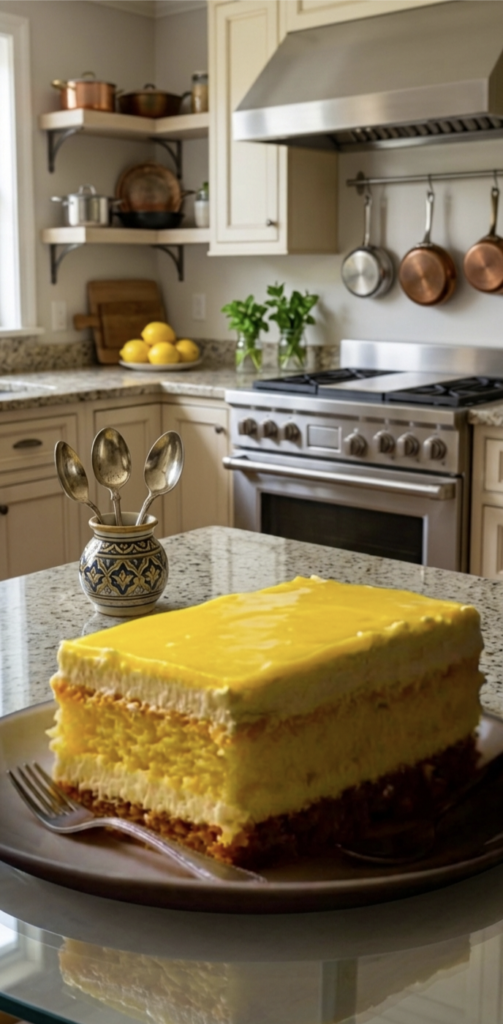
ನಿಂಬೆಹಣ್ಣಿನ ಲೇಯರ್ ಕೇಕ್ ರೆಸಿಪಿ (Lemon Layer Cake Recipe)
Lemon Layer Cake
ಈ ಕೇಕ್ ನೋಡಲು ಎಷ್ಟು ಸುಂದರವಾಗಿದೆಯೋ, ತಿನ್ನಲು ಅಷ್ಟೇ ಮೃದು ಮತ್ತು ರುಚಿಕರವಾಗಿರುತ್ತದೆ. ನಿಂಬೆಹಣ್ಣಿನ ಹುಳಿ ಮತ್ತು ಸಕ್ಕರೆಯ ಸಿಹಿ ಎರಡೂ ಸೇರಿ ಒಂದು ಅದ್ಭುತವಾದ ಫ್ಲೇವರ್ ನೀಡುತ್ತದೆ. ಪಾರ್ಟಿಗಳು ಅಥವಾ ಹಬ್ಬದ ದಿನಗಳಲ್ಲಿ ಮಾಡಲು ಇದು ಸೂಕ್ತವಾಗಿದೆ.
ಬೇಕಾಗುವ ಪದಾರ್ಥಗಳು (Ingredients)
ಕೇಕ್ ತಯಾರಿಕೆಯನ್ನು ಮೂರು ಪ್ರಮುಖ ಭಾಗಗಳಾಗಿ ವಿಂಗಡಿಸಬಹುದು: ಕೇಕ್ ಬೇಸ್, ಲೆಮನ್ ಕರ್ಡ್ (ತುಂಬಿಸಲು) ಮತ್ತು ಫ್ರಾಸ್ಟಿಂಗ್ (ಮೇಲಿನ ಅಲಂಕಾರಕ್ಕೆ).
1. ಸ್ಪಾಂಜ್ ಕೇಕ್ ಮಾಡಲು:
- ಮೈದಾ ಹಿಟ್ಟು (All-purpose flour): 2 ಕಪ್
- ಸಕ್ಕರೆ ಪುಡಿ (Powdered sugar): 1.5 ಕಪ್
- ಬೆಣ್ಣೆ (ಕೋಣೆಯ ತಾಪಮಾನದಲ್ಲಿರಲಿ): 1 ಕಪ್
- ಮೊಟ್ಟೆ: 4 (ಸಸ್ಯಾಹಾರಿಗಳಾಗಿದ್ದರೆ 1 ಕಪ್ ಗಟ್ಟಿ ಮೊಸರು ಬಳಸಿ)
- ಬೇಕಿಂಗ್ ಪೌಡರ್: 1.5 ಟೀಚಮಚ
- ಬೇಕಿಂಗ್ ಸೋಡಾ: 1/2 ಟೀಚಮಚ
- ಉಪ್ಪು: ಒಂದು ಚಿಟಿಕೆ
- ನಿಂಬೆ ರಸ (Fresh lemon juice): 3 ಟೇಬಲ್ ಚಮಚ
- ನಿಂಬೆ ಸಿಪ್ಪೆಯ ತುರಿ (Lemon zest): 1 ಟೇಬಲ್ ಚಮಚ
- ಹಾಲು: 1/2 ಕಪ್
- ವೆನಿಲ್ಲಾ ಎಸೆನ್ಸ್: 1 ಟೀಚಮಚ
2. ಲೆಮನ್ ಕರ್ಡ್ (Lemon Curd / ಮಧ್ಯದ ಲೇಯರ್):
- ನಿಂಬೆ ರಸ: 1/2 ಕಪ್
- ಸಕ್ಕರೆ: 3/4 ಕಪ್
- ಬೆಣ್ಣೆ: 4 ಟೇಬಲ್ ಚಮಚ
- ಮೊಟ್ಟೆಯ ಹಳದಿ ಲೋಳೆ (Egg yolks): 3 (ಅಥವಾ 2 ಟೇಬಲ್ ಚಮಚ ಕಾರ್ನ್ಫ್ಲೋರ್ ಹಾಲಿನಲ್ಲಿ ಕಲಸಿದ್ದು)
- ನಿಂಬೆ ಸಿಪ್ಪೆಯ ತುರಿ: 1 ಟೀಚಮಚ
3. ಕ್ರೀಮ್ ಫ್ರಾಸ್ಟಿಂಗ್ ಮತ್ತು ಅಲಂಕಾರಕ್ಕೆ:
- ವಿಪ್ಪಿಂಗ್ ಕ್ರೀಮ್ ಅಥವಾ ಕ್ರೀಮ್ ಚೀಸ್: 2 ಕಪ್
- ಸಕ್ಕರೆ ಪುಡಿ: 1/2 ಕಪ್
- ಅಲಂಕಾರಕ್ಕೆ: ತೆಳುವಾಗಿ ಹೆಚ್ಚಿದ ನಿಂಬೆಹಣ್ಣಿನ ಸ್ಲೈಸ್ಗಳು ಮತ್ತು ಪುದೀನಾ ಎಲೆಗಳು.
ಕೇಕ್ ಮಾಡುವ ಹಂತ-ಹಂತದ ವಿಧಾನ (Step-by-Step Instructions)
Lemon Layer Cake
ಹಂತ 1: ಕೇಕ್ ಬ್ಯಾಟರ್ ಸಿದ್ಧಪಡಿಸುವುದು
- ಮೊದಲು ಒಂದು ದೊಡ್ಡ ಪಾತ್ರೆಯಲ್ಲಿ ಮೈದಾ ಹಿಟ್ಟು, ಬೇಕಿಂಗ್ ಪೌಡರ್, ಬೇಕಿಂಗ್ ಸೋಡಾ ಮತ್ತು ಉಪ್ಪನ್ನು ಒಟ್ಟಿಗೆ ಸೇರಿಸಿ 2-3 ಬಾರಿ ಚೆನ್ನಾಗಿ ಜರಡಿ ಹಿಡಿದು ಪಕ್ಕಕ್ಕೆ ಇಟ್ಟುಕೊಳ್ಳಿ.
- ಇನ್ನೊಂದು ಪಾತ್ರೆಯಲ್ಲಿ ಮೃದುವಾದ ಬೆಣ್ಣೆ ಮತ್ತು ಸಕ್ಕರೆ ಪುಡಿಯನ್ನು ಹಾಕಿ ಬಿಳಿ ಮತ್ತು ಮೃದುವಾಗುವವರೆಗೆ (Fluffy) ಚೆನ್ನಾಗಿ ಬ್ಲೆಂಡ್ ಮಾಡಿ.
- ಈಗ ಇದಕ್ಕೆ ಒಂದೊಂದಾಗಿ ಮೊಟ್ಟೆಗಳನ್ನು ಸೇರಿಸುತ್ತಾ ಚೆನ್ನಾಗಿ ಮಿಕ್ಸ್ ಮಾಡಿ. (ಸಸ್ಯಾಹಾರಿಗಳಾದರೆ ಮೊಸರನ್ನು ಸೇರಿಸಿ ಬ್ಲೆಂಡ್ ಮಾಡಿ). ನಂತರ ವೆನಿಲ್ಲಾ ಎಸೆನ್ಸ್, ನಿಂಬೆ ರಸ ಮತ್ತು ನಿಂಬೆ ಸಿಪ್ಪೆಯ ತುರಿ (Zest) ಸೇರಿಸಿ ಮಿಶ್ರಣ ಮಾಡಿ.
- ಈಗ ಜರಡಿ ಹಿಡಿದ ಒಣ ಹಿಟ್ಟಿನ ಮಿಶ್ರಣವನ್ನು ಮತ್ತು ಹಾಲನ್ನು ಸ್ವಲ್ಪ ಸ್ವಲ್ಪವಾಗಿ ಈ ಬೆಣ್ಣೆಯ ಮಿಶ್ರಣಕ್ಕೆ ಸೇರಿಸುತ್ತಾ ‘ಕಟ್ ಅಂಡ್ ಫೋಲ್ಡ್’ (Cut and Fold) ವಿಧಾನದಲ್ಲಿ ನಿಧಾನವಾಗಿ ಕಲಸಿ. ಮಿಶ್ರಣದಲ್ಲಿ ಗಂಟುಗಳು ಇರಬಾರದು.
ಹಂತ 2: ಕೇಕ್ ಬೇಕ್ ಮಾಡುವುದು
- ಚಿತ್ರದಲ್ಲಿರುವಂತೆ ಆಯತಾಕಾರದ (Rectangular) ಕೇಕ್ ಟಿನ್ ತೆಗೆದುಕೊಳ್ಳಿ. ಅದಕ್ಕೆ ಸ್ವಲ್ಪ ಬೆಣ್ಣೆ ಸವರಿ, ಬಟರ್ ಪೇಪರ್ ಹಾಕಿ ಸಿದ್ಧಪಡಿಸಿ.
- ಓವನ್ ಅನ್ನು 180°C ಗೆ 10 ನಿಮಿಷಗಳ ಕಾಲ ಪ್ರಿ-ಹೀಟ್ ಮಾಡಿ.
- ಸಿದ್ಧಪಡಿಸಿದ ಬ್ಯಾಟರ್ ಅನ್ನು ಕೇಕ್ ಟಿನ್ಗೆ ಹಾಕಿ, ಸಮನಾಗಿ ಹರಡಿ.
- ಓವನ್ನಲ್ಲಿ 180°C ತಾಪಮಾನದಲ್ಲಿ 30 ರಿಂದ 35 ನಿಮಿಷಗಳ ಕಾಲ ಬೇಕ್ ಮಾಡಿ. ಕೇಕ್ ಬೆಂದಿದೆಯೇ ಎಂದು ಪರೀಕ್ಷಿಸಲು ಮಧ್ಯದಲ್ಲಿ ಒಂದು ಟೂತ್ಪಿಕ್ ಚುಚ್ಚಿ ನೋಡಿ, ಅದು ಸ್ವಚ್ಛವಾಗಿ ಬಂದರೆ ಕೇಕ್ ಬೆಂದಿದೆ ಎಂದರ್ಥ.
- ಕೇಕ್ ಅನ್ನು ಓವನ್ನಿಂದ ಹೊರತೆಗೆದು ಸಂಪೂರ್ಣವಾಗಿ ತಣ್ಣಗಾಗಲು ಬಿಡಿ.
ಹಂತ 3: ಲೆಮನ್ ಕರ್ಡ್ (Lemon Curd) ತಯಾರಿ
- ಒಂದು ಸಣ್ಣ ಪಾತ್ರೆಯಲ್ಲಿ ನಿಂಬೆ ರಸ, ಸಕ್ಕರೆ, ನಿಂಬೆ ಸಿಪ್ಪೆಯ ತುರಿ ಮತ್ತು ಬೆಣ್ಣೆಯನ್ನು ಹಾಕಿ ಕಡಿಮೆ ಉರಿಯಲ್ಲಿ ಬಿಸಿ ಮಾಡಿ.
- ಸಕ್ಕರೆ ಕರಗಿದ ನಂತರ, ಮೊಟ್ಟೆಯ ಹಳದಿ ಲೋಳೆಯನ್ನು (ಅಥವಾ ಕಾರ್ನ್ಫ್ಲೋರ್ ಮಿಶ್ರಣ) ನಿಧಾನವಾಗಿ ಕೈ ಬಿಡದಂತೆ ಕೈಯಾಡಿಸುತ್ತಾ ಸೇರಿಸಿ.
- ಮಿಶ್ರಣವು ಗಟ್ಟಿಯಾಗಿ, ಚಮಚದ ಹಿಂಭಾಗಕ್ಕೆ ಅಂಟಿಕೊಳ್ಳುವ ಹದಕ್ಕೆ ಬಂದಾಗ ಉರಿಯನ್ನು ಆಫ್ ಮಾಡಿ. ಇದನ್ನು ಸೋಸಿ, ತಣ್ಣಗಾಗಲು ಫ್ರಿಡ್ಜ್ನಲ್ಲಿ ಇಡಿ.
ಹಂತ 4: ಕ್ರೀಮ್ ಫ್ರಾಸ್ಟಿಂಗ್ ಸಿದ್ಧತೆ
- ಒಂದು ತಣ್ಣಗಿನ ಬೌಲ್ನಲ್ಲಿ ವಿಪ್ಪಿಂಗ್ ಕ್ರೀಮ್ ಮತ್ತು ಸಕ್ಕರೆ ಪುಡಿಯನ್ನು ಹಾಕಿ ಗಟ್ಟಿಯಾದ ಶಿಖರಗಳು (Stiff peaks) ಬರುವವರೆಗೆ ಎಲೆಕ್ಟ್ರಿಕ್ ಬೀಟರ್ ಬಳಸಿ ಚೆನ್ನಾಗಿ ಬೀಟ್ ಮಾಡಿ.
ಕೇಕ್ ಜೋಡಣೆ ಮತ್ತು ಅಲಂಕಾರ (Assembling the Cake)
ಚಿತ್ರದಲ್ಲಿರುವಂತೆ ಸುಂದರವಾದ ಲೇಯರ್ಗಳನ್ನು ಪಡೆಯಲು ಈ ಕೆಳಗಿನಂತೆ ಮಾಡಿ:
- ತಣ್ಣಗಾದ ಆಯತಾಕಾರದ ಸ್ಪಾಂಜ್ ಕೇಕ್ ಅನ್ನು ಅಡ್ಡಲಾಗಿ ಎರಡು ಅಥವಾ ಮೂರು ಸಮಾನ ಭಾಗಗಳಾಗಿ (Layers) ಕತ್ತರಿಸಿ.
- ಮೊದಲ ಲೇಯರ್ ಕೇಕ್ ಅನ್ನು ಒಂದು ಸರ್ವಿಂಗ್ ಪ್ಲೇಟ್ ಮೇಲಿಡಿ. ಅದರ ಮೇಲೆ ಸ್ವಲ್ಪ ಸಕ್ಕರೆ ನೀರನ್ನು (Sugar syrup) ಚಿಮುಕಿಸಿ.
- ಈಗ ಅದರ ಮೇಲೆ ಸಿದ್ಧಪಡಿಸಿದ ವಿಪ್ಪಿಂಗ್ ಕ್ರೀಮ್ ಅನ್ನು ಒಂದು ಲೇಯರ್ ಹರಡಿ. ಅದರ ಮೇಲೆಯೇ ನಾವು ಮಾಡಿದ ಲೆಮನ್ ಕರ್ಡ್ ಅನ್ನು ಸಮನಾಗಿ ಸವರಿ.
- ಇದರ ಮೇಲೆ ಕೇಕ್ನ ಎರಡನೇ ಲೇಯರ್ ಇಟ್ಟು, ಇದೇ ಪ್ರಕ್ರಿಯೆಯನ್ನು ಪುನರಾವರ್ತಿಸಿ.
- ಕೊನೆಯಲ್ಲಿ ಕೇಕ್ನ ಮೇಲ್ಭಾಗಕ್ಕೆ ಚಿತ್ರದಲ್ಲಿ ಕಾಣುವಂತೆ ದಪ್ಪದಾದ ಕ್ರೀಮ್ ಮತ್ತು ಲೆಮನ್ ಗ್ಲೇಜ್ (ಉಳಿದ ಲೆಮನ್ ಕರ್ಡ್) ಹಾಕಿ ನಯಗೊಳಿಸಿ.
- ಅಲಂಕಾರ: ಕೇಕ್ ಮೇಲ್ಭಾಗದಲ್ಲಿ ಚಿತ್ರದಲ್ಲಿರುವಂತೆ ನಿಂಬೆಹಣ್ಣಿನ ತೆಳು ಸ್ಲೈಸ್ಗಳನ್ನು ಅಚ್ಚುಕಟ್ಟಾಗಿ ಜೋಡಿಸಿ, ಮಧ್ಯದಲ್ಲಿ ಹಸಿರು ಪುದೀನಾ ಅಥವಾ ನಿಂಬೆ ಎಲೆಗಳನ್ನು ಇಟ್ಟು ಅಲಂಕರಿಸಿ. ಸುತ್ತಲೂ ಸ್ವಲ್ಪ ನಿಂಬೆ ಸಿಪ್ಪೆಯ ತುರಿಯನ್ನು ಉದುರಿಸಿ.
ನಿಮ್ಮ ಕಣ್ಣಿಗೆ ಹಬ್ಬ ನೀಡುವ, ಬಾಯಲ್ಲಿ ನೀರೂರಿಸುವ ಲೆಮನ್ ಲೇಯರ್ ಕೇಕ್ ಈಗ ಸಿದ್ಧವಾಗಿದೆ! ಇದನ್ನು ಕತ್ತರಿಸುವ ಮುನ್ನ ಕನಿಷ್ಠ 2 ಗಂಟೆಗಳ ಕಾಲ ಫ್ರಿಡ್ಜ್ನಲ್ಲಿ ಇಟ್ಟರೆ ಲೇಯರ್ಗಳು ಚೆನ್ನಾಗಿ ಸೆಟ್ ಆಗುತ್ತವೆ.
ಕೆಲವು ಪ್ರಮುಖ ಟಿಪ್ಸ್:
- ನಿಂಬೆ ಸಿಪ್ಪೆಯನ್ನು ತುರಿಯುವಾಗ ಕೇವಲ ಮೇಲಿನ ಹಳದಿ ಭಾಗವನ್ನು ಮಾತ್ರ ತುರಿಯಿರಿ. ಒಳಗಿನ ಬಿಳಿ ಭಾಗ ಬಿದ್ದರೆ ಕೇಕ್ ಕಹಿಯಾಗುತ್ತದೆ.
- ಕೇಕ್ ಸಂಪೂರ್ಣವಾಗಿ ತಣ್ಣಗಾದ ಮೇಲೆಯೇ ಕ್ರೀಮ್ ಹಚ್ಚಿ, ಇಲ್ಲದಿದ್ದರೆ ಕ್ರೀಮ್ ಕರಗಿ ಹೋಗುತ್ತದೆ.
Lemon https://en.wikipedia.org/wiki/Blueberry Layer Cake
ಈ ಲೆಮನ್ ಲೇಯರ್ ಕೇಕ್ ನಿಜಕ್ಕೂ ಒಂದು ಅದ್ಭುತವಾದ ಸಿಹಿ ತಿನಿಸಾಗಿದ್ದು, ನಿಮ್ಮ ಡೈನಿಂಗ್ ಟೇಬಲ್ಗೆ ಕಳೆ ತರುತ್ತದೆ. ಇದರ ಮೃದುವಾದ ಸ್ಪಾಂಜ್, ಲಘು ಹುಳಿಯಾದ ಕರ್ಡ್ ಮತ್ತು ವೆಲ್ವೆಟ್ನಂತಹ ಕ್ರೀಮ್ ಫ್ರಾಸ್ಟಿಂಗ್ ಖಂಡಿತವಾಗಿಯೂ ನಿಮ್ಮ ಕುಟುಂಬ ಹಾಗೂ ಅತಿಥಿಗಳ ನೆಚ್ಚಿನ ಆಯ್ಕೆಯಾಗಲಿದೆ.
ನಿಮ್ಮ ಮುಂದಿನ ಸಂಭ್ರಮಾಚರಣೆಗೆ ಈ ರೆಸಿಪಿಯನ್ನು ಖಂಡಿತ ಪ್ರಯತ್ನಿಸಿ, ಮತ್ತು ನೀವು ಮಾಡಿದ ಕೇಕ್ನ ಸುಂದರವಾದ ಫೋಟೋಗಳನ್ನು ಕೆಳಗಿನ ಕಮೆಂಟ್ ಸೆಕ್ಷನ್ನಲ್ಲಿ ನನ್ನೊಂದಿಗೆ ಹಂಚಿಕೊಳ್ಳಿ! ಹ್ಯಾಪಿ ಬೇಕಿಂಗ್