
Homemade Dry Fruit Chocolate Bites
- Learn how to make healthy, crunchy Homemade Premium Dry Fruit Chocolate Bites at home. Easy step-by-step recipe loaded with almonds, cashews, and pistachios
Homemade Dry Fruit Chocolate Bites ರೆಸಿಪಿ
Homemade Dry Fruit https://en.wikipedia.org/wiki/Blueberry Chocolate Bites
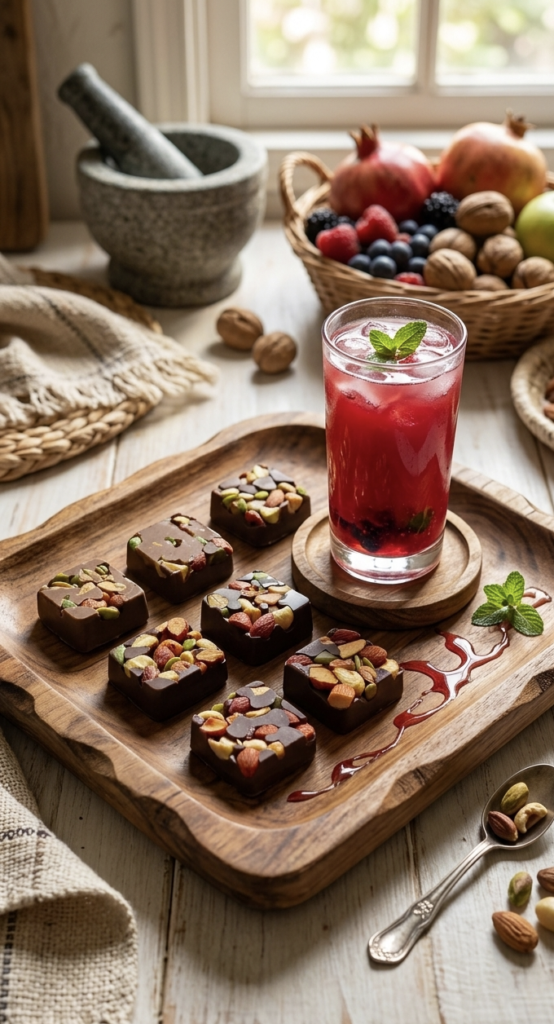
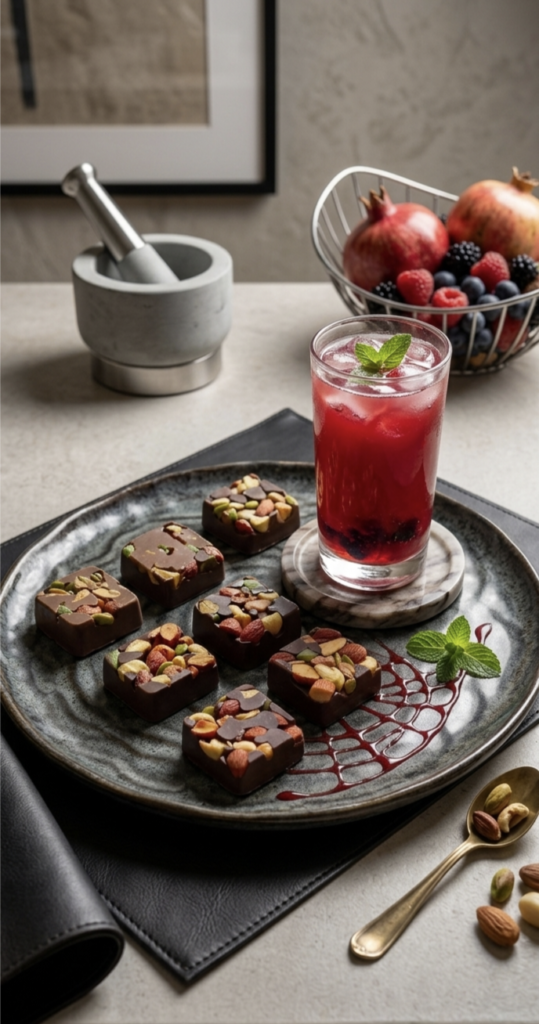
Here is a detailed, step-by-step recipe to make the delicious and visually stunning Dry Fruit Chocolate Bites as shown in the file 1000288439.jpg. These premium-looking chocolate squares are packed with the goodness of crunchy nuts and seeds, making them a perfect healthy treat or a thoughtful homemade gift for special occasions.
1. Ingredients Required
Homemade Dry Fruit Chocolate Bites
To achieve the exact rich and loaded look from image 1000288439.jpg, you will need the following high-quality ingredients:
- Chocolate Compound: 250 grams (You can use Dark Chocolate for a rich, less-sweet taste, or Milk Chocolate if you prefer it sweeter).
- Almonds (Badam): 50 grams (Finely chopped).
- Cashews (Kaju): 50 grams (Finely chopped).
- Pistachios (Pista): 30 grams (Blanched, peeled, and chopped).
- Pumpkin Seeds: 20 grams (These give the vibrant green, healthy look seen on top of the chocolate).
- Ghee or Butter: 1 tablespoon (For roasting the nuts).
- Equipment: A square-shaped silicon chocolate mould.
2. Step-by-Step Preparation Method
Step 1: Roasting the Nuts and Seeds
Roasting is essential to bring out the crunch and aroma of the dry fruits.
- Place a pan on low heat and add one tablespoon of ghee or butter.
- Once the ghee melts, add the chopped almonds and cashews. Roast them on a low flame until they turn a light golden-brown color.
- Next, add the chopped pistachios and pumpkin seeds to the pan. Roast for another 1 minute. Be careful not to burn them, as pumpkin seeds can pop quickly.
- Transfer the roasted nuts and seeds to a plate and let them cool down completely to room temperature.
Step 2: Melting the Chocolate (Double Boiling Method)
Homemade Dry Fruit Chocolate Bites
To get a glossy, smooth finish like the chocolates in 1000288439.jpg, never melt chocolate directly over a flame. Use the double-boiling method instead:
- Take a vessel and fill it halfway with water. Bring it to a steady simmer.
- Chop the chocolate compound into small, uniform pieces and place them in a heat-resistant glass or stainless steel bowl.
- Place this bowl on top of the simmering water vessel. Ensure that the bottom of the bowl does not touch the hot water directly; it should only heat up from the trapped steam.
- Stir continuously with a spatula. Within 3 to 5 minutes, the chocolate will melt completely into a smooth, glossy liquid. Remove the bowl from the heat.
3. Assembling and Setting the Bites
To get the signature artistic layout where the nuts are beautifully embedded and visible on top (as seen in image 1000288439.jpg), follow these steps:
- The Base Layer: Pour the melted chocolate liquid into each cavity of your square silicon mould until they are about half-full.
- Remove Air Bubbles: Gently tap the mould on your kitchen counter a few times. This ensures that the chocolate settles evenly and eliminates any trapped air bubbles.
- The Dry Fruit Topping: Now, generously pack the top layer of each chocolate square with your roasted mix of almonds, cashews, pistachios, and pumpkin seeds. Press them down very lightly so they stick to the wet chocolate.
- The Abstract Drizzle: To replicate the exact pattern in 1000288439.jpg, take a spoon and randomly drizzle tiny streaks of melted chocolate over the nuts. This creates a beautiful, rustic abstract camouflage effect on top.
- Refrigeration: Place the filled mould inside the refrigerator (not the freezer) for 15 to 20 minutes to set completely.
- Demoulding: Once the chocolate feels completely firm, gently push the bottom of the flexible silicon mould to pop out your perfect, glossy square chocolate bites.
4. Pro Tips for the Best Results
- Storage: Store these bites in an airtight container. They stay perfectly fresh at room temperature for up to 2 weeks, or inside the refrigerator for 2 to 3 months.
- Customization: If you like a hint of flavor, you can add a drop of vanilla extract or a tiny pinch of sea salt to the melted chocolate before pouring.
- Healthier Alternative: For a completely sugar-free version, you can substitute the regular chocolate compound with pure unsweetened cacao or stevia-sweetened dark chocolate.
ಕೇವಲ ೧೫ ನಿಮಿಷದಲ್ಲಿ ಮಾಡಿ ಪ್ರೀಮಿಯಂ ಲುಕ್ ನೀಡುವ ಡ್ರೈ ಫ್ರೂಟ್ ಚಾಕೊಲೇಟ್ ಬೈಟ್ಸ್!
“Homemade Dry Fruit Chocolate Https://my-dessertkitchen.com/3-layer-chocolate-mousse-cake-recipe/ Bites
ಒಣ ಹಣ್ಣುಗಳು (Dry Fruits) ಮತ್ತು ಚಾಕೊಲೇಟ್ ಬಳಸಿ ಮಾಡುವ ಅತ್ಯಂತ ರುಚಿಕರವಾದ ಹಾಗೂ ಪೌಷ್ಟಿಕಾಂಶಭರಿತ “ಡ್ರೈ ಫ್ರೂಟ್ ಚಾಕೊಲೇಟ್ ಬೈಟ್ಸ್” (Dry Fruit Chocolate Bites) ರೆಸಿಪಿ ಇಲ್ಲಿದೆ. ಇದನ್ನು ಮನೆಯಲ್ಲಿಯೇ ಸುಲಭವಾಗಿ ಮಾಡಬಹುದು. ಹಬ್ಬ ಹರಿದಿನಗಳಲ್ಲಿ ಅಥವಾ ಮಕ್ಕಳಿಗೆ ಸ್ನ್ಯಾಕ್ಸ್ ರೂಪದಲ್ಲಿ ನೀಡಲು ಇದು ಅತ್ಯುತ್ತಮ ಆಯ್ಕೆ.
೧. ಪೀಠಿಕೆ ಮತ್ತು ಮಹತ್ವ
Homemade Dry Fruit Chocolate Bites
ಚಾಕೊಲೇಟ್ ಎಂದರೆ ಕೇವಲ ಮಕ್ಕಳಷ್ಟೇ ಅಲ್ಲ, ಹಿರಿಯರಿಗೂ ಅಚ್ಚುಮೆಚ್ಚು. ಮಾರುಕಟ್ಟೆಯಲ್ಲಿ ಸಿಗುವ ಸಾಮಾನ್ಯ ಚಾಕೊಲೇಟ್ಗಳಲ್ಲಿ ಸಕ್ಕರೆ ಮತ್ತು ಪ್ರಿಸರ್ವೇಟಿವ್ಗಳ ಪ್ರಮಾಣ ಹೆಚ್ಚಿರುತ್ತದೆ. ಆದರೆ, ನಾವು ಮನೆಯಲ್ಲೇ ಡಾರ್ಕ್ ಚಾಕೊಲೇಟ್ ಅಥವಾ ಮಿಲ್ಕ್ ಚಾಕೊಲೇಟ್ ಬಳಸಿ, ಅದಕ್ಕೆ ಬಾದಾಮಿ, ಗೋಡಂಬಿ, ಪಿಸ್ತಾ ಮತ್ತು ಕುಂಬಳಕಾಯಿ ಬೀಜಗಳಂತಹ ಆರೋಗ್ಯಕರ ಒಣ ಹಣ್ಣುಗಳನ್ನು ಸೇರಿಸಿ ಮಾಡಿದಾಗ ಅದು ಆರೋಗ್ಯಕರ ತಿನಿಸಾಗಿ ಬದಲಾಗುತ್ತದೆ.
ಚಿತ್ರ 1000288439.jpg ನಲ್ಲಿರುವಂತೆ ಚೌಕಾಕಾರದ (Square-shaped) ಚಾಕೊಲೇಟ್ಗಳ ಮೇಲೆ ಡ್ರೈ ಫ್ರೂಟ್ಸ್ಗಳು ಕಣ್ಣಿಗೆ ಆಕರ್ಷಕವಾಗಿ ಕಾಣುವುದಲ್ಲದೆ, ಪ್ರತಿ ಬಾಯಿಗೂ ಉತ್ತಮ ಕ್ರಂಚಿ (Crunchy) ಫ್ಲೇವರ್ ನೀಡುತ್ತವೆ. ಬನ್ನಿ, ಇದನ್ನು ಮಾಡುವ ವಿಧಾನವನ್ನು ವಿವರವಾಗಿ ತಿಳಿಯೋಣ.
೨. ಬೇಕಾಗುವ ಪದಾರ್ಥಗಳು (Ingredients)
Homemade Dry Fruit Chocolate Bites
ಈ ರೆಸಿಪಿಯನ್ನು ಮಾಡಲು ಮುಖ್ಯವಾಗಿ ಬೇಕಾಗುವ ಸಾಮಗ್ರಿಗಳು ಮತ್ತು ಅವುಗಳ ಅಳತೆ ಹೀಗಿದೆ:
- ಡಾರ್ಕ್ ಚಾಕೊಲೇಟ್ ಕಾಂಪೌಂಡ್ ಅಥವಾ ಮಿಲ್ಕ್ ಚಾಕೊಲೇಟ್ ಕಾಂಪೌಂಡ್: ೨೫೦ ಗ್ರಾಂ (ನಿಮ್ಮ ಸಿಹಿಯ ಆದ್ಯತೆಗೆ ಅನುಗುಣವಾಗಿ ಆಯ್ಕೆ ಮಾಡಿ)
- ಬಾದಾಮಿ (Almonds): ೫೦ ಗ್ರಾಂ (ಸಣ್ಣದಾಗಿ ಕತ್ತರಿಸಿದ್ದು)
- ಗೋಡಂಬಿ (Cashews): ೫೦ ಗ್ರಾಂ (ಸಣ್ಣದಾಗಿ ಕತ್ತರಿಸಿದ್ದು)
- ಪಿಸ್ತಾ (Pistachios): ೩೦ ಗ್ರಾಂ (ಸಿಪ್ಪೆ ಸುಲಿದು ಕತ್ತರಿಸಿದ್ದು)
- ಕುಂಬಳಕಾಯಿ ಬೀಜಗಳು (Pumpkin Seeds): ೨೦ ಗ್ರಾಂ (ಚಿತ್ರದಲ್ಲಿ ಹಸಿರು ಬಣ್ಣದಲ್ಲಿ ಕಾಣುವಂತೆ ಆಕರ್ಷಕವಾಗಿರಲು)
- ತುಪ್ಪ ಅಥವಾ ಬೆಣ್ಣೆ: ೧ ಚಮಚ (ಡ್ರೈ ಫ್ರೂಟ್ಸ್ ಹುರಿಯಲು)
- ಸಿಲಿಕಾನ್ ಚಾಕೊಲೇಟ್ ಮೋಲ್ಡ್ (Silicon Mould): ಚೌಕಾಕಾರದ್ದು (Square Shape)
೩. ತಯಾರಿ ಹಂತಗಳು (Preparation Steps)
ಹಂತ ೧: ಒಣ ಹಣ್ಣುಗಳನ್ನು ಹುರಿಯುವುದು (Roasting Dry Fruits)
- ಮೊದಲಿಗೆ ಒಂದು ಬಾಣಲೆಯನ್ನು ಸಣ್ಣ ಉರಿಯಲ್ಲಿ ಬಿಸಿ ಮಾಡಿ. ಅದಕ್ಕೆ ಒಂದು ಚಮಚ ತುಪ್ಪ ಅಥವಾ ಬೆಣ್ಣೆಯನ್ನು ಹಾಕಿ.
- ತುಪ್ಪ ಕರಗಿದ ನಂತರ ಕತ್ತರಿಸಿದ ಬಾದಾಮಿ ಮತ್ತು ಗೋಡಂಬಿ ತುಂಡುಗಳನ್ನು ಹಾಕಿ ತಿಳಿ ಹಳದಿ ಬಣ್ಣ ಬರುವವರೆಗೆ ಹುರಿಯಿರಿ.
- ನಂತರ ಅದಕ್ಕೆ ಕತ್ತರಿಸಿದ ಪಿಸ್ತಾ ಮತ್ತು ಕುಂಬಳಕಾಯಿ ಬೀಜಗಳನ್ನು ಸೇರಿಸಿ ಇನ್ನೂ ೧ ನಿಮಿಷ ಹುರಿಯಿರಿ. (ಹೆಚ್ಚು ಸೀದುಹೋಗದಂತೆ ಎಚ್ಚರ ವಹಿಸಿ).
- ಹುರಿದ ಒಣ ಹಣ್ಣುಗಳನ್ನು ಒಂದು ತಟ್ಟೆಗೆ ಹಾಕಿ ಸಂಪೂರ್ಣವಾಗಿ ತಣ್ಣಗಾಗಲು ಬಿಡಿ. ಇದು ಚಾಕೊಲೇಟ್ಗೆ ಕ್ರಂಚಿ ರುಚಿಯನ್ನು ನೀಡುತ್ತದೆ.
ಹಂತ ೨: ಚಾಕೊಲೇಟ್ ಕರಗಿಸುವುದು (Melting the Chocolate)
Homemade Dry Fruit Chocolate Bites
ಚಾಕೊಲೇಟ್ ಅನ್ನು ನೇರವಾಗಿ ಉರಿಯ ಮೇಲೆ ಕರಗಿಸಬಾರದು, ಅದು ಸೀದುಹೋಗುತ್ತದೆ. ಅದಕ್ಕಾಗಿ ಡಬಲ್ ಬಾಯ್ಲಿಂಗ್ (Double Boiling) ವಿಧಾನವನ್ನು ಬಳಸಬೇಕು.
- ಒಂದು ಪಾತ್ರೆಯಲ್ಲಿ ಅರ್ಧದಷ್ಟು ನೀರನ್ನು ಹಾಕಿ ಚೆನ್ನಾಗಿ ಕುದಿಸಿ.
- ಚಾಕೊಲೇಟ್ ಕಾಂಪೌಂಡ್ ಅನ್ನು ಸಣ್ಣ ಸಣ್ಣ ತುಂಡುಗಳಾಗಿ ಕತ್ತರಿಸಿ, ಒಂದು ಗಾಜಿನ ಅಥವಾ ಸ್ಟೀಲ್ ಬೌಲ್ನಲ್ಲಿ ಹಾಕಿ.
- ಈಗ ಈ ಚಾಕೊಲೇಟ್ ಬೌಲ್ ಅನ್ನು ಕುದಿಯುತ್ತಿರುವ ನೀರಿನ ಪಾತ್ರೆಯ ಮೇಲೆ ಇಡಿ (ಕೆಳಗಿನ ನೀರು ಮೇಲಿನ ಬೌಲ್ಗೆ ತಾಗಬಾರದು, ಕೇವಲ ಹಬೆಯಿಂದ ಚಾಕೊಲೇಟ್ ಕರಗಬೇಕು).
- ಚಮಚದಿಂದ ನಿರಂತರವಾಗಿ ಕೈಯಾಡಿಸುತ್ತಿರಿ. ೩ ರಿಂದ ೫ ನಿಮಿಷಗಳಲ್ಲಿ ಚಾಕೊಲೇಟ್ ಸಂಪೂರ್ಣವಾಗಿ ಕರಗಿ, ನಯವಾದ (Smooth & Glossy) ದ್ರವ ರೂಪಕ್ಕೆ ಬರುತ್ತದೆ. ನಂತರ ಉರಿಯನ್ನು ಆಫ್ ಮಾಡಿ ಬೌಲ್ ಕೆಳಗಿಳಿಸಿ.
೪. ಚಾಕೊಲೇಟ್ ಬೈಟ್ಸ್ ಜೋಡಣೆ (Assembling & Setting)
Homemade Dry Fruit Chocolate Bites
ಚಿತ್ರ 1000288439.jpg ನಲ್ಲಿರುವಂತೆ ಸುಂದರವಾದ ವಿನ್ಯಾಸವನ್ನು ಪಡೆಯಲು ಈ ಕೆಳಗಿನ ಕ್ರಮವನ್ನು ಅನುಸರಿಸಿ:
- ಬೇಸ್ ಲೇಯರ್: ಮೊದಲು ಕರಗಿದ ಚಾಕೊಲೇಟ್ ದ್ರವವನ್ನು ಸಿಲಿಕಾನ್ ಮೋಲ್ಡ್ನ ಪ್ರತಿ ಚೌಕಾಕಾರದ ಕ್ಯೂಬ್ಗೆ ಅರ್ಧದಷ್ಟು ತುಂಬಿಸಿ. ಮೋಲ್ಡ್ ಅನ್ನು ನಿಧಾನವಾಗಿ ಟ್ಯಾಪ್ (Tap) ಮಾಡಿ, ಇದರಿಂದ ಒಳಗಿರುವ ಗಾಳಿಯ ಗುಳ್ಳೆಗಳು (Air Bubbles) ಹೊರಟುಹೋಗುತ್ತವೆ.
- ಡ್ರೈ ಫ್ರೂಟ್ಸ್ ಜೋಡಣೆ: ಈಗ ಹುರಿದು ಇಟ್ಟುಕೊಂಡಿರುವ ಬಾದಾಮಿ, ಗೋಡಂಬಿ, ಪಿಸ್ತಾ ಮತ್ತು ಕುಂಬಳಕಾಯಿ ಬೀಜಗಳ ಮಿಶ್ರಣವನ್ನು ಚಾಕೊಲೇಟ್ ಮೇಲ್ಭಾಗದಲ್ಲಿ ದಟ್ಟವಾಗಿ ತುಂಬಿಸಿ. ಚಿತ್ರದಲ್ಲಿ ಕಾಣುವಂತೆ ಒಣ ಹಣ್ಣುಗಳು ಮೇಲ್ಭಾಗದಲ್ಲಿ ಎದ್ದು ಕಾಣಬೇಕು.
- ಟಾಪ್ ಕೋಟಿಂಗ್ (ಐಚ್ಛಿಕ): ಒಣ ಹಣ್ಣುಗಳ ನಡುವೆ ಸಣ್ಣದಾಗಿ ಕರಗಿದ ಚಾಕೊಲೇಟ್ ಅನ್ನು ಲೈನ್ ತರಹ ಹಾಕಬಹುದು (ಚಿತ್ರದಲ್ಲಿರುವಂತೆ ಕೆಲವು ಕಡೆ ಚಾಕೊಲೇಟ್ ಒಣ ಹಣ್ಣುಗಳ ಮೇಲೆ ಹರಡಿಕೊಂಡಿರುತ್ತದೆ).
- ಫ್ರೀಜಿಂಗ್: ಈಗ ಈ ಮೋಲ್ಡ್ ಅನ್ನು ರೆಫ್ರಿಜರೇಟರ್ (Fridge) ನಲ್ಲಿ ೧೫ ರಿಂದ ೨೦ ನಿಮಿಷಗಳ ಕಾಲ ಇಡಿ. (ಫ್ರೀಜರ್ನಲ್ಲಿ ಇಡುವ ಅಗತ್ಯವಿಲ್ಲ).
- ಮೋಲ್ಡ್ನಿಂದ ತೆಗೆಯುವುದು: ಚಾಕೊಲೇಟ್ ಚೆನ್ನಾಗಿ ಗಟ್ಟಿಯಾದ ನಂತರ, ಸಿಲಿಕಾನ್ ಮೋಲ್ಡ್ ಅನ್ನು ಹಿಂದಿನಿಂದ ನಿಧಾನವಾಗಿ ಒತ್ತಿ ಚಾಕೊಲೇಟ್ ಕ್ಯೂಬ್ಗಳನ್ನು ಹೊರಗೆ ತೆಗೆಯಿರಿ.
ಈಗ ಅತ್ಯಂತ ಆಕರ್ಷಕ ಹಾಗೂ ರುಚಿಕರವಾದ ಹೋಮ್ ಮೇಡ್ ಡ್ರೈ ಫ್ರೂಟ್ ಚಾಕೊಲೇಟ್ ಬೈಟ್ಸ್ ಸಿದ್ಧವಾಗಿದೆ!
೫. ಉಪಯುಕ್ತ ಸಲಹೆಗಳು (Chef Tips)
Homemade Dry Fruit Chocolate Bites
- ಶೇಖರಣೆ: ಈ ಚಾಕೊಲೇಟ್ಗಳನ್ನು ಗಾಳಿಯಾಡದ ಡಬ್ಬದಲ್ಲಿ (Air-tight container) ಇಟ್ಟು ಫ್ರಿಡ್ಜ್ನಲ್ಲಿಟ್ಟರೆ ೨ ರಿಂದ ೩ ತಿಂಗಳು ಕೆಡದಂತೆ ಬಳಸಬಹುದು.
- ಫ್ಲೇವರ್ ಬದಲಾವಣೆ: ನಿಮಗೆ ಇಷ್ಟವಿದ್ದರೆ ಚಾಕೊಲೇಟ್ ಕರಗಿಸುವಾಗ ಒಂದು ಚಿಟಿಕೆ ಏಲಕ್ಕಿ ಪುಡಿ ಅಥವಾ ವೆನಿಲ್ಲಾ ಎಸೆನ್ಸ್ ಸೇರಿಸಬಹುದು.
- ಪರ್ಯಾಯ ಸಾಮಗ್ರಿ: ಕುಂಬಳಕಾಯಿ ಬೀಜಗಳ ಬದಲು ಸೂರ್ಯಕಾಂತಿ ಬೀಜಗಳು ಅಥವಾ ಒಣ ದ್ರಾಕ್ಷಿಯನ್ನೂ ಬಳಸಬಹುದು.
ಮನೆಯಲ್ಲೇ ಶುಚಿಯಾಗಿ, ಪ್ರೀತಿಯಿಂದ ಮಾಡುವ ಈ ಚಾಕೊಲೇಟ್ ಆರೋಗ್ಯಕ್ಕೂ ಒಳ್ಳೆಯದು, ತಿನ್ನಲೂ ಅದ್ಭುತವಾಗಿರುತ್ತದೆ.
Homemade Dry Fruit Chocolate https://en.wikipedia.org/wiki/BlueberryBites
Homemade Dry Fruit Chocolate Bites
ಈ ರೆಸಿಪಿ ಇಷ್ಟವಾದಲ್ಲಿ ನಿಮ್ಮ ಫ್ರೆಂಡ್ಸ್ ಅಂಡ್ ಫ್ಯಾಮಿಲಿ ಗೆ ಶೇರ್ ಮಾಡಿ ಅಂಡ್ ಸಪೋರ್ಟ್ ಮಾಡಿ ಟ್ರೈ ಮಾಡಿ ನೋಡಿ ಈ ರೆಸಿಪಿ ನಾ ಥ್ಯಾಂಕ್ ಯು ❤️