
Chocolate Strawberry Ganache Cake
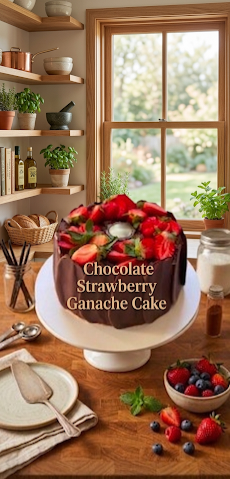
Chocolate Strawberry Ganache Cake
Ultimate Chocolate Strawberry Ganache Cake Recipe
This Chocolate Strawberry Ganache Cake is the perfect blend of rich, moist chocolate sponge, silky smooth ganache, and the refreshing tartness of fresh strawberries. It’s a showstopper dessert perfect for birthdays, anniversaries, or your food blog!
Ingredients
1. For the Chocolate Cake Base:
- All-purpose flour: 2 cups
- Sugar: 1.5 cups (granulated or powdered)
- Unsweetened Cocoa Powder: 3/4 cup
- Baking Powder: 1.5 tsp
- Baking Soda: 1.5 tsp
- Salt: a pinch
- Eggs: 2 large (For eggless: use 1 cup of thick yogurt)
- Whole Milk: 1 cup
- Vegetable Oil: 1/2 cup (any neutral-flavored oil)
- Vanilla Extract: 2 tsp
- Boiling Water: 1 cup (Crucial for blooming the cocoa and making the cake extra moist)
2. For the Chocolate Ganache:
- Dark Chocolate: 400g (finely chopped)
- Heavy Cream/Fresh Cream: 200ml
3. For Assembly & Decoration:
- Fresh Strawberries: 250g (washed and dried)
- Chocolate Shards/Wafers: Enough to surround the cake (as seen in the image)
Step-by-Step Instructions
Phase 1: Prepare the Chocolate Sponge
- Preheat & Prep: Preheat your oven to 180°C (350°F). Grease a 7 or 8-inch round cake tin and line the bottom with parchment paper.
- Dry Ingredients: In a large bowl, sift together flour, sugar, cocoa powder, baking powder, baking soda, and salt. Whisk to combine.
- Wet Ingredients: Add the eggs (or yogurt), milk, oil, and vanilla extract. Whisk until the batter is smooth and lump-free.
- The Secret Step: Slowly pour in the boiling water while whisking continuously. The batter will be thin, but this is exactly what makes the cake incredibly soft.
- Bake: Pour the batter into the tin and bake for 30-35 minutes. Check with a toothpick; if it comes out clean, it’s done. Let it cool completely on a wire rack.
Phase 2: Making the Silk Ganache
- Place the chopped chocolate in a heat-proof glass bowl.
- Heat the cream in a small saucepan over medium heat until it just begins to simmer (do not let it boil).
- Pour the hot cream over the chocolate. Let it sit for 5 minutes without stirring.
- Gently whisk from the center outwards until you have a glossy, smooth ganache. Let it cool until it reaches a spreadable consistency.
Phase 3: Assembling the Cake
- Leveling: Cut the cooled cake horizontally into two layers.
- Filling: Place the bottom layer on a cake stand. Spread a generous layer of ganache. Add a layer of thinly sliced strawberries on top of the ganache.
- Frosting: Place the second cake layer on top. Cover the entire cake (top and sides) with the remaining ganache using a spatula.
Phase 4: Decoration (The “Visual” Appeal)
- The Border: While the ganache is still slightly tacky, press the chocolate shards or wafers around the perimeter of the cake.
- The Topping: Arrange whole or halved fresh strawberries on the top in a circular pattern. You can add a dollop of whipped cream or a white chocolate drizzle in the center for contrast.
Pro-Tips for Success
- Dry the Berries: Ensure your strawberries are completely dry before placing them on the cake, otherwise, they might release juice and make the ganache runny.
- Ganache Texture: If your ganache is too runny, pop it in the fridge for 10-15 minutes. If it’s too hard, microwave it for 5 seconds to soften it.
- The “Soak”: For an even moister cake, lightly brush the cake layers with a simple sugar syrup (equal parts water and sugar) before applying the ganache.
Chocolate Strawberry Ganache Cake
ಅಲ್ಟಿಮೇಟ್ ಚಾಕೊಲೇಟ್ ಸ್ಟ್ರಾಬೆರಿ ಗಾನಾಚೆ ಕೇಕ್ ರೆಸಿಪಿ
ಚಾಕೊಲೇಟ್ ಮತ್ತು ಸ್ಟ್ರಾಬೆರಿಗಳ ಸಂಗಮವು ಎಂದಿಗೂ ಹಳೆಯದಾಗದ ಕ್ಲಾಸಿಕ್ ಕಾಂಬಿನೇಷನ್. ಗಾಢವಾದ ಚಾಕೊಲೇಟ್ನ ಕಹಿ ಮತ್ತು ತಾಜಾ ಸ್ಟ್ರಾಬೆರಿಗಳ ಸಿಹಿ-ಹುಳಿ ರುಚಿ ನಿಮ್ಮನ್ನು ಬೆರಗುಗೊಳಿಸುತ್ತದೆ.
ಬೇಕಾಗುವ ಪದಾರ್ಥಗಳು (Ingredients)
1. ಚಾಕೊಲೇಟ್ ಕೇಕ್ ಬೇಸ್ ಗಾಗಿ:
- ಮೈದಾ ಹಿಟ್ಟು: 2 ಕಪ್
- ಸಕ್ಕರೆ ಪುಡಿ: 1.5 ಕಪ್
- ಕೊಕೊ ಪೌಡರ್ (Unsweetened): 3/4 ಕಪ್
- ಬೇಕಿಂಗ್ ಪೌಡರ್: 1.5 ಟೀಚಮಚ
- ಬೇಕಿಂಗ್ ಸೋಡಾ: 1.5 ಟೀಚಮಚ
- ಉಪ್ಪು: ಒಂದು ಚಿಟಿಕೆ
- ಮೊಟ್ಟೆಗಳು: 2 (ಸಸ್ಯಾಹಾರಿಗಳಾಗಿದ್ದರೆ 1 ಕಪ್ ಮೊಸರು ಬಳಸಿ)
- ಹಾಲು: 1 ಕಪ್
- ಸಸ್ಯಜನ್ಯ ಎಣ್ಣೆ (ವಾಸನೆ ಇಲ್ಲದ): 1/2 ಕಪ್
- ವೆನಿಲ್ಲಾ ಎಸೆನ್ಸ್: 2 ಟೀಚಮಚ
- ಕುದಿಯುವ ನೀರು: 1 ಕಪ್ (ಇದು ಚಾಕೊಲೇಟ್ ರುಚಿಯನ್ನು ಹೆಚ್ಚಿಸುತ್ತದೆ)
2. ಚಾಕೊಲೇಟ್ ಗಾನಾಚೆಗಾಗಿ:
- ಡಾರ್ಕ್ ಚಾಕೊಲೇಟ್ (ಕತ್ತರಿಸಿದ್ದು): 400 ಗ್ರಾಂ
- ಫ್ರೆಶ್ ಕ್ರೀಮ್: 200 ಮಿಲಿ
3. ಅಲಂಕಾರಕ್ಕಾಗಿ:
- ತಾಜಾ ಸ್ಟ್ರಾಬೆರಿಗಳು: 250 ಗ್ರಾಂ
- ಚಾಕೊಲೇಟ್ ಶೇಡ್ಸ್ ಅಥವಾ ವೆಫರ್ಸ್ (ಕೇಕ್ ಸುತ್ತಲೂ ಜೋಡಿಸಲು)
ತಯಾರಿಸುವ ಹಂತಗಳು (Step-by-Step Instructions)
ಹಂತ 1: ಕೇಕ್ ಹಿಟ್ಟು ಸಿದ್ಧಪಡಿಸುವುದು
ಮೊದಲು ಓವನ್ ಅನ್ನು 180°C ಗೆ ಪ್ರಿ-ಹೀಟ್ ಮಾಡಿ. ಒಂದು ದೊಡ್ಡ ಪಾತ್ರೆಯಲ್ಲಿ ಮೈದಾ, ಸಕ್ಕರೆ, ಕೊಕೊ ಪೌಡರ್, ಬೇಕಿಂಗ್ ಪೌಡರ್ ಮತ್ತು ಬೇಕಿಂಗ್ ಸೋಡಾವನ್ನು ಜರಡಿ ಹಿಡಿದು ಚೆನ್ನಾಗಿ ಬೆರೆಸಿ. ಇನ್ನೊಂದು ಪಾತ್ರೆಯಲ್ಲಿ ಮೊಟ್ಟೆ (ಅಥವಾ ಮೊಸರು), ಹಾಲು, ಎಣ್ಣೆ ಮತ್ತು ವೆನಿಲ್ಲಾ ಎಸೆನ್ಸ್ ಸೇರಿಸಿ ಚೆನ್ನಾಗಿ ವಿಸ್ಕ್ ಮಾಡಿ. ಈಗ ಒಣ ಪದಾರ್ಥಗಳನ್ನು ದ್ರವ ಪದಾರ್ಥಗಳೊಂದಿಗೆ ನಿಧಾನವಾಗಿ ಬೆರೆಸಿ. ಕೊನೆಯಲ್ಲಿ ಕುದಿಯುವ ನೀರನ್ನು ಸೇರಿಸಿ ಮಿಶ್ರಣ ಮಾಡಿ. ಹಿಟ್ಟು ಸ್ವಲ್ಪ ತೆಳುವಾಗಿ ಕಾಣಿಸಬಹುದು, ಚಿಂತಿಸಬೇಡಿ.
ಹಂತ 2: ಕೇಕ್ ಬೇಯಿಸುವುದು
ಕೇಕ್ ಟಿನ್ ಗೆ ಬೆಣ್ಣೆ ಸವರಿ, ಸ್ವಲ್ಪ ಮೈದಾ ಉದುರಿಸಿ ಅಥವಾ ಬಟರ್ ಪೇಪರ್ ಹಾಕಿ. ಸಿದ್ಧಪಡಿಸಿದ ಮಿಶ್ರಣವನ್ನು ಟಿನ್ ಗೆ ಸುರಿಯಿರಿ. ಓವನ್ನಲ್ಲಿ 30 ರಿಂದ 35 ನಿಮಿಷಗಳ ಕಾಲ ಬೇಯಿಸಿ. ಕೇಕ್ ಬೆಂದಿದೆಯೇ ಎಂದು ಪರೀಕ್ಷಿಸಲು ಟೂತ್ಪಿಕ್ ಚುಚ್ಚಿ ನೋಡಿ, ಅದು ಸ್ವಚ್ಛವಾಗಿ ಹೊರಬರಬೇಕು. ಕೇಕ್ ಸಂಪೂರ್ಣವಾಗಿ ತಣ್ಣಗಾಗಲು ಬಿಡಿ.
ಹಂತ 3: ಚಾಕೊಲೇಟ್ ಗಾನಾಚೆ ತಯಾರಿಕೆ
ಒಂದು ಬೌಲ್ನಲ್ಲಿ ಕತ್ತರಿಸಿದ ಚಾಕೊಲೇಟ್ ತೆಗೆದುಕೊಳ್ಳಿ. ಫ್ರೆಶ್ ಕ್ರೀಮ್ ಅನ್ನು ಸಣ್ಣ ಉರಿಯಲ್ಲಿ ಬಿಸಿ ಮಾಡಿ (ಕುದಿಸಬೇಡಿ). ಬಿಸಿಯಾದ ಕ್ರೀಮ್ ಅನ್ನು ಚಾಕೊಲೇಟ್ ಮೇಲೆ ಸುರಿಯಿರಿ ಮತ್ತು 5 ನಿಮಿಷ ಹಾಗೆಯೇ ಬಿಡಿ. ನಂತರ ನಿಧಾನವಾಗಿ ಮಿಕ್ಸ್ ಮಾಡಿದರೆ ರೇಷ್ಮೆಯಂತಹ ಮೃದುವಾದ ಗಾನಾಚೆ ಸಿದ್ಧವಾಗುತ್ತದೆ. ಇದು ಸ್ವಲ್ಪ ಗಟ್ಟಿಯಾಗುವವರೆಗೆ ಕೋಣೆಯ ಉಷ್ಣಾಂಶದಲ್ಲಿ ಬಿಡಿ.
ಹಂತ 4: ಕೇಕ್ ಜೋಡಣೆ ಮತ್ತು ಫ್ರಾಸ್ಟಿಂಗ್
ತಣ್ಣಗಾದ ಕೇಕ್ ಅನ್ನು ಎರಡು ಪದರಗಳಾಗಿ ಕತ್ತರಿಸಿ. ಮೊದಲ ಪದರದ ಮೇಲೆ ಸ್ವಲ್ಪ ಶುಗರ್ ಸಿರಪ್ (ನೀರು ಮತ್ತು ಸಕ್ಕರೆಯ ಮಿಶ್ರಣ) ಚಿಮುಕಿಸಿ. ನಂತರ ಅದರ ಮೇಲೆ ಗಾನಾಚೆ ಪದರವನ್ನು ಹರಡಿ. ಅದರ ಮೇಲೆ ಕೆಲವು ಸಣ್ಣದಾಗಿ ಕತ್ತರಿಸಿದ ಸ್ಟ್ರಾಬೆರಿ ತುಂಡುಗಳನ್ನು ಇಡಿ. ಈಗ ಎರಡನೇ ಪದರವನ್ನು ಇಟ್ಟು, ಕೇಕ್ನ ಮೇಲ್ಭಾಗ ಮತ್ತು ಸುತ್ತಲೂ ಉಳಿದ ಗಾನಾಚೆಯನ್ನು ಸಮವಾಗಿ ಸವರಿ.
ಹಂತ 5: ಅಲಂಕಾರ (Final Touches)
ಚಿತ್ರದಲ್ಲಿರುವಂತೆ ಕೇಕ್ನ ಸುತ್ತಲೂ ಚಾಕೊಲೇಟ್ ಬಾರ್ಗಳನ್ನು ಅಥವಾ ಶೇಡ್ಸ್ಗಳನ್ನು ಒಂದೊಂದಾಗಿ ಅಂಟಿಸಿ. ಕೇಕ್ನ ಮೇಲ್ಭಾಗದಲ್ಲಿ ತಾಜಾ ಸ್ಟ್ರಾಬೆರಿಗಳನ್ನು ಕಲಾತ್ಮಕವಾಗಿ ಜೋಡಿಸಿ. ಸ್ಟ್ರಾಬೆರಿಗಳ ಮಧ್ಯೆ ಬೇಕಿದ್ದರೆ ಸ್ವಲ್ಪ ವೈಟ್ ಚಾಕೊಲೇಟ್ ಡ್ರಿಜಲ್ ಮಾಡಬಹುದು.
ಉಪಯುಕ್ತ ಸಲಹೆಗಳು (Pro-Tips)
- ತಾಜಾ ಸ್ಟ್ರಾಬೆರಿ: ಸ್ಟ್ರಾಬೆರಿಗಳನ್ನು ತೊಳೆಯುವಾಗ ಅದರ ತೊಟ್ಟನ್ನು ತೆಗೆಯಬೇಡಿ, ಅಲಂಕಾರಕ್ಕೆ ಬಳಸುವ ಮುನ್ನ ತೆಗೆದರೆ ಅವು ತಾಜಾವಾಗಿರುತ್ತವೆ.
- ಗಾನಾಚೆ ಸಾಂದ್ರತೆ: ಗಾನಾಚೆ ತುಂಬಾ ತೆಳುವಾಗಿದ್ದರೆ ಸ್ವಲ್ಪ ಹೊತ್ತು ಫ್ರಿಡ್ಜ್ನಲ್ಲಿಡಿ, ಅದು ಹರಡಲು ಸುಲಭವಾಗುವಷ್ಟು ಗಟ್ಟಿಯಾಗುತ್ತದೆ.
- ಅಕ್ವೇರಿಯಂ ಸಕ್ಕರೆ: ಕೇಕ್ ಹೆಚ್ಚು ಸಾಫ್ಟ್ ಆಗಿರಬೇಕೆಂದರೆ ಮೈದಾ ಹಿಟ್ಟಿನ ಬದಲಿಗೆ ಕೇಕ್ ಫ್ಲೋರ್ ಬಳಸಬಹುದು.
- ಸಮಯದ ನಿರ್ವಹಣೆ: ಕೇಕ್ ಅನ್ನು ಸರ್ವ್ ಮಾಡುವ ಕನಿಷ್ಠ 2 ಗಂಟೆಗಳ ಮೊದಲು ಫ್ರಿಡ್ಜ್ನಲ್ಲಿಟ್ಟರೆ ಸೆಟ್ ಆಗಲು ಸುಲಭವಾಗುತ್ತದೆ.
ಈ ಕೇಕ್ನ ವಿಶೇಷತೆ ಏನು?
ಈ ಕೇಕ್ ಕೇವಲ ಸಿಹಿಯಲ್ಲ, ಇದು ಒಂದು ಅನುಭವ. ಚಾಕೊಲೇಟ್ನ ಸಾಂದ್ರತೆ ಮತ್ತು ಸ್ಟ್ರಾಬೆರಿಯ ತಾಜಾತನವು ಪ್ರತಿ ತುತ್ತಿನಲ್ಲೂ ಹೊಸ ರುಚಿಯನ್ನು ನೀಡುತ್ತದೆ. ನಿಮ್ಮ ಬ್ಲಾಗ್ ಓದುಗರಿಗೆ ಇದು ಖಂಡಿತವಾಗಿಯೂ ಇಷ್ಟವಾಗುತ್ತದೆ!
ಇದನ್ನು ಮನೆಯಲ್ಲಿ ಪ್ರಯತ್ನಿಸಿ ಮತ್ತು ನಿಮ್ಮ ಅನಿಸಿಕೆಗಳನ್ನು ಹಂಚಿಕೊಳ್ಳಿ.