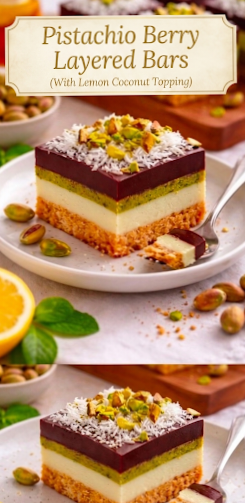
ಪಿಸ್ತಾ ಮತ್ತು ಬೆರ್ರಿಲೇಯರ್ಡ್ ಡಿಲೈಟ್: ಹಂತ-ಹಂತವಾಗಿ ತಯಾರಿಸುವ ವಿಧಾನ
Pistachio Berry Layered Bars
ಸಿಹಿ ತಿಂಡಿಗಳೆಂದರೆ ಯಾರಿಗೆ ಇಷ್ಟವಿಲ್ಲ? ಅದರಲ್ಲೂ ನೋಡಲು ಮಿನಿಯೇಚರ್ ಕಲೆಯಂತೆ ಕಾಣುವ, ಬಣ್ಣಬಣ್ಣದ ಪದರಗಳನ್ನು ಹೊಂದಿರುವ ಸಿಹಿ ತಿನಿಸುಗಳು ಹಬ್ಬದ ಸಂಭ್ರಮವನ್ನು ಅಥವಾ ವಿಶೇಷ ದಿನಗಳನ್ನು ಇನ್ನಷ್ಟು ಅದ್ದೂರಿಯಾಗಿಸುತ್ತವೆ. ಇಂದು ನಾವು ಕೇವಲ ರುಚಿಯಷ್ಟೇ ಅಲ್ಲ, ನೋಡಲು ಅತ್ಯಂತ ವೃತ್ತಿಪರ (Professional) ಮತ್ತು ಆಕರ್ಷಕವಾಗಿ ಕಾಣುವ ‘ಪಿಸ್ತಾ ಮತ್ತು ಬೆರ್ರಿ ಲೇಯರ್ಡ್ ಬಾರ್ಸ್’ ತಯಾರಿಸುವುದು ಹೇಗೆ ಎಂದು ತಿಳಿಯೋಣ.
ಈ ಸಿಹಿಯು ಪ್ರಮುಖವಾಗಿ ನಾಲ್ಕು ಪದರಗಳನ್ನು ಹೊಂದಿದೆ. ಒಂದೊಂದು ಪದರವು ತನ್ನದೇ ಆದ ವಿಭಿನ್ನ ರುಚಿ ಮತ್ತು ವಿನ್ಯಾಸವನ್ನು ನೀಡುತ್ತದೆ. ಇದು ಯಾವುದೇ ಓವನ್ (Bake-free) ಅಗತ್ಯವಿಲ್ಲದೆ ತಯಾರಿಸಬಹುದಾದ ರೆಸಿಪಿ ಎಂಬುದು ಇದರ ಮತ್ತೊಂದು ವಿಶೇಷ.
ಪದಾರ್ಥಗಳ ಪಟ್ಟಿ (Ingredients)
ಯಾವುದೇ ಅಡುಗೆಯಲ್ಲಿ ಅಳತೆ ಬಹಳ ಮುಖ್ಯ. ಈ ರೆಸಿಪಿಗಾಗಿ ಈ ಕೆಳಗಿನ ಪದಾರ್ಥಗಳನ್ನು ಸಿದ್ಧಪಡಿಸಿಕೊಳ್ಳಿ:
1. ಕ್ರಸ್ಟ್ ಅಥವಾ ಬೇಸ್ ಪದರಕ್ಕಾಗಿ:
- ಡೈಜೆಸ್ಟಿವ್ ಬಿಸ್ಕತ್ತುಗಳು: 200 ಗ್ರಾಂ (ಪುಡಿ ಮಾಡಿದ್ದು)
- ಕರಗಿಸಿದ ಬೆಣ್ಣೆ (Unsalted Butter): 4-5 ದೊಡ್ಡ ಚಮಚ
- ಒಣ ಕೊಬ್ಬರಿ ತುರಿ (Desiccated Coconut): 2 ಚಮಚ (ರುಚಿಗಾಗಿ)
2. ಎರಡನೇ ಪದರ (ವೈಟ್ ಕ್ರೀಮ್ ಲೇಯರ್):
- ಕ್ರೀಮ್ ಚೀಸ್ ಅಥವಾ ಗಟ್ಟಿ ಪನೀರ್: 250 ಗ್ರಾಂ
- ಕಂಡೆನ್ಸ್ಡ್ ಮಿಲ್ಕ್ (Condenced Milk): 1/2 ಕಪ್
- ವೆನಿಲ್ಲಾ ಎಸೆನ್ಸ್: 1 ಚಮಚ
- ತಾಜಾ ಕ್ರೀಮ್ (Fresh Cream): 2 ಚಮಚ
3. ಮೂರನೇ ಪದರ (ಪಿಸ್ತಾ ಗ್ರೀನ್ ಲೇಯರ್):
- ಪಿಸ್ತಾ ಕಾಳುಗಳು: 100 ಗ್ರಾಂ (ಸಿಪ್ಪೆ ತೆಗೆದು ಪುಡಿ ಮಾಡಿದ್ದು)
- ಸಕ್ಕರೆ ಪುಡಿ: 2 ಚಮಚ
- ಹಸಿರು ಆಹಾರದ ಬಣ್ಣ: ಒಂದು ಚಿಟಿಕೆ (ಇಚ್ಛೆಯಿದ್ದರೆ ಮಾತ್ರ)
- ಹಾಲು: 1-2 ಚಮಚ (ಪೇಸ್ಟ್ ಮಾಡಲು)
4. ನಾಲ್ಕನೇ ಪದರ (ಬೆರ್ರಿ ಜೆಲ್ಲಿ ಲೇಯರ್):
- ಮಿಶ್ರ ಬೆರ್ರಿ ರಸ (Raspberry/Strawberry): 1.5 ಕಪ್
- ಅಗರ್-ಅಗರ್ ಅಥವಾ ಜಿಲೆಟಿನ್: 1.5 ಚಮಚ
- ಸಕ್ಕರೆ: 1/4 ಕಪ್ (ಹಣ್ಣಿನ ಸಿಹಿಗೆ ಅನುಗುಣವಾಗಿ)
5. ಅಲಂಕಾರಕ್ಕಾಗಿ:
- ಹೆಚ್ಚಿದ ಪಿಸ್ತಾ ಚೂರುಗಳು
- ಒಣ ಕೊಬ್ಬರಿ ತುರಿ
ತಯಾರಿಸುವ ಹಂತ-ಹಂತದ ವಿಧಾನ (Step-by-Step Instructions)
ಹಂತ 1: ತಳದ ಪದರವನ್ನು ಸಿದ್ಧಪಡಿಸುವುದು (The Base Layer)
ಮೊದಲು ಒಂದು ಮಿಕ್ಸರ್ ಜಾರ್ನಲ್ಲಿ ಬಿಸ್ಕತ್ತುಗಳನ್ನು ಹಾಕಿ ನುಣ್ಣಗೆ ಪುಡಿ ಮಾಡಿಕೊಳ್ಳಿ. ಈ ಪುಡಿಯನ್ನು ಒಂದು ಬಟ್ಟಲಿಗೆ ಹಾಕಿ, ಅದಕ್ಕೆ ಕರಗಿಸಿದ ಬೆಣ್ಣೆ ಮತ್ತು ಕೊಬ್ಬರಿ ತುರಿಯನ್ನು ಸೇರಿಸಿ ಚೆನ್ನಾಗಿ ಬೆರೆಸಿ. ಇದು ಒದ್ದೆ ಮರಳಿನ ಹದಕ್ಕೆ ಇರಬೇಕು.
ಈಗ ಒಂದು ಚೌಕಾಕಾರದ ಗಾಜಿನ ಟ್ರೇ ಅಥವಾ ಬೇಕಿಂಗ್ ಟ್ರೇಗೆ ಈ ಮಿಶ್ರಣವನ್ನು ಹಾಕಿ, ಚಮಚ ಅಥವಾ ಲೋಟದ ತಳಭಾಗದಿಂದ ಗಟ್ಟಿಯಾಗಿ ಒತ್ತಿ ಹರಡಿ. ಇದನ್ನು ಸೆಟ್ ಆಗಲು ಕನಿಷ್ಠ 20 ನಿಮಿಷಗಳ ಕಾಲ ಫ್ರಿಡ್ಜ್ನಲ್ಲಿಡಿ.
ಹಂತ 2: ಎರಡನೇ ಶ್ವೇತ ವರ್ಣದ ಪದರ (The Creamy White Layer)
ಒಂದು ಬಟ್ಟಲಿನಲ್ಲಿ ಕ್ರೀಮ್ ಚೀಸ್ (ಅಥವಾ ಮಿಕ್ಸಿಯಲ್ಲಿ ನುಣ್ಣಗೆ ರುಬ್ಬಿದ ಪನೀರ್) ತೆಗೆದುಕೊಳ್ಳಿ. ಅದಕ್ಕೆ ಕಂಡೆನ್ಸ್ಡ್ ಮಿಲ್ಕ್ ಮತ್ತು ವೆನಿಲ್ಲಾ ಎಸೆನ್ಸ್ ಸೇರಿಸಿ ಹ್ಯಾಂಡ್ ಬ್ಲೆಂಡರ್ನಿಂದ ಚೆನ್ನಾಗಿ ಫ್ಲಫಿ ಆಗುವವರೆಗೆ ಬೀಟ್ ಮಾಡಿ.
ಈ ಮಿಶ್ರಣವನ್ನು ಫ್ರಿಡ್ಜ್ನಲ್ಲಿಟ್ಟಿದ್ದ ಬಿಸ್ಕತ್ತು ಪದರದ ಮೇಲೆ ಸಮನಾಗಿ ಹರಡಿ. ಇದರ ಮೇಲ್ಮೈ ಸುಗಮವಾಗಿರಲಿ (Smooth surface). ಇದನ್ನು ಮತ್ತೆ 15 ನಿಮಿಷ ಫ್ರೀಜರ್ನಲ್ಲಿ ಇರಿಸಿ.
ಹಂತ 3: ಮೂರನೇ ಹಸಿರು ಪಿಸ್ತಾ ಪದರ (The Pistachio Layer)
ಪಿಸ್ತಾವನ್ನು ನುಣ್ಣಗೆ ಪುಡಿ ಮಾಡಿ, ಅದಕ್ಕೆ ಸಕ್ಕರೆ ಪುಡಿ ಮತ್ತು ಸ್ವಲ್ಪ ಹಾಲು ಸೇರಿಸಿ ಹದವಾದ ಪೇಸ್ಟ್ ತಯಾರಿಸಿಕೊಳ್ಳಿ. ಇದನ್ನು ಕ್ರೀಮ್ ಪದರದ ಮೇಲೆ ಅತೀ ಜಾಗರೂಕತೆಯಿಂದ ಹರಡಿ. ಪಿಸ್ತಾ ಪದರವು ಸ್ವಲ್ಪ ಗಟ್ಟಿಯಾಗಿರುವುದರಿಂದ ಇದನ್ನು ಹರಡುವಾಗ ಕೆಳಗಿನ ಪದರ ಹಾಳಾಗದಂತೆ ಎಚ್ಚರಿಕೆ ವಹಿಸಿ. ಇದನ್ನು ಮತ್ತೆ ಫ್ರಿಡ್ಜ್ನಲ್ಲಿರಿಸಿ.
ಹಂತ 4: ನಾಲ್ಕನೇ ಕೆಂಪು ಬೆರ್ರಿ ಪದರ (The Berry Topping)
ಒಂದು ಪಾತ್ರೆಯಲ್ಲಿ ಬೆರ್ರಿ ಹಣ್ಣಿನ ರಸ ಅಥವಾ ಹಿಸುಕಿದ ಬೆರ್ರಿ ಹಣ್ಣುಗಳನ್ನು ಸಕ್ಕರೆಯೊಂದಿಗೆ ಬಿಸಿ ಮಾಡಿ. ಇನ್ನೊಂದು ಸಣ್ಣ ಕಪ್ನಲ್ಲಿ ಅಗರ್-ಅಗರ್ ಪುಡಿಯನ್ನು ಸ್ವಲ್ಪ ನೀರಿನಲ್ಲಿ ಕರಗಿಸಿ ಬೆರ್ರಿ ಮಿಶ್ರಣಕ್ಕೆ ಸೇರಿಸಿ. ಒಂದು ಕುದಿ ಬಂದ ನಂತರ ಒಲೆಯನ್ನು ಆರಿಸಿ.
ಈ ಮಿಶ್ರಣವು ಉಗುರು ಬೆಚ್ಚಗಾದಾಗ (ತುಂಬಾ ಬಿಸಿಯಾಗಿರುವಾಗ ಸುರಿಯಬೇಡಿ) ಪಿಸ್ತಾ ಪದರದ ಮೇಲೆ ನಿಧಾನವಾಗಿ ಸುರಿಯಿರಿ.
ಹಂತ 5: ಅಲಂಕಾರ ಮತ್ತು ಸೆಟ್ ಮಾಡುವುದು (Garnishing & Setting)
ಇಡೀ ಸಿಹಿಯನ್ನು ಕನಿಷ್ಠ 6 ರಿಂದ 8 ಗಂಟೆಗಳ ಕಾಲ ಅಥವಾ ಇಡೀ ರಾತ್ರಿ ರೆಫ್ರಿಜರೇಟರ್ನಲ್ಲಿ ಇರಿಸಿ. ಇದು ಸಂಪೂರ್ಣವಾಗಿ ಸೆಟ್ ಆದ ನಂತರ ಫ್ರಿಡ್ಜ್ನಿಂದ ಹೊರತೆಗೆಯಿರಿ.
ಅದರ ಮೇಲೆ ಒಣ ಕೊಬ್ಬರಿ ತುರಿ ಮತ್ತು ಕತ್ತರಿಸಿದ ಪಿಸ್ತಾ ಚೂರುಗಳನ್ನು ಸಮನಾಗಿ ಉದುರಿಸಿ. ಈಗ ಚೂಪಾದ ಚಾಕುವಿನಿಂದ ಚೌಕಾಕಾರದ ಬಾರ್ಗಳಾಗಿ ಕತ್ತರಿಸಿ.
ಉಪಯುಕ್ತ ಸಲಹೆಗಳು (Pro Tips for Success)
- ಶಾರ್ಪ್ ಲೇಯರ್ಗಳು: ಪದರಗಳು ಒಂದಕ್ಕೊಂದು ಬೆರೆಯಬಾರದೆಂದರೆ, ಪ್ರತಿ ಪದರವನ್ನು ಹಾಕಿದ ನಂತರ ಅದನ್ನು ಕಡ್ಡಾಯವಾಗಿ ಫ್ರಿಡ್ಜ್ನಲ್ಲಿ ಇಟ್ಟು ಗಟ್ಟಿಯಾದ ಮೇಲೆಯೇ ಮುಂದಿನ ಪದರ ಹಾಕಿ.
- ಜೆಲ್ಲಿ ಪದರ: ಬೆರ್ರಿ ರಸಕ್ಕೆ ಅಗರ್-ಅಗರ್ ಸೇರಿಸುವಾಗ ಅದು ಗಂಟಾಗದಂತೆ ನೋಡಿಕೊಳ್ಳಿ. ಅತಿಯಾಗಿ ಬಿಸಿಯಿರುವಾಗ ಕೆಳಗಿನ ಪದರದ ಮೇಲೆ ಸುರಿಯಬೇಡಿ, ಇದರಿಂದ ಕ್ರೀಮ್ ಕರಗಬಹುದು.
- ಪನೀರ್ ಬಳಕೆ: ನೀವು ಕ್ರೀಮ್ ಚೀಸ್ ಬದಲಿಗೆ ಪನೀರ್ ಬಳಸುತ್ತಿದ್ದರೆ, ಪನೀರ್ ಮೃದುವಾಗಿರಲಿ ಮತ್ತು ಅದರಲ್ಲಿ ನೀರಿನಂಶವಿಲ್ಲದಂತೆ ನೋಡಿಕೊಳ್ಳಿ.
- ಪರ್ಯಾಯ ಆಯ್ಕೆ: ಬೆರ್ರಿ ಹಣ್ಣುಗಳು ಸಿಗದಿದ್ದರೆ, ನೀವು ಸ್ಟ್ರಾಬೆರಿ ಅಥವಾ ಮ್ಯಾಂಗೋ ಪಲ್ಪ್ ಕೂಡ ಬಳಸಬಹುದು.
ಪೋಷಕಾಂಶಗಳ ಮಾಹಿತಿ (Health Benefits)
- ಪಿಸ್ತಾ: ಇದರಲ್ಲಿ ಆಂಟಿ-ಆಕ್ಸಿಡೆಂಟ್ಗಳು ಮತ್ತು ಆರೋಗ್ಯಕರ ಕೊಬ್ಬು ಇರುತ್ತದೆ. ಇದು ಮೆದುಳಿನ ಆರೋಗ್ಯಕ್ಕೆ ಒಳ್ಳೆಯದು.
- ಬೆರ್ರಿ ಹಣ್ಣುಗಳು: ಇವು ವಿಟಮಿನ್ ಸಿ ಮತ್ತು ಫೈಬರ್ನಿಂದ ಸಮೃದ್ಧವಾಗಿವೆ.
- ಸಕ್ಕರೆ ಪ್ರಮಾಣ: ನೀವು ಆರೋಗ್ಯದ ಕಡೆ ಹೆಚ್ಚು ಗಮನ ಹರಿಸುವವರಾಗಿದ್ದರೆ, ಸಕ್ಕರೆಯ ಬದಲಿಗೆ ಸ್ಟೀವಿಯಾ ಅಥವಾ ಜೇನುತುಪ್ಪವನ್ನೂ ಬಳಸಬಹುದು (ಪದರಗಳ ಹದಕ್ಕೆ ತಕ್ಕಂತೆ).
ಕೊನೆಯ ಮಾತು
ಈ ಪಿಸ್ತಾ ಮತ್ತು ಬೆರ್ರಿ ಲೇಯರ್ಡ್ ಬಾರ್ಸ್ ನೋಡಲು ಎಷ್ಟು ಸುಂದರವೋ, ಅಷ್ಟೇ ಅದ್ಭುತವಾದ ರುಚಿ ಹೊಂದಿರುತ್ತದೆ. ಹುಳಿ-ಸಿಹಿಯ ಸಮತೋಲನವು ನಿಮ್ಮ ನಾಲಿಗೆಗೆ ಹೊಸ ಅನುಭವ ನೀಡುತ್ತದೆ. ಇದನ್ನು ನಿಮ್ಮ ಮನೆಯಲ್ಲಿ ನಡೆಯುವ ಪುಟ್ಟ ಸಮಾರಂಭಗಳಲ್ಲಿ ಅಥವಾ ಅತಿಥಿಗಳು ಬಂದಾಗ ತಯಾರಿಸಿ ಸರ್ಪ್ರೈಸ್ ನೀಡಿ.
ಈ ರೆಸಿಪಿ ನಿಮಗೆ ಇಷ್ಟವಾದಲ್ಲಿ ನಿಮ್ಮ ಸ್ನೇಹಿತರೊಂದಿಗೆ ಹಂಚಿಕೊಳ್ಳಿ ಮತ್ತು ನೀವು ತಯಾರಿಸಿದ ಸಿಹಿಯ ಫೋಟೋಗಳನ್ನು ನಮ್ಮೊಂದಿಗೆ ಶೇರ್ ಮಾಡಲು ಮರೆಯಬೇಡಿ!
Exquisite Pistachio & Berry Layered Bars: A Step-by-Step Dessert Guide
If you are looking for a dessert that looks like it came straight out of a high-end patisserie, you’ve come to the right place. These Pistachio and Berry Layered Bars are a feast for both the eyes and the palate. With a crunchy base, a velvety cream center, a nutty pistachio heart, and a vibrant berry crown, this “No-Bake” wonder is perfect for any celebration.
Ingredients
1. The Crunchy Base:
- Digestive Biscuits: 200g (finely crushed)
- Unsalted Butter: 5 tbsp (melted)
- Desiccated Coconut: 2 tbsp (for added texture)
2. The Creamy White Layer:
- Cream Cheese or Soft Paneer: 250g
- Condensed Milk: ½ cup
- Vanilla Extract: 1 tsp
- Fresh Cream: 2 tbsp
3. The Nutty Pistachio Layer:
- Pistachios: 100g (shelled and finely ground)
- Powdered Sugar: 2 tbsp
- Milk: 1-2 tbsp (to form a thick paste)
- Green Food Coloring: A tiny pinch (optional)
4. The Vibrant Berry Layer:
- Mixed Berry Juice (Raspberry/Strawberry): 1.5 cups
- Agar-Agar Powder or Gelatin: 1.5 tbsp
- Sugar: ¼ cup (adjust based on the sweetness of the berries)
5. For Garnish:
- Crushed Pistachios
- Desiccated Coconut
Step-by-Step Instructions
Step 1: Preparing the Foundation (The Base)
Start by crushing the digestive biscuits into a fine crumb using a food processor. Transfer the crumbs to a bowl and mix in the melted butter and desiccated coconut. Stir until the mixture feels like wet sand. Press this mixture firmly into the bottom of a square glass dish or lined baking tray. Use the back of a spoon to smooth it out. Chill in the refrigerator for 20 minutes to set.
Step 2: Crafting the Silky Cream Layer
In a mixing bowl, beat the cream cheese (or smooth blended paneer) until soft. Add the condensed milk, vanilla extract, and fresh cream. Whisk until the mixture is light and fluffy. Pour this over the chilled biscuit base, spreading it evenly. Return the tray to the freezer for 15 minutes.
Step 3: Creating the Pistachio Heart
Grind the pistachios into a fine powder. Mix it with powdered sugar and a tablespoon of milk to create a spreadable paste. Gently spread this pistachio layer over the white cream layer. Be careful not to press too hard, as you want the layers to remain distinct.
Step 4: The Berry Jelly Topping
In a saucepan, heat the berry juice and sugar. In a separate small bowl, dissolve the agar-agar in a little water and add it to the juice. Bring the mixture to a gentle boil, then remove from heat. Let it cool slightly until it is lukewarm. Carefully pour the berry liquid over the pistachio layer.
Step 5: Setting and Garnishing
Place the entire tray in the refrigerator for at least 6–8 hours (overnight is best). Once fully set, remove from the fridge. Sprinkle generously with desiccated coconut and chopped pistachios for that professional finish. Slice into neat squares using a sharp, warm knife.
Pro-Tips for Perfection
- Distinct Layers: To get those sharp, clean lines shown in the photo, ensure each layer is sufficiently chilled and firm before adding the next one.
- Temperature Control: Never pour a hot jelly layer over the cream layer, or it will cause the cream to melt and the colors to bleed.
- The Slice: For the cleanest cuts, wipe your knife with a warm, damp cloth between every single slice