
“If you are looking for a delicious and elegant dessert, this White Chocolate Red Velvet Bars recipe is perfect for you.”
White Chocolate Https://my-dessertkitchen.com/3-layer-chocolate-mousse-cake-recipe/ Red Velvet Bars
“Try this delicious White Chocolate Red Velvet Bars recipe today!”
White Chocolate Red Velvet Bars
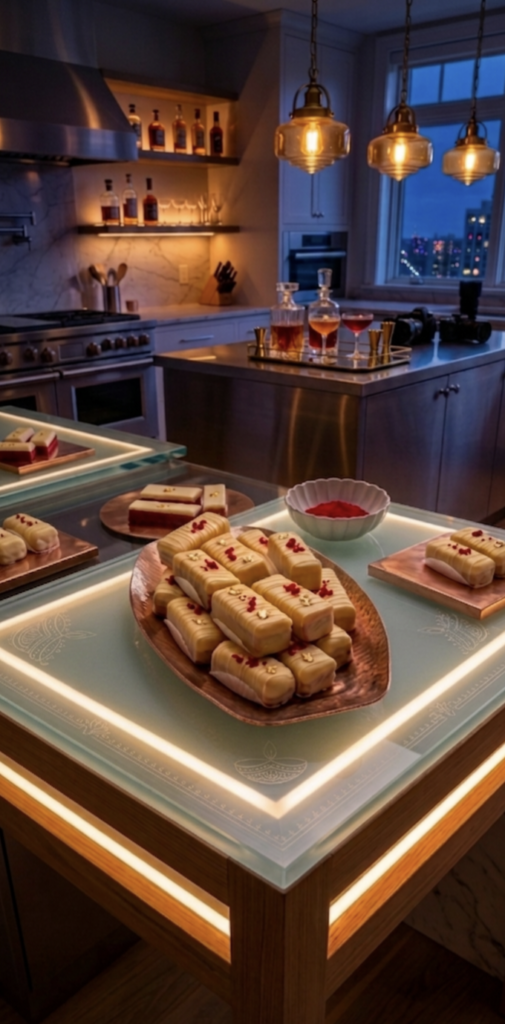
This recipe is divided into two main parts: the Red Velvet Base and the White Chocolate Coating.
1. For the Red Velvet Base:
White Chocolate Red Velvet Bars
- All-Purpose Flour (Maida): 1.5 cups
- Cocoa Powder: 2 tbsp (good quality)
- Unsalted Butter: ½ cup (at room temperature)
- Powdered Sugar: 1 cup
- Eggs: 2 (or ½ cup of thick yogurt/curd for an eggless version)
- Vanilla Extract: 1 tsp
- Red Food Coloring: 1 to 2 tsp (liquid or gel)
- Baking Soda: ½ tsp
- Salt: A pinch
2. For the White Chocolate Coating & Decoration:
- White Chocolate Chips/Bar: 2 cups
- Butter or Coconut Oil: 1 tbsp (helps in smooth melting)
- For Garnish: Freeze-dried strawberry bits or red sugar sprinkles
## Step-by-Step Instructions
Step 1: Preparation
- Preheat your oven to 180°C (350°F) for about 10 minutes.
- Line an 8×8 inch square baking tray with parchment paper and grease it lightly with a little butter.
Step 2: Sifting Dry Ingredients
- In a large bowl, combine the all-purpose flour, cocoa powder, baking soda, and a pinch of salt.
- Sift the mixture twice to ensure there are no lumps and to make the base airy and soft.
Step 3: Mixing Wet Ingredients
White Chocolate Red Velvet Bars
- In another bowl, add the room-temperature butter and powdered sugar. Using an electric mixer or a whisk, beat until the mixture becomes pale, light, and fluffy.
- Add the eggs one at a time, beating well after each addition (if using yogurt, add it at this stage).
- Stir in the vanilla extract and red food coloring. Mix well until the batter gets a vibrant, deep red color.
Step 4: Baking the Base
- Gently fold the dry ingredients into the wet mixture using a ‘cut and fold’ method. Do not overmix, or the bars will become dense.
- Pour the red batter into the prepared baking tray and smooth the top with a spatula.
- Bake in the preheated oven for 20 to 25 minutes. Insert a toothpick into the center—if it comes out clean, your base is ready.
- Remove from the oven and let it cool down completely for at least 1 hour.
Step 5: Cutting into Bars
White Chocolate Red Velvet Bars
- Once cooled, lift the red velvet slab out of the tray using the parchment paper.
- Using a sharp knife, trim the edges if needed and cut them into clean, identical rectangular bars (as seen in the image).
## Coating with White Chocolate
- Double Boiler Method: Fill a saucepan with an inch of water and bring it to a gentle simmer. Place a heatproof glass or steel bowl over it (the bottom of the bowl should not touch the water). Add the white chocolate chips and 1 tbsp of butter. Stir continuously until completely melted and silky smooth.
- Take the chocolate off the heat.
- Dip each red velvet bar into the melted white chocolate, ensuring it is completely and evenly coated on all sides.
- Lift the bar using a fork, tap it gently on the edge of the bowl to let the excess chocolate drip off.
- Place the coated bars onto clean parchment paper.
## Decoration & Serving
- Drizzling: Pour the remaining melted white chocolate into a small piping bag or Ziploc bag with a tiny corner cut off. Drizzle zigzag lines across the top of each bar (matching the pattern in the photo).
- Garnish: Before the chocolate sets, immediately sprinkle a few bits of freeze-dried strawberries or red sprinkles on top.
- Pop the bars into the refrigerator for 15–20 minutes to allow the white chocolate coating to set firmly.
Your visually stunning and melt-in-the-mouth White Chocolate Red Velvet Bars are ready to serve!
💡 Pro Tips:
- Cocoa Powder Control: Do not increase the cocoa powder amount. Red velvet relies on just a hint of chocolate flavor; too much cocoa will turn the vibrant red color into a dull brown.
- Handling White Chocolate: White chocolate burns easily. Always melt it on low heat and keep moisture/water drops completely away from it, or it will seize up and become grainy.
-
- ವೈಟ್ ಚಾಕೊಲೇಟ್ ಡಿಲೈಟ್ (White Chocolate Delight)
ಕನ್ನಡದಲ್ಲಿ ಅತ್ಯಂತ ರುಚಿಕರವಾದ ಮತ್ತು ಆಕರ್ಷಕವಾದ ವೈಟ್ ಚಾಕೊಲೇಟ್ ರೆಡ್ ವೆಲ್ವೆಟ್ ಬಾರ್ಸ್ (White Chocolate Red Velvet Bars) ತಯಾರಿಸುವ ಸರಳ ವಿಧಾನ ಇಲ್ಲಿದೆ. ನೋಡುವುದಕ್ಕೆ ಐಷಾರಾಮಿಯಾಗಿ ಕಾಣುವ ಈ ಸ್ವೀಟ್, ಹಬ್ಬ ಹರಿದಿನಗಳಿಗೆ ಅಥವಾ ವಿಶೇಷ ಸಮಾರಂಭಗಳಿಗೆ ಸೂಕ್ತವಾಗಿದೆ.
ಇಲ್ಲಿ ನೀಡಲಾಗಿರುವ ಅಳತೆ ಮತ್ತು ಹಂತಗಳನ್ನು ಅನುಸರಿಸಿ ನೀವು ಸುಲಭವಾಗಿ ಇದನ್ನು ಮನೆಯಲ್ಲೇ ತಯಾರಿಸಬಹುದು.
ಬೇಕಾಗುವ ಸಾಮಗ್ರಿಗಳು (Ingredients)
ಈ ರೆಸಿಪಿಯನ್ನು ನಾವು ಎರಡು ಮುಖ್ಯ ಭಾಗಗಳಾಗಿ ವಿಂಗಡಿಸಬಹುದು: ಬೇಸ್ (ಕೆಳಗಿನ ಕೆಂಪು ಭಾಗ) ಮತ್ತು ಟಾಪಿಂಗ್ (ಮೇಲಿನ ವೈಟ್ ಚಾಕೊಲೇಟ್ ಲೇಯರ್).
1. ರೆಡ್ ವೆಲ್ವೆಟ್ ಬೇಸ್ ಮಾಡಲು:
-
- ಮೈದಾ ಹಿಟ್ಟು (All-Purpose Flour): 1.5 ಕಪ್
-
- ಕೋಕೋ ಪೌಡರ್ (Cocoa Powder): 2 ಟೇಬಲ್ ಚಮಚ (ಉತ್ತಮ ಗುಣಮಟ್ಟದ್ದು)
-
- ಬೆಣ್ಣೆ (Unsalted Butter): ಕಪ್ (ಕೋಣೆ ತಾಪಮಾನದಲ್ಲಿರಲಿ – Room Temperature)
-
- ಸಕ್ಕರೆ ಪುಡಿ (Powdered Sugar): 1 ಕಪ್
-
- ಮೊಟ್ಟೆ (Eggs): 2 (ಮೊಟ್ಟೆ ಬಳಸದಿದ್ದರೆ 1/2 ಕಪ್ ಗಟ್ಟಿ ಮೊಸರು ಬಳಸಬಹುದು)
-
- ವನಿಲಾ ಎಸೆನ್ಸ್ (Vanilla Essence): 1 ಟೀಚಮಚ
-
- ರೆಡ್ ಫುಡ್ ಕಲರ್ (Red Food Coloring): 1 ರಿಂದ 2 ಟೀಚಮಚ (ಲಿಕ್ವಿಡ್ ಅಥವಾ ಜೆಲ್)
-
- ಅಡುಗೆ ಸೋಡಾ (Baking Soda): 1/2 ಟೀಚಮಚ
-
- ಉಪ್ಪು: ಒಂದು ಚಿಟಿಕೆ
2. ವೈಟ್ ಚಾಕೊಲೇಟ್ ಕೋಟಿಂಗ್ ಮತ್ತು ಅಲಂಕಾರಕ್ಕೆ:
-
- ವೈಟ್ ಚಾಕೊಲೇಟ್ ಕಾಂಪೌಂಡ್ (White Chocolate Chips/Bar): 2 ಕಪ್
-
- ಬೆಣ್ಣೆ ಅಥವಾ ತೆಂಗಿನ ಎಣ್ಣೆ: 1 ಟೇಬಲ್ ಚಮಚ (ಚಾಕೊಲೇಟ್ ಕರಗಿಸಲು)
-
- ಅಲಂಕಾರಕ್ಕಾಗಿ: ಒಣಗಿದ ಸ್ಟ್ರಾಬೆರಿ ಚೂರುಗಳು (Freeze-dried strawberries) ಅಥವಾ ಕೆಂಪು ಸಕ್ಕರೆ ಹರಳುಗಳು (Red Sprinkles).
ಹಂತ-ಹಂತವಾದ ತಯಾರಿಕಾ ವಿಧಾನ (Step-by-Step Instructions)
ಹಂತ 1: ಸಿದ್ಧತೆ (Preparation)
-
- ಮೊದಲು ನಿಮ್ಮ ಓವನ್ ಅನ್ನು 180°C (350°F) ತಾಪಮಾನಕ್ಕೆ 10 ನಿಮಿಷಗಳ ಕಾಲ ಪ್ರಿ-ಹೀಟ್ (Pre-heat) ಮಾಡಿ.
-
- ಒಂದು ಚೌಕಾಕಾರದ (8×8 ಇಂಚು) ಬೇಕಿಂಗ್ ಟ್ರೇಗೆ ಸ್ವಲ್ಪ ಬೆಣ್ಣೆ ಸವರಿ, ಅದರ ಮೇಲೆ ಪಾರ್ಚ್ಮೆಂಟ್ ಪೇಪರ್ (Baking Paper) ಹಾಕಿ ಸಿದ್ಧವಾಗಿಟ್ಟುಕೊಳ್ಳಿ.
ಹಂತ 2: ಒಣ ಸಾಮಗ್ರಿಗಳನ್ನು ಜರಡಿ ಹಿಡಿಯುವುದು
-
- ಒಂದು ದೊಡ್ಡ ಪಾತ್ರೆಯಲ್ಲಿ ಮೈದಾ ಹಿಟ್ಟು, ಕೋಕೋ ಪೌಡರ್, ಅಡುಗೆ ಸೋಡಾ ಮತ್ತು ಒಂದು ಚಿಟಿಕೆ ಉಪ್ಪನ್ನು ಒಟ್ಟಿಗೆ ಸೇರಿಸಿ.
-
- ಈ ಮಿಶ್ರಣವನ್ನು 2 ಬಾರಿ ಚೆನ್ನಾಗಿ ಜರಡಿ (Sieve) ಹಿಡಿಯಿರಿ. ಇದರಿಂದ ಹಿಟ್ಟಿನಲ್ಲಿ ಯಾವುದೇ ಗಂಟುಗಳಿರುವುದಿಲ್ಲ ಮತ್ತು ಕೇಕ್ ಬೇಸ್ ಮೃದುವಾಗಿ ಬರುತ್ತದೆ.
ಹಂತ 3: ಒದ್ದೆ ಸಾಮಗ್ರಿಗಳ ಮಿಶ್ರಣ (Wet Ingredients)
-
- ಇನ್ನೊಂದು ಪಾತ್ರೆಯಲ್ಲಿ ಕೋಣೆ ತಾಪಮಾನದಲ್ಲಿರುವ ಬೆಣ್ಣೆ ಮತ್ತು ಸಕ್ಕರೆ ಪುಡಿಯನ್ನು ಹಾಕಿ. ಎಲೆಕ್ಟ್ರಿಕ್ ಬೀಟರ್ ಅಥವಾ ವಿಸ್ಕರ್ ಬಳಸಿ ಅದು ಮೃದು ಹಾಗೂ ಬಿಳಿಯಾಗುವವರೆಗೆ (Fluffy) ಚೆನ್ನಾಗಿ ಮಿಕ್ಸ್ ಮಾಡಿ.
-
- ಇದಕ್ಕೆ ಒಂದೊಂದಾಗಿ ಮೊಟ್ಟೆಯನ್ನು ಸೇರಿಸುತ್ತಾ ಬೀಟ್ ಮಾಡಿ (ಮೊಸರು ಬಳಸುವುದಾದರೆ ಈ ಹಂತದಲ್ಲಿ ಮೊಸರು ಸೇರಿಸಿ).
-
- ನಂತರ ವನಿಲಾ ಎಸೆನ್ಸ್ ಮತ್ತು ರೆಡ್ ಫುಡ್ ಕಲರ್ ಸೇರಿಸಿ ಚೆನ್ನಾಗಿ ಕೈಯಾಡಿಸಿ. ಮಿಶ್ರಣವು ಗಾಢ ಕೆಂಪು ಬಣ್ಣಕ್ಕೆ ತಿರುಗಬೇಕು.
ಹಂತ 4: ಹಿಟ್ಟನ್ನು ಸಿದ್ಧಪಡಿಸುವುದು ಮತ್ತು ಬೇಕ್ ಮಾಡುವುದು
-
- ಈಗ ಸಿದ್ಧಪಡಿಸಿದ ಒಣ ಹಿಟ್ಟಿನ ಮಿಶ್ರಣವನ್ನು ಸ್ವಲ್ಪ ಸ್ವಲ್ಪವಾಗಿ ಒದ್ದೆ ಮಿಶ್ರಣಕ್ಕೆ ಸೇರಿಸುತ್ತಾ ‘ಕಟ್ ಅಂಡ್ ಫೋಲ್ಡ್’ (Cut and Fold) ವಿಧಾನದಲ್ಲಿ ನಿಧಾನವಾಗಿ ಮಿಕ್ಸ್ ಮಾಡಿ. ಅತಿಯಾಗಿ ಮಿಕ್ಸ್ ಮಾಡಬೇಡಿ.
-
- ಸಿದ್ಧವಾದ ಕೆಂಪು ಹಿಟ್ಟನ್ನು ಬೇಕಿಂಗ್ ಟ್ರೇಗೆ ಸುರಿದು, ಮೇಲ್ಭಾಗವನ್ನು ಸಮನಾಗಿ ಮಾಡಿ.
-
- ಪ್ರಿ-ಹೀಟ್ ಆದ ಓವನ್ನಲ್ಲಿ 20 ರಿಂದ 25 ನಿಮಿಷಗಳ ಕಾಲ ಬೇಕ್ ಮಾಡಿ. ಟೂತ್ಪಿಕ್ ಚುಚ್ಚಿ ನೋಡಿದಾಗ ಅದು ಸ್ವಚ್ಛವಾಗಿ ಹೊರಬಂದರೆ ಬೇಸ್ ಸಿದ್ಧವಾಗಿದೆ ಎಂದರ್ಥ.
-
- ಓವನ್ನಿಂದ ಹೊರತೆಗೆದು ಸಂಪೂರ್ಣವಾಗಿ ತಣ್ಣಗಾಗಲು ಬಿಡಿ (ಕನಿಷ್ಠ 1 ಗಂಟೆ).
ಹಂತ 5: ಬಾರ್ಗಳನ್ನು ಕತ್ತರಿಸುವುದು
-
- ತಣ್ಣಗಾದ ರೆಡ್ ವೆಲ್ವೆಟ್ ಬೇಸ್ ಅನ್ನು ಟ್ರೇಯಿಂದ ಹೊರತೆಗೆಯಿರಿ.
-
- ಚೂಪಾದ ಚಾಕುವಿನಿಂದ ಚಿತ್ರದಲ್ಲಿ ಕಾಣುವಂತೆ ಸಣ್ಣ ಆಯತಾಕಾರದ (Rectangular) ಬಾರ್ಗಳಾಗಿ ಕತ್ತರಿಸಿಕೊಳ್ಳಿ.
ವೈಟ್ ಚಾಕೊಲೇಟ್ ಕೋಟಿಂಗ್ ಮಾಡುವುದು ಹೇಗೆ?
-
- ಡಬಲ್ ಬಾಯ್ಲರ್ ವಿಧಾನ (Double Boiler Method): ಒಂದು ಪಾತ್ರೆಯಲ್ಲಿ ನೀರನ್ನು ಕುದಿಯಲು ಇಡಿ. ಅದರ ಮೇಲೆ ಮತ್ತೊಂದು ಗಾಜಿನ ಅಥವಾ ಸ್ಟೀಲ್ ಪಾತ್ರೆಯನ್ನು ಇಟ್ಟು (ಮೇಲಿನ ಪಾತ್ರೆಗೆ ನೀರು ತಾಗಬಾರದು), ಅದರಲ್ಲಿ ವೈಟ್ ಚಾಕೊಲೇಟ್ ಚೂರುಗಳು ಮತ್ತು 1 ಚಮಚ ಬೆಣ್ಣೆ ಹಾಕಿ ನಿಧಾನವಾಗಿ ಕರಗಿಸಿ. (ಅಥವಾ ಮೈಕ್ರೋವೇವ್ನಲ್ಲಿ 30 ಸೆಕೆಂಡುಗಳ ಕಾಲ ಇಟ್ಟು ಕರಗಿಸಬಹುದು).
-
- ಚಾಕೊಲೇಟ್ ಸಂಪೂರ್ಣವಾಗಿ ಕರಗಿ ರೇಷ್ಮೆಯಂತೆ ಮೃದುವಾದಾಗ ಉರಿಯಿಂದ ಕೆಳಗಿಳಿಸಿ.
-
- ಈಗ ಕತ್ತರಿಸಿಟ್ಟುಕೊಂಡ ಪ್ರತಿಯೊಂದು ರೆಡ್ ವೆಲ್ವೆಟ್ ಬಾರ್ ಅನ್ನು ಕರಗಿದ ವೈಟ್ ಚಾಕೊಲೇಟ್ನಲ್ಲಿ ಮುಳುಗಿಸಿ (Dip), ಎಲ್ಲಾ ಕಡೆ ಸಮನಾಗಿ ಕೋಟ್ ಮಾಡಿ.
-
- ಒಂದು ಫೋರ್ಕ್ (Fork) ಸಹಾಯದಿಂದ ಬಾರ್ ಅನ್ನು ಎತ್ತಿ, ಹೆಚ್ಚುವರಿ ಚಾಕೊಲೇಟ್ ಬಸಿದು ಹೋಗಲು ಬಿಡಿ.
-
- ನಂತರ ಇದನ್ನು ಪಾರ್ಚ್ಮೆಂಟ್ ಪೇಪರ್ ಮೇಲಿಡಿ.
ಅಲಂಕಾರ ಮತ್ತು ಸರ್ವಿಂಗ್ (Decoration & Serving)
White Chocolate Red Velvet Bars
-
- ಡಿಸೈನ್ ಮಾಡುವುದು: ಉಳಿದ ವೈಟ್ ಚಾಕೊಲೇಟ್ ಅನ್ನು ಒಂದು ಸಣ್ಣ ಪೈಪಿಂಗ್ ಬ್ಯಾಗ್ ಅಥವಾ ಹಾಲಿನ ಕವರ್ಗೆ ಹಾಕಿ, ಬಾರ್ಗಳ ಮೇಲೆ ಅಡ್ಡಲಾಗಿ ಜಿಗ್ಜಾಗ್ (Zig-zag) ಲೈನ್ಗಳನ್ನು ಎಳೆಯಿರಿ (ಚಿತ್ರದಲ್ಲಿರುವಂತೆ).
-
- ಟಾಪಿಂಗ್: ಚಾಕೊಲೇಟ್ ಒಣಗುವ ಮುನ್ನವೇ ಅದರ ಮೇಲೆ ಒಣಗಿದ ಸ್ಟ್ರಾಬೆರಿ ಪುಡಿ ಅಥವಾ ಕೆಂಪು ಹರಳುಗಳನ್ನು ಉದುರಿಸಿ.
-
- ಇವುಗಳನ್ನು 15-20 ನಿಮಿಷಗಳ ಕಾಲ ಫ್ರಿಡ್ಜ್ನಲ್ಲಿ ಇಟ್ಟರೆ ಚಾಕೊಲೇಟ್ ಗಟ್ಟಿಯಾಗುತ್ತದೆ.
ಈಗ ನಿಮ್ಮ ಕಣ್ಣಿಗೆ ಆಕರ್ಷಕವಾದ, ಬಾಯಲ್ಲಿ ಇಟ್ಟರೆ ಕರಗುವ ವೈಟ್ ಚಾಕೊಲೇಟ್ ರೆಡ್ ವೆಲ್ವೆಟ್ ಬಾರ್ಸ್ ಸವಿಯಲು ಸಿದ್ಧ!
💡 ಪ್ರಮುಖ ಸಲಹೆಗಳು (Chef Tips):
-
- White Chocolate Red Velvet Bars
-
- ಕೋಕೋ ಪೌಡರ್ ಪ್ರಮಾಣ: ರೆಡ್ ವೆಲ್ವೆಟ್ ಕೇಕ್ನಲ್ಲಿ ಕೋಕೋ ಪೌಡರ್ ಕೇವಲ ರುಚಿಗೆ ಮಾತ್ರ ಇರುತ್ತದೆ. ಅತಿಯಾಗಿ ಹಾಕಿದರೆ ಕೆಂಪು ಬಣ್ಣ ಬರುವುದಿಲ್ಲ, ಕಂದು ಬಣ್ಣಕ್ಕೆ ತಿರುಗುತ್ತದೆ.
-
- ಚಾಕೊಲೇಟ್ ಕರಗಿಸುವಾಗ: ವೈಟ್ ಚಾಕೊಲೇಟ್ ಬೇಗನೆ ಸೀದುಹೋಗುತ್ತದೆ, ಆದ್ದರಿಂದ ಕಡಿಮೆ ಉರಿಯಲ್ಲಿ ನಿರಂತರವಾಗಿ ಕೈಯಾಡಿಸುತ್ತಾ ಕರಗಿಸಬೇಕು. ಒಂದು ಹನಿ ನೀರು ಕೂಡ ಚಾಕೊಲೇಟ್ ಮಿಶ್ರಣಕ್ಕೆ ಬೀಳದಂತೆ ಎಚ್ಚರ ವಹಿಸಿ.
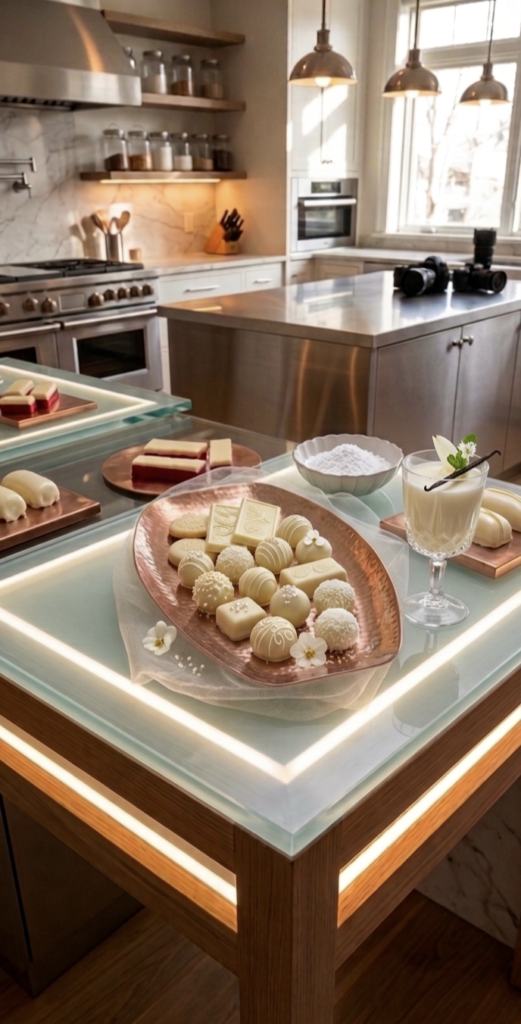
White Chocolate Red Velvet https://en.wikipedia.org/wiki/Blueberry Bars