
Strawberry-Shaped Cake
Learn how to make a stunning, bakery-style Strawberry-Shaped Cake at home. Follow our easy step-by-step recipe.
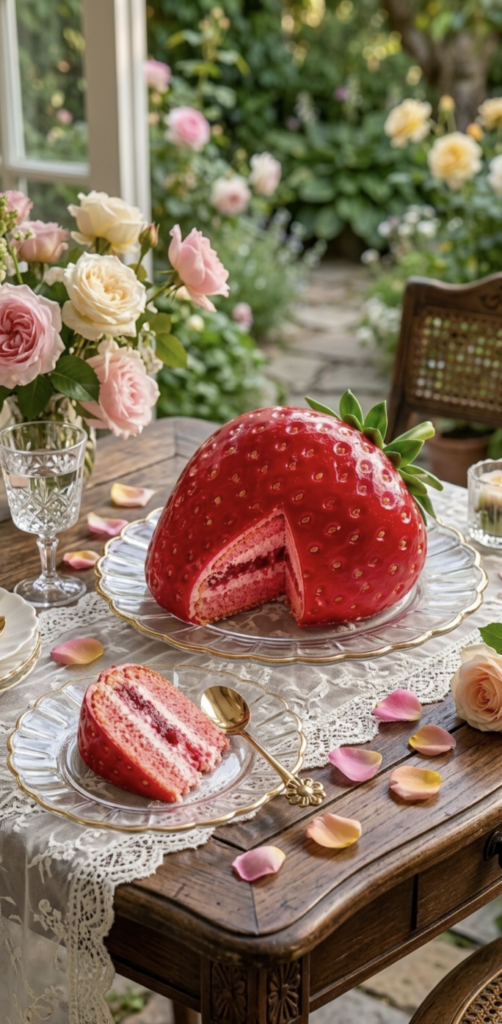
Exquisite Strawberry-Shaped Cake Recipe
Strawberry-Shaped Cake
This guide will walk you through creating a stunning, bakery-style Strawberry-Shaped Cake right in your own kitchen. Visually, it looks exactly like a giant, glossy strawberry, and on the inside, it features moist layers of pink sponge, luscious buttercream, and rich strawberry compote.
Whether you are preparing this for a birthday, an anniversary, or a special celebration, this detailed recipe ensures a showstopping dessert.
Part 1: Ingredients Profile
To achieve the perfect texture, structure, and flavor, we divide our ingredients into three distinct elements: the sponge, the filling, and the outer decoration.
1. For the Strawberry-Infused Sponge Cake
- All-Purpose Flour (Maida): 2.5 cups (approx. 300g) – provides the structural base.
- Baking Powder: 1.5 teaspoons – for the necessary lift.
- Baking Soda: 1/2 teaspoon – reacts with acidic ingredients for fluffiness.
- Salt: a pinch – balances the sweetness.
- Unsalted Butter: 3/4 cup (150g), softened at room temperature.
- Granulated Sugar: 1.5 cups (300g) – finely ground.
- Fresh Thick Yogurt (Curd): 1/2 cup – adds incredible moisture.
- Whole Milk: 1 cup – at room temperature to adjust batter consistency.
- Pure Strawberry Essence/Extract: 1.5 teaspoons.
- Pink or Red Gel Food Coloring: 2 to 3 drops (gel color provides a vibrant shade without altering batter moisture).
2. For the Filling & Frosting
- Heavy Whipping Cream (or Unsalted Butter for Buttercream): 2 cups – chilled.
- Powdered Sugar: 1 cup (adjust based on sweetness preference).
- Vanilla Extract: 1 teaspoon.
- Premium Strawberry Jam or Homemade Strawberry Compote: 1 cup.
- Fresh Strawberries: 1 cup, finely chopped (optional, for real fruit crunch between layers).
3. For the Realistic Strawberry Decoration
Strawberry-Shaped Cake
- Red Fondant: 400g (or Red Mirror Glaze if you prefer a shiny, jelly-like exterior).
- Green Fondant: 100g – for crafting the top leaves and stem.
- Yellow or White Sesame Seeds / Tiny Sprinkles: 2 tablespoons – to mimic the strawberry achenes (seeds).
- Sugar Syrup: 1/2 cup (equal parts water and sugar boiled together) – to keep the sponge layers ultra-moist.
Part 2: Step-by-Step Instructions
Strawberry-Shaped https://my-dessertkitchen.com/homemade-raspberry-truffles/ Cake
Step 1: Baking the Perfect Foundation
- Preheat and Prep: Preheat your kitchen oven to 180°C. Lightly grease two identical 6-inch or 7-inch round cake pans with butter and line the bottoms with parchment paper. Using deep, smaller diameter pans helps in stacking the cake vertically to achieve the strawberry shape.
- Sift Dry Ingredients: In a large mixing bowl, sift together the all-purpose flour, baking powder, baking soda, and a pinch of salt. Sifting twice introduces air, making the cake lighter.
- Cream Butter and Sugar: In a separate large bowl, use a hand mixer or stand mixer to beat the softened butter and granulated sugar together. Beat for 4 to 5 minutes on medium-high speed until the mixture becomes pale, light, and fluffy.
- Incorporate Wet Ingredients: Whisk in the smooth yogurt until fully combined. Next, add the strawberry essence and the red/pink gel food coloring. Mix well until the color is uniform.
- Combine the Batter: Alternate adding the dry ingredients and the milk into the butter mixture. Start with 1/3 of the flour, follow with 1/2 of the milk, and repeat, ending with the flour. Use the cut-and-fold method with a spatula to mix. Do not overmix, as this develops gluten and makes the cake dense.
- Bake: Divide the pink batter equally between the prepared pans. Bake at 180°C for 30 to 35 minutes. Insert a toothpick into the center; if it comes out clean, your cakes are done.
- Cooling: Allow the cakes to rest in their pans for 10 minutes, then invert them onto a wire cooling rack. They must cool completely before carving or frosting.
Step 2: Assembling and Sculpting the Strawberry Shape
Strawberry-Shaped Cake
- Leveling: Use a serrated bread knife to slice off any domed tops from the cooled cakes so they are perfectly flat. Then, slice each cake horizontally into two equal layers, giving you 4 layers in total.
- Layering: Place the base layer on a cake board. Lightly brush it with sugar syrup. Spread an even layer of whipped cream or buttercream, followed by a generous swirl of strawberry jam/compote and a sprinkle of finely chopped fresh strawberries. Place the second layer on top and repeat this process for all layers.
- The Sculpture (Carving): Place the stacked cake into the refrigerator for 20 minutes to firm up; this makes carving much cleaner. Using a sharp, long serrated knife, begin shaving the cake. Start from the top-middle and taper downwards, narrowing the base layer significantly to create an inverted cone or teardrop shape, just like a natural strawberry.
- Crumb Coat: Once you achieve the desired strawberry silhouette, cover the entire outside of the cake with a thin layer of cream. This “crumb coat” seals in loose crumbs. Chill the cake in the refrigerator for 45 minutes to lock the shape in place.
Step 3: Bringing the Strawberry to Life (Decoration)
Strawberry-Shaped Cake
- Applying the Red Skin: Dust your kitchen counter with a little cornstarch. Roll out your red fondant into a large, thin circle (about 1/8 inch thick). Carefully lift the fondant using your rolling pin and drape it smoothly over the chilled, carved cake.
- Smoothing: Use a fondant smoother or your hands to gently press the fondant against the curved shape of the cake, working from top to bottom. Trim away any excess fondant at the base with a sharp knife.
- Adding the Textured Seeds: To make it look hyper-realistic, take a small modeling tool (or the back of a small paintbrush) and gently press small, diagonal indentations all around the red surface. Using a tiny drop of water or edible glue, press a yellow sprinkle or a white sesame seed into each indentation.
- Crafting the Green Stem and Leaves: Roll out your green fondant. Cut out 5 to 6 pointed leaf shapes. Use a knife to score light vein lines on the leaves. Arrange them at the top center of the cake, letting them drape slightly over the red shoulders. Roll a small cylinder of green fondant to create the central stem and attach it right in the middle.
Part 4: Pro-Tips for Bakery-Style Success
- The Glaze Alternative: If working with fondant feels too complicated, you can opt for a Red Mirror Glaze. After carving and smoothing the cake with buttercream till it is completely frozen, pour a warm gelatin-and-white-chocolate-based red glaze over the cake. It will give you that hyper-glossy, wet look seen in high-end pastry shops.
- Structural Stability: Because a strawberry shape is top-heavy and narrow at the bottom, insert a wooden dowel or a sturdy straw right down the center of the cake layers before carving. This keeps the cake from shifting or tilting.
Your spectacular, custom-shaped strawberry cake is now ready to impress your guests and be the highlight of your event!
“If you loved this beautiful and delicious Strawberry-Shaped Cake recipe, don’t keep it to yourself! Share it with your friends and family so they can surprise their loved ones with this amazing dessert too.”
ನೋಡಲು ಅಸಲಿ ಹಣ್ಣಿನಂತಿರುವ ಸ್ಪೆಷಲ್ ‘ಸ್ಟ್ರಾಬೆರಿ ಕೇಕ್’ ರೆಸಿಪಿ
Strawberry-Shaped Cake
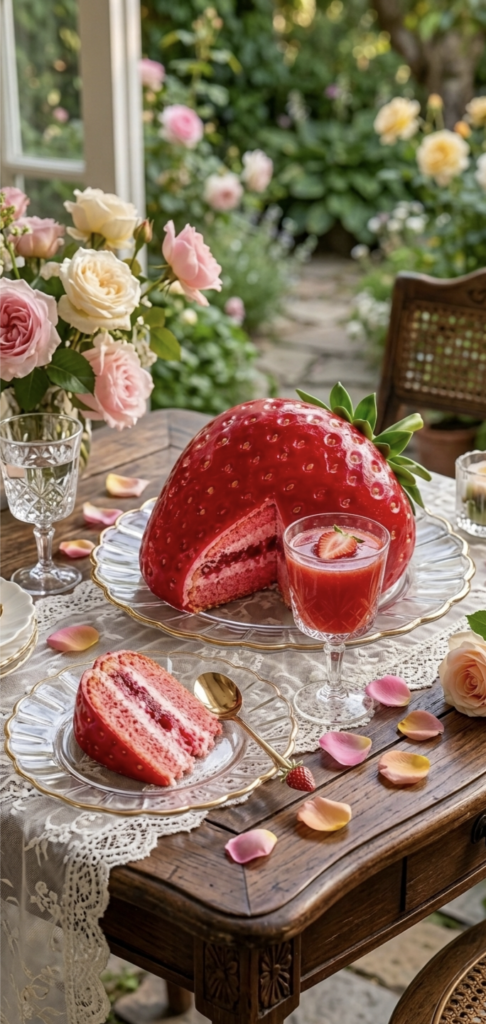
ಆಕರ್ಷಕ ಸ್ಟ್ರಾಬೆರಿ ಆಕಾರದ ಕೇಕ್ ರೆಸಿಪಿ (Strawberry-Shaped Cake Recipe)
Strawberry-Shaped https://en.wikipedia.org/wiki/Blueberry Cake
ನೋಡಲು ಅಸಲಿ ಜಿಗುಟಾದ ದೊಡ್ಡ ಸ್ಟ್ರಾಬೆರಿ ಹಣ್ಣಿನಂತೆ ಕಂಗೊಳಿಸುವ, ಕತ್ತರಿಸಿದಾಗ ಒಳಗಡೆ ಅದ್ಭುತವಾದ ಲೇಯರ್ಗಳು ಹಾಗೂ ಸ್ಟ್ರಾಬೆರಿ ಜಾಮ್ ಹೊಂದಿರುವ ಈ ಕೇಕ್ ಯಾವುದೇ ಹುಟ್ಟುಹಬ್ಬ ಅಥವಾ ವಿಶೇಷ ಸಮಾರಂಭಗಳಿಗೆ ಅತ್ಯುತ್ತಮ ಆಯ್ಕೆಯಾಗಿದೆ. ಇದನ್ನು ಬೇಕರಿ ಶೈಲಿಯಲ್ಲಿ ಮನೆಯಲ್ಲೇ ಸುಲಭವಾಗಿ ಹೇಗೆ ಮಾಡಬಹುದು ಎಂಬುದರ ಸಂಪೂರ್ಣ ವಿವರ ಇಲ್ಲಿದೆ.
ಭಾಗ 1: ಬೇಕಾಗುವ ಪದಾರ್ಥಗಳು
Strawberry-Shaped Cake
ಕೇಕ್ ಅತ್ಯುತ್ತಮ ವಿನ್ಯಾಸ ಮತ್ತು ರುಚಿ ಪಡೆಯಲು, ಪದಾರ್ಥಗಳನ್ನು ಮೂರು ಭಾಗಗಳಾಗಿ ವಿಂಗಡಿಸಿಕೊಳ್ಳೋಣ: ಸ್ಪಾಂಜ್ ಕೇಕ್, ಫಿಲ್ಲಿಂಗ್ ಮತ್ತು ಮೇಲ್ಭಾಗದ ಅಲಂಕಾರ.
1. ಸ್ಟ್ರಾಬೆರಿ ಸ್ಪಾಂಜ್ ಕೇಕ್ ಮಾಡಲು:
- ಮೈದಾ ಹಿಟ್ಟು: 2.5 ಕಪ್ (ಸುಮಾರು 300 ಗ್ರಾಂ)
- ಬೇಕಿಂಗ್ ಪೌಡರ್: 1.5 ಟೀಸ್ಪೂನ್
- ಬೇಕಿಂಗ್ ಸೋಡಾ: 1/2 ಟೀಸ್ಪೂನ್
- ಉಪ್ಪು: ಒಂದು ಚಿಟಿಕೆ (ರುಚಿಯನ್ನು ಸಮತೋಲನಗೊಳಿಸಲು)
- ಬೆಣ್ಣೆ (Unsalted Butter): 3/4 ಕಪ್ (ಕೋಣೆ ಉಷ್ಣಾಂಶದಲ್ಲಿರಲಿ)
- ಸಕ್ಕರೆ ಪುಡಿ: 1.5 ಕಪ್
- ಗಟ್ಟಿ ಮೊಸರು: 1/2 ಕಪ್ (ಕೇಕ್ ಮೃದುವಾಗಲು ಸಹಾಯ ಮಾಡುತ್ತದೆ)
- ಹಾಲು: 1 ಕಪ್ (ಕೋಣೆ ಉಷ್ಣಾಂಶದಲ್ಲಿರಲಿ)
- ಸ್ಟ್ರಾಬೆರಿ ಎಸೆನ್ಸ್: 1.5 ಟೀಸ್ಪೂನ್
- ಕೆಂಪು ಅಥವಾ ಗುಲಾಬಿ ಜೆಲ್ ಫುಡ್ ಕಲರ್: 2 ರಿಂದ 3 ಹನಿಗಳು
2. ಒಳಗಿನ ಲೇಯರ್ ಮತ್ತು ಫ್ರಸ್ಟಿಂಗ್ ಮಾಡಲು:
- ಹೆವಿ ವಿಪ್ಪಿಂಗ್ ಕ್ರೀಮ್ (Heavy Whipping Cream): 2 ಕಪ್ (ಚೆನ್ನಾಗಿ ತಣ್ಣಗಿರಬೇಕು)
- ಸಕ್ಕರೆ ಪುಡಿ: 1 ಕಪ್
- ವೆನಿಲ್ಲಾ ಎಸೆನ್ಸ್: 1 ಟೀಸ್ಪೂನ್
- ಸ್ಟ್ರಾಬೆರಿ ಜಾಮ್ ಅಥವಾ ಕಾಂಪೋಟ್: 1 ಕಪ್
- ತಾಜಾ ಸ್ಟ್ರಾಬೆರಿ ಹಣ್ಣುಗಳು: 1 ಕಪ್ (ಸಣ್ಣದಾಗಿ ಕತ್ತರಿಸಿದ್ದು – ಐಚ್ಛಿಕ)
3. ಸ್ಟ್ರಾಬೆರಿ ಆಕಾರದ ಅಲಂಕಾರಕ್ಕೆ:
- ಕೆಂಪು ಬಣ್ಣದ ಫೊಂಡೆಂಟ್ (Red Fondant): 400 ಗ್ರಾಂ (ಅಥವಾ ರೆಡ್ ಮಿರರ್ ಗ್ಲೇಸ್)
- ಹಸಿರು ಬಣ್ಣದ ಫೊಂಡೆಂಟ್ (Green Fondant): 100 ಗ್ರಾಂ (ಎಲೆ ಮತ್ತು ತೊಟ್ಟು ಮಾಡಲು)
- ಹಳದಿ ಅಥವಾ ಬಿಳಿ ಸ್ಪ್ರಿಂಕಲ್ಸ್ ಅಥವಾ ಬಿಳಿ ಎಳ್ಳು: 2 ದೊಡ್ಡ ಚಮಚ (ಸ್ಟ್ರಾಬೆರಿ ಬೀಜಗಳಂತೆ ತೋರಿಸಲು)
- ಶುಗರ್ ಸಿರಪ್: 1/2 ಕಪ್ (ಸಕ್ಕರೆ ಮತ್ತು ನೀರನ್ನು ಸಮಪ್ರಮಾಣದಲ್ಲಿ ಕುದಿಸಿ ಆರಿಸಿದ್ದು)
ಭಾಗ 2: ಹಂತ-ಹಂತವಾದ ತಯಾರಿಕೆಯ ವಿಧಾನ
Strawberry-Shaped Cake
ಹಂತ 1: ಸ್ಪಾಂಜ್ ಕೇಕ್ ತಯಾರಿಸುವುದು
- ಓವನ್ ಸಿದ್ಧತೆ: ಮೊದಲು ನಿಮ್ಮ ಓವನ್ ಅನ್ನು 180°C ಉಷ್ಣಾಂಶದಲ್ಲಿ ಪ್ರೀ-ಹೀಟ್ (Preheat) ಮಾಡಿ. ಎರಡು 6 ಇಂಚಿನ ರೌಂಡ್ ಕೇಕ್ ಪಾತ್ರೆಗಳಿಗೆ ಬೆಣ್ಣೆ ಸವರಿ, ಕೆಳಭಾಗಕ್ಕೆ ಪಾರ್ಚ್ಮೆಂಟ್ ಪೇಪರ್ ಹಾಕಿ ಸಿದ್ಧವಾಗಿಡಿ.
- ಒಣ ಪದಾರ್ಥಗಳ ಮಿಶ್ರಣ: ಒಂದು ಪಾತ್ರೆಯಲ್ಲಿ ಮೈದಾ ಹಿಟ್ಟು, ಬೇಕಿಂಗ್ ಪೌಡರ್, ಬೇಕಿಂಗ್ ಸೋಡಾ ಮತ್ತು ಉಪ್ಪನ್ನು ಒಟ್ಟಿಗೆ ಸೇರಿಸಿ 2 ಬಾರಿ ಜರಡಿ ಹಿಡಿದು ಪಕ್ಕಕ್ಕಿಡಿ. ಇದರಿಂದ ಹಿಟ್ಟಿನಲ್ಲಿ ಗಾಳಿಯಾಡಿ ಕೇಕ್ ಹಗುರವಾಗುತ್ತದೆ.
- ಬೆಣ್ಣೆ ಮತ್ತು ಸಕ್ಕರೆ ಮಿಶ್ರಣ: ಮತ್ತೊಂದು ದೊಡ್ಡ ಪಾತ್ರೆಯಲ್ಲಿ ಮೃದುವಾದ ಬೆಣ್ಣೆ ಮತ್ತು ಸಕ್ಕರೆ ಪುಡಿಯನ್ನು ಎಲೆಕ್ಟ್ರಿಕ್ ಬೀಟರ್ ಅಥವಾ ವಿಸ್ಕರ್ ಸಹಾಯದಿಂದ 4-5 ನಿಮಿಷಗಳ ಕಾಲ ಚೆನ್ನಾಗಿ ಬಡಿಯಿರಿ. ಮಿಶ್ರಣವು ತಿಳಿ ಬಿಳಿ ಬಣ್ಣಕ್ಕೆ ಮತ್ತು ಮೃದುವಾಗಿ ಬರಬೇಕು.
- ದ್ರವ ಪದಾರ್ಥಗಳ ಸೇರ್ಪಡೆ: ಈಗ ಈ ಮಿಶ್ರಣಕ್ಕೆ ಗಟ್ಟಿ ಮೊಸರು, ಸ್ಟ್ರಾಬೆರಿ ಎಸೆನ್ಸ್ ಮತ್ತು ಕೆಂಪು/ಗುಲಾಬಿ ಜೆಲ್ ಫುಡ್ ಕಲರ್ ಸೇರಿಸಿ ನಿಧಾನವಾಗಿ ಮಿಕ್ಸ್ ಮಾಡಿ.
- ಬ್ಯಾಟರ್ ಸಿದ್ಧತೆ: ಈಗ ಜರಡಿ ಹಿಡಿದ ಒಣ ಹಿಟ್ಟನ್ನು ಮತ್ತು ಹಾಲನ್ನು ಸ್ವಲ್ಪ ಸ್ವಲ್ಪವಾಗಿ ಬೆಣ್ಣೆಯ ಮಿಶ್ರಣಕ್ಕೆ ಸೇರಿಸುತ್ತಾ ಹೋಗಿ. ಹಿಟ್ಟನ್ನು ಜೋರಾಗಿ ತಿರುಗಿಸಬೇಡಿ, ಬದಲಿಗೆ ‘ಕಟ್ ಅಂಡ್ ಫೋಲ್ಡ್’ (Cut and Fold) ವಿಧಾನದಲ್ಲಿ ನಿಧಾನವಾಗಿ ಮಿಶ್ರಣ ಮಾಡಿ.
- ಬೇಕ್ ಮಾಡುವುದು: ಸಿದ್ಧವಾದ ಪಿಂಕ್ ಬ್ಯಾಟರ್ ಅನ್ನು ಎರಡು ಪಾತ್ರೆಗಳಿಗೆ ಸಮನಾಗಿ ಹಂಚಿ ಹಾಕಿ. ಪ್ರೀ-ಹೀಟ್ ಆದ ಓವನ್ನಲ್ಲಿ 180°C ನಲ್ಲಿ 30 ರಿಂದ 35 ನಿಮಿಷ ಬೇಕ್ ಮಾಡಿ. ಕೇಕ್ ಮಧ್ಯಕ್ಕೆ ಕಡ್ಡಿ ಚುಚ್ಚಿ ನೋಡಿದಾಗ ಅದು ಕ್ಲೀನ್ ಆಗಿ ಬಂದರೆ ಕೇಕ್ ಬೆಂದಿದೆ ಎಂದರ್ಥ. ನಂತರ ಅದನ್ನು ಸಂಪೂರ್ಣವಾಗಿ ತಣ್ಣಗಾಗಲು ಬಿಡಿ.
ಹಂತ 2: ಲೇಯರಿಂಗ್ ಮತ್ತು ಸ್ಟ್ರಾಬೆರಿ ಆಕಾರ ನೀಡುವುದು (Sculpting)
Strawberry-Shaped Cake
- ಕೇಕ್ ಕತ್ತರಿಸುವುದು: ಸಂಪೂರ್ಣ ತಣ್ಣಗಾದ ಕೇಕ್ನ ಮೇಲ್ಭಾhಗದ ಉಬ್ಬನ್ನು ಕತ್ತರಿಸಿ ಸಮತಟ್ಟು ಮಾಡಿ. ನಂತರ ಪ್ರತಿ ಕೇಕ್ ಅನ್ನು ಅಡ್ಡಲಾಗಿ ಎರಡು ಭಾಗಗಳಾಗಿ ಕತ್ತರಿಸಿ. ಈಗ ನಿಮ್ಮ ಬಳಿ ಒಟ್ಟು 4 ಲೇಯರ್ಗಳು ಇರುತ್ತವೆ.
- ಲೇಯರ್ ಜೋಡಣೆ: ಕೇಕ್ ಬೋರ್ಡ್ ಮೇಲೆ ಮೊದಲ ಲೇಯರ್ ಇಟ್ಟು, ಅದರ ಮೇಲೆ ಸ್ವಲ್ಪ ಶುಗರ್ ಸಿರಪ್ ಬ್ರಷ್ ಮಾಡಿ. ನಂತರ ವಿಪ್ಪಿಂಗ್ ಕ್ರೀಮ್ ಅನ್ನು ಸಮನಾಗಿ ಹರಡಿ, ಅದರ ಮೇಲೆ ಸ್ಟ್ರಾಬೆರಿ ಜಾಮ್ ಮತ್ತು ಕತ್ತರಿಸಿದ ತಾಜಾ ಸ್ಟ್ರಾಬೆರಿ ಚೂರುಗಳನ್ನು ಹಾಕಿ. ಇದೇ ರೀತಿ 4 ಲೇಯರ್ಗಳನ್ನು ಒಂದರ ಮೇಲೊಂದರಂತೆ ಜೋಡಿಸಿ.
- ಆಕಾರ ನೀಡುವುದು (Carving): ಜೋಡಿಸಿದ ಕೇಕ್ ಅನ್ನು 20 ನಿಮಿಷ ಫ್ರಿಡ್ಜ್ನಲ್ಲಿಡಿ (ಇದು ಕತ್ತರಿಸುವಾಗ ಕೇಕ್ ಪುಡಿಯಾಗದಂತೆ ತಡೆಯುತ್ತದೆ). ಈಗ ತೀಕ್ಷ್ಣವಾದ ಉದ್ದನೆಯ ಚಾಕುವನ್ನು ತೆಗೆದುಕೊಂಡು, ಕೇಕ್ನ ಮೇಲ್ಭಾಗದಿಂದ ಕೆಳಭಾಗಕ್ಕೆ ಇಳಿಜಾರಾಗಿ ಕತ್ತರಿಸುತ್ತಾ ಬನ್ನಿ. ಕೆಳಭಾಗದ ಲೇಯರ್ ಕಿರಿದಾಗಿರಬೇಕು ಮತ್ತು ಮೇಲ್ಭಾಗ ಅಗಲವಾಗಿರಬೇಕು. ಅಂದರೆ, ತಲೆಕೆಳಗಾದ ಶಂಕುವಿನಾಕಾರ (Inverted Cone) ಅಥವಾ ಸ್ಟ್ರಾಬೆರಿ ಹಣ್ಣಿನ ನೈಜ ಆಕಾರಕ್ಕೆ ಕೇಕ್ ಅನ್ನು ತರಬೇಕು.
- ಕ crumbs ಕೋಟ್: ಆಕಾರ ಬಂದ ನಂತರ, ಕೇಕ್ನ ಹೊರಭಾಗಕ್ಕೆ ವಿಪ್ಪಿಂಗ್ ಕ್ರೀಮ್ನ ಅತ್ಯಂತ ತೆಳುವಾದ ಲೇಯರ್ ಹಚ್ಚಿ (Crumble Coat). ಇದನ್ನು 45 ನಿಮಿಷಗಳ ಕಾಲ ಫ್ರಿಡ್ಜ್ನಲ್ಲಿ ಇಟ್ಟು ಗಟ್ಟಿಯಾಗಲು ಬಿಡಿ.
ಹಂತ 3: ಅಂತಿಮ ಅಲಂಕಾರ (Final Decoration)
Strawberry-Shaped Cake
- ಕೆಂಪು ಹೊದಿಕೆ: ನಿಮ್ಮ ಅಡುಗೆಮನೆಯ ಕೌಂಟರ್ ಟಾಪ್ ಮೇಲೆ ಸ್ವಲ್ಪ ಕಾರ್ನ್ಫ್ಲೋರ್ ಧೂಳೀಕರಿಸಿ, ಕೆಂಪು ಫೊಂಡೆಂಟ್ ಅನ್ನು ದೊಡ್ಡದಾಗಿ ಮತ್ತು ತೆಳುವಾಗಿ ಲಟ್ಟಿಸಿಕೊಳ್ಳಿ. ಇದನ್ನು ನಿಧಾನವಾಗಿ ಎತ್ತಿ ಫ್ರಿಡ್ಜ್ನಿಂದ ತೆಗೆದ ಕೇಕ್ನ ಮೇಲೆ ಸುರುಳಿಯಿಲ್ಲದಂತೆ ಹರಡಿ. ಕೈಗಳಿಂದ ಅಥವಾ ಫೊಂಡೆಂಟ್ ಸ್ಮೂದರ್ನಿಂದ ಕೇಕ್ನ ಆಕಾರಕ್ಕೆ ತಕ್ಕಂತೆ ಒತ್ತಿ ಸರಿಪಡಿಸಿ. ಕೆಳಗಿನ ಹೆಚ್ಚುವರಿ ಫೊಂಡೆಂಟ್ ಅನ್ನು ಕತ್ತರಿಸಿ ತೆಗೆಯಿರಿ.
- ಬೀಜಗಳ ಜೋಡಣೆ: ಸ್ಟ್ರಾಬೆರಿ ಹಣ್ಣಿನ ಮೇಲೆ ಸಣ್ಣ ಗುಂಡಿಗಳಿರುತ್ತವೆ. ಇದಕ್ಕಾಗಿ ಒಂದು ಸಣ್ಣ ಕಡ್ಡಿ ಅಥವಾ ಬ್ರಷ್ನ ಹಿಂಭಾಗದಿಂದ ಫೊಂಡೆಂಟ್ ಮೇಲೆ ಅಲ್ಲಲ್ಲಿ ಸಣ್ಣದಾಗಿ ಒತ್ತಿ ತಗ್ಗುಗಳನ್ನು ಮಾಡಿ. ಆ ತಗ್ಗುಗಳಿಗೆ ಸಣ್ಣ ಹನಿ ನೀರು ಹಚ್ಚಿ, ಹಳದಿ ಸ್ಪ್ರಿಂಕಲ್ಸ್ ಅಥವಾ ಬಿಳಿ ಎಳ್ಳನ್ನು ಒತ್ತಿ ಕೂರಿಸಿ. ಇದು ನಿಜವಾದ ಸ್ಟ್ರಾಬೆರಿ ಬೀಜಗಳಂತೆ ಕಾಣುತ್ತದೆ.
- ಹಸಿರು ಎಲೆ ಮತ್ತು ತೊಟ್ಟು: ಹಸಿರು ಫೊಂಡೆಂಟ್ ಲಟ್ಟಿಸಿ 5-6 ಚೂಪಾದ ಎಲೆಗಳ ಆಕಾರವನ್ನು ಕತ್ತರಿಸಿ. ಚಾಕುವಿನಿಂದ ಎಲೆಯ ನರಗಳ ಗೆರೆಗಳನ್ನು ಮೂಡಿಸಿ. ಇದನ್ನು ಕೇಕ್ನ ಮೇಲ್ಭಾಗದ ಮಧ್ಯದಲ್ಲಿ ಜೋಡಿಸಿ. ಮಧ್ಯದಲ್ಲಿ ಒಂದು ಸಣ್ಣ ಹಸಿರು ಫೊಂಡೆಂಟ್ ರೋಲ್ ಇಟ್ಟು ತೊಟ್ಟನ್ನು ಸಿದ್ಧಪಡಿಸಿ.
ಈಗ ನಿಮ್ಮ ಕಣ್ಣು ಮತ್ತು ನಾಲಿಗೆಗೆ ಹಬ್ಬ ನೀಡುವ ಅದ್ಭುತವಾದ ಸ್ಟ್ರಾಬೆರಿ ಶೇಪ್ ಕೇಕ್ ಸವಿಯಲು ಸಿದ್ಧವಾಗಿದೆ!
Strawberry-Shaped Cake
ಪ್ರೊ-ಟಿಪ್ಸ್ (ವಿಶೇಷ ಸೂಚನೆಗಳು):
- ಮಿರರ್ ಗ್ಲೇಸ್ ಪರ್ಯಾಯ: ನಿಮಗೆ ಫೊಂಡೆಂಟ್ ಬಳಸಲು ಕಷ್ಟ ಎನಿಸಿದರೆ, ಕೇಕ್ ಅನ್ನು ಕ್ರೀಮ್ನಿಂದ ಸಂಪೂರ್ಣ ನಯಗೊಳಿಸಿ ಫ್ರೀಜರ್ನಲ್ಲಿ ಗಟ್ಟಿಯಾಗಿಸಿ, ಅದರ ಮೇಲೆ ಕೆಂಪು ಬಣ್ಣದ ‘ರೆಡ್ ಮಿರರ್ ಗ್ಲೇಸ್’ (Red Mirror Glaze) ಸುರಿಯಬಹುದು. ಇದು ಚಿತ್ರದಲ್ಲಿರುವಂತೆ ಹೊಳೆಯುವ ಮತ್ತು ಜೆಲ್ಲಿಯಂತಹ ಲುಕ್ ನೀಡುತ್ತದೆ.
- ಸ್ಥಿರತೆಗಾಗಿ: ಸ್ಟ್ರಾಬೆರಿ ಆಕಾರವು ಕೆಳಗೆ ಕಿರಿದಾಗಿರುವುದರಿಂದ ಕೇಕ್ ಬಿದ್ದುಹೋಗುವ ಸಾಧ್ಯತೆ ಇರುತ್ತದೆ. ಆದ್ದರಿಂದ ಲೇಯರ್ ಜೋಡಿಸುವಾಗಲೇ ಮಧ್ಯದಲ್ಲಿ ಒಂದು ಉದ್ದನೆಯ ಮರದ ಕಡ್ಡಿ (Wooden Dowel) ಅಥವಾ ದಪ್ಪ ಸ್ಟ್ರಾ ಚುಚ್ಚಿದರೆ ಕೇಕ್ ಗಟ್ಟಿಯಾಗಿ ನಿಲ್ಲುತ್ತದೆ.
Strawberry-Shaped Cake
Strawberry-Shaped Cake Https://my-dessertkitchen.com/3-layer-chocolate-mousse-cake-recipe/
“ಈ ಸುಂದರವಾದ ಮತ್ತು ರುಚಿಕರವಾದ ಸ್ಟ್ರಾಬೆರಿ ಆಕಾರದ ಕೇಕ್ ರೆಸಿಪಿ ನಿಮಗಷ್ಟೇ ಅಲ್ಲದೆ ನಿಮ್ಮವರಿಗೂ ಇಷ್ಟವಾಗಬಹುದು! ಇಂದೇ ಈ ರೆಸಿಪಿಯನ್ನು ನಿಮ್ಮ ಫ್ರೆಂಡ್ಸ್ ಮತ್ತು ಫ್ಯಾಮಿಲಿ ಜೊತೆ ಶೇರ್ ಮಾಡಿ, ಅವರಿಗೂ ಸರ್ಪ್ರೈಸ್ ನೀಡಲು ಪ್ರೋತ್ಸಾಹಿಸಿ.”