
Strawberry Https://my-dessertkitchen.com/3-layer-chocolate-mousse-cake-recipe/ Cheesecake Recipe
Mouth-Watering Classic Strawberry Cheesecake Recipe
Strawberry Cheesecake Recipe
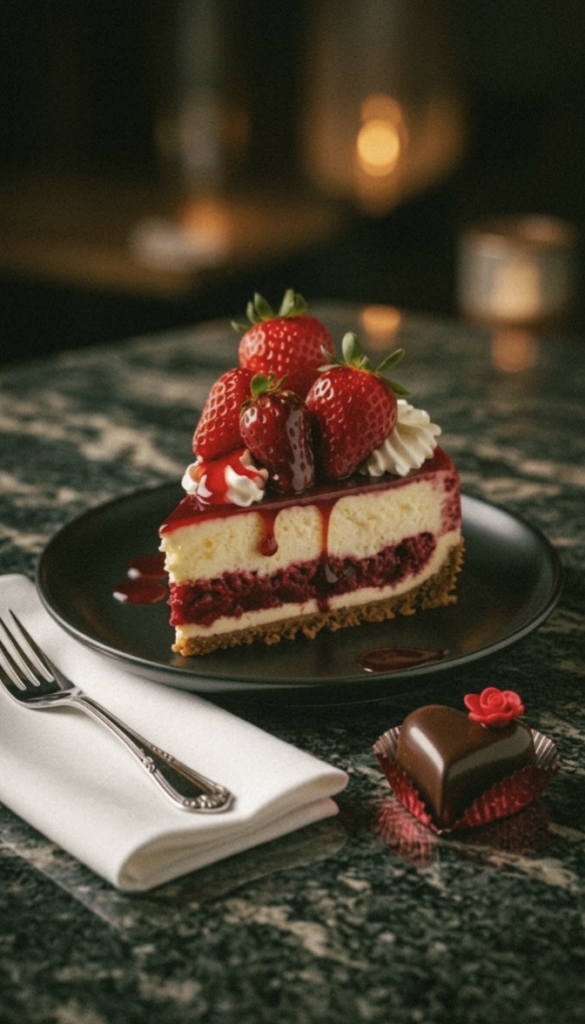
Who doesn’t love a good dessert? A creamy, velvety cheesecake with a sweet strawberry glaze dripping down the sides and topped with fresh strawberries is the ultimate treat. While it looks like it straight out of a premium bakery, you can actually make this beautiful dessert right at home!
In this blog post, we will walk you through a step-by-step guide to making a perfect baked Strawberry Cheesecake, inspired by the gorgeous presentation in 1000298999.jpg.
The Three Layers of a Perfect Cheesecake
To master a cheesecake, we need to focus on three distinct parts:
- The Crust: The crunchy, buttery biscuit base at the bottom.
- The Filling: The smooth, rich, and creamy center made with cream cheese.
- The Topping: The vibrant strawberry sauce and fresh fruit that bring the whole dessert together.
Ingredients
Strawberry Cheesecake Recipe
1. For the Crust:
- Graham Crackers or Digestive Biscuits: 15-18 biscuits (crushed into fine crumbs)
- Unsalted Butter: 5-6 tbsp (melted)
- Sugar: 2 tbsp (optional)
2. For the Cream Cheese Filling:
Strawberry Cheesecake Recipe
- Cream Cheese: 450g (must be at room temperature)
- Powdered Sugar: 1 cup
- Sour Cream or Thick Hung Curd: 1/2 cup
- Vanilla Extract: 1 tsp
- Eggs: 2 large (at room temperature) (Note: If making it eggless, substitute eggs with 1/2 cup heavy cream and 2 tbsp cornstarch).
- Fresh Strawberry Puree (for the middle layer): 1/2 cup
3. For the Strawberry Glaze & Decoration:
- Fresh Strawberries: 1 cup (finely chopped)
- Sugar: 1/4 cup
- Lemon Juice: 1 tsp
- Whipped Cream: For piping decorations
Step-by-Step Instructions
Strawberry Cheesecake Recipe
Step 1: Prepare the Crust
Strawberry Cheesecake Recipe
- Place the biscuits in a ziplock bag and crush them with a rolling pin (or pulse them in a food processor) until they turn into fine crumbs.
- Transfer the crumbs to a bowl, add the melted butter (and sugar if using), and mix well. The texture should resemble wet sand.
- Lightly grease a Springform Pan with butter. Press the biscuit mixture firmly and evenly into the bottom of the pan using the back of a glass or measuring cup.
- Place the pan in the refrigerator for 10 minutes to set. Meanwhile, preheat your oven to 160°C.
Step 2: Make the Creamy Filling
- In a large bowl, beat the room-temperature cream cheese using an electric hand mixer or a whisk until it is completely smooth and creamy.
- Add the powdered sugar and beat again until the sugar is fully incorporated and no lumps remain.
- Add the sour cream (or hung curd) and vanilla extract. Mix gently on low speed. Tip: Do not over-mix at this stage to avoid trapping too much air, which causes cracks during baking.
- Add the eggs one at a time, mixing just until combined (fold gently).
Step 3: Layering and Baking
- To achieve the beautiful hidden strawberry layer inside the cheesecake as shown in 1000298999.jpg, pour half of the cream cheese filling over the chilled biscuit crust.
- Gently spread the strawberry puree or thick strawberry jam over this layer.
- Carefully pour the remaining cream cheese filling on top and smooth the surface with a spatula.
- Water Bath Method (Highly Recommended): Wrap the outside of your springform pan securely with 2-3 layers of aluminum foil to prevent water from seeping in. Place it inside a larger roasting pan. Pour hot water into the roasting pan until it reaches halfway up the sides of the cake pan.
- Bake at 160°C for 50 to 60 minutes. The edges should be set, but the center should still have a slight jiggle.
- Turn off the oven, prop the oven door slightly open, and let the cheesecake cool inside the oven for 1 hour.
- Remove it, let it come to room temperature, and then chill it in the refrigerator for at least 4-6 hours (preferably overnight).
Step 4: Make the Strawberry Glaze
- In a saucepan, combine the chopped strawberries, sugar, and lemon juice over medium heat.
- Cook for 8-10 minutes, stirring frequently, until the strawberries break down and the sauce thickens into a glossy glaze.
- Remove from heat and let it cool completely before using.
How to Assemble and Serve
Strawberry Cheesecake Recipe
Once the cheesecake is thoroughly chilled, gently run a knife around the edges and open the springform pan. Now, let’s replicate the beautiful look from 1000298999.jpg:
- Spoon the cooled strawberry glaze over the top of the cheesecake, letting a few dramatic drips run down the sides.
- Fill a piping bag fitted with a star tip with whipped cream and pipe elegant rosettes around the top edge.
- Garnish with whole or halved glossy, fresh red strawberries right on top of the cream.
Pro-Tip for Cutting: Dip a sharp knife in hot water and wipe it clean before making each slice. This gives you those clean, restaurant-style, picture-perfect cake slices!
Quick Pro-Tips for Success
Strawberry Cheesecake Recipe
- Always use Room Temp Ingredients: Cold cream cheese or cold eggs will result in a lumpy batter.
- Don’t Rush the Cooling: Cooling the cake slowly in the oven and letting it set overnight in the fridge is the secret to that dense, silky texture.
Happy Baking! Share your thoughts and let me know how your cheesecake turned out in the comments below!
ಬಾಯಿಯಲ್ಲಿ ನೀರೂರಿಸುವ ಕ್ಲಾಸಿಕ್ ಸ್ಟ್ರಾಬೆರಿ ಚೀಸ್ಕೇಕ್ ರೆಸಿಪಿ (Strawberry Cheesecake Recipe)
Strawberry Cheesecake Recipe
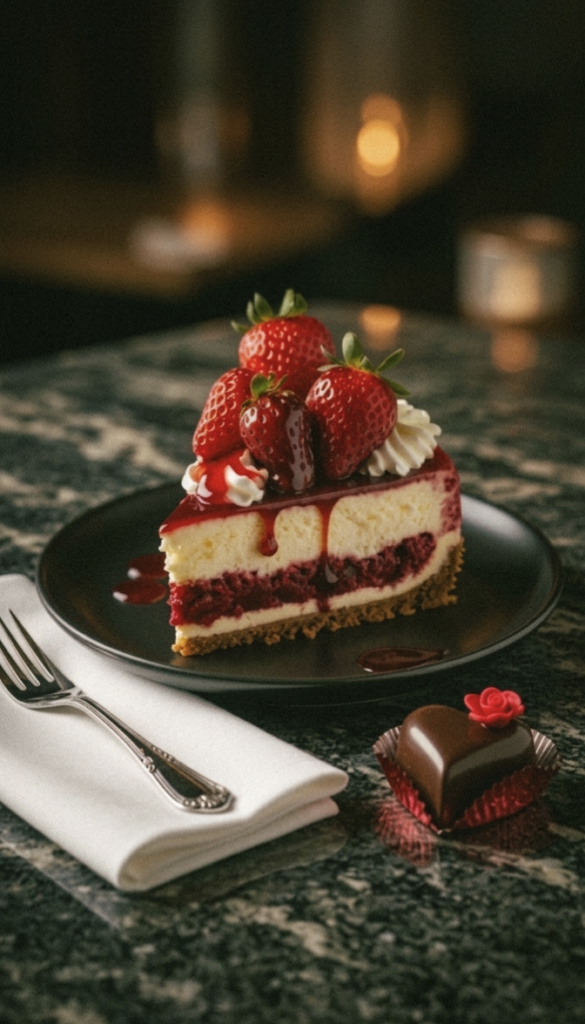
ಸ್ವೀಟ್ಸ್ ಎಂದರೆ ಯಾರಿಗೆ ತಾನೇ ಇಷ್ಟವಿಲ್ಲ ಹೇಳಿ? ಅದರಲ್ಲೂ ಮೃದುವಾದ, ಕೆನೆಯುಕ್ತ ಚೀಸ್ಕೇಕ್ ಮೇಲೊಂದು ಸಿಹಿಯಾದ ಸ್ಟ್ರಾಬೆರಿ ಸಿರಪ್ ಮತ್ತು ತಾಜಾ ಸ್ಟ್ರಾಬೆರಿ ಹಣ್ಣುಗಳಿದ್ದರೆ ಅದರ ಮಜಾವೇ ಬೇರೆ. ಬೇಕರಿ ಅಥವಾ ದೊಡ್ಡ ರೆಸ್ಟೋರೆಂಟ್ಗಳಲ್ಲಿ ಮಾತ್ರ ಸಿಗುವ ಈ ಅದ್ಭುತ ಡೆಸರ್ಟ್ ಅನ್ನು ನೀವು ಮನೆಯಲ್ಲೇ ಅತ್ಯಂತ ಸುಲಭವಾಗಿ ತಯಾರಿಸಬಹುದು.
ಇಂದಿನ ಬ್ಲಾಗ್ನಲ್ಲಿ, ಯಾವುದೇ ತಪ್ಪುಗಳಿಲ್ಲದೆ, ಪರ್ಫೆಕ್ಟ್ ಆಗಿ “ಬೇಕ್ ಮಾಡಿದ ಸ್ಟ್ರಾಬೆರಿ ಚೀಸ್ಕೇಕ್” ಮಾಡುವುದು ಹೇಗೆ ಎಂಬುದನ್ನು ಹಂತ-ಹಂತವಾಗಿ ತಿಳಿದುಕೊಳ್ಳೋಣ.
ಚೀಸ್ಕೇಕ್ನ ಮೂರು ಮುಖ್ಯ ಹಂತಗಳು
Strawberry Cheesecake Recipe
ಒಂದು ಉತ್ತಮ ಚೀಸ್ಕೇಕ್ ತಯಾರಿಸಲು ನಾವು ಪ್ರಮುಖವಾಗಿ ಮೂರು ಭಾಗಗಳ ಕಡೆಗೆ ಗಮನ ಹರಿಸಬೇಕು:
- ಕ್ರಸ್ಟ್ (Crust): ಬಿಸ್ಕೆಟ್ಗಳಿಂದ ಮಾಡಲ್ಪಟ್ಟ ಕೆಳಗಿನ ಗರಿಗರಿಯಾದ ಪದರ.
- ಫಿಲ್ಲಿಂಗ್ (Filling): ಕ್ರೀಮ್ ಚೀಸ್ ಮತ್ತು ಮೊಟ್ಟೆ/ಕ್ರೀಮ್ನಿಂದ ಮಾಡಲ್ಪಟ್ಟ ಮಧ್ಯದ ಮೃದುವಾದ ಪದರ.
- ಟಾಪಿಂಗ್ (Topping): ಚೀಸ್ಕೇಕ್ನ ಅಂದ ಹಾಗೂ ರುಚಿ ಹೆಚ್ಚಿಸುವ ಸ್ಟ್ರಾಬೆರಿ ಗ್ಲೇಜ್ ಅಥವಾ ಸಿರಪ್.
ಬೇಕಾಗುವ ಸಾಮಗ್ರಿಗಳು (Ingredients)
Strawberry Cheesecake Recipe
1. ಬೇಸ್ ಅಥವಾ ಕ್ರಸ್ಟ್ ಮಾಡಲು:
- ಗ್ರಾಹಂ ಕ್ರಾಕರ್ಸ್ ಅಥವಾ ಡೈಜೆಸ್ಟಿವ್ ಬಿಸ್ಕೆಟ್: 15-18 ಬಿಸ್ಕೆಟ್ಗಳು (ಪುಡಿ ಮಾಡಿದ್ದು)
- ಕರಗಿಸಿದ ಬೆಣ್ಣೆ (Unsalted Butter): 5-6 ಟೇಬಲ್ ಚಮಚ
- ಸಕ್ಕರೆ: 2 ಟೇಬಲ್ ಚಮಚ (ಐಚ್ಛಿಕ)
2. ಚೀಸ್ಕೇಕ್ ಫಿಲ್ಲಿಂಗ್ ಮಾಡಲು:
- ಕ್ರೀಮ್ ಚೀಸ್ (Cream Cheese): 450 ಗ್ರಾಂ (ಕೋಣೆಯ ಉಷ್ಣಾಂಶದಲ್ಲಿರಬೇಕು – Room Temperature)
- ಸಕ್ಕರೆ ಪುಡಿ: 1 ಕಪ್
- ಹುಳಿ ಕ್ರೀಮ್ (Sour Cream) ಅಥವಾ ಗಟ್ಟಿ ಮೊಸರು (Hung Curd): 1/2 ಕಪ್
- ವೆನಿಲ್ಲಾ ಎಸೆನ್ಸ್: 1 ಟೀಚಮಚ
- ಮೊಟ್ಟೆಗಳು: 2 (ಕೋಣೆಯ ಉಷ್ಣಾಂಶದಲ್ಲಿರಬೇಕು) (ಗಮನಿಸಿ: ಮೊಟ್ಟೆ ಬಳಸದಿದ್ದರೆ 1/2 ಕಪ್ ಗಟ್ಟಿ ಕ್ರೀಮ್ ಮತ್ತು 2 ಚಮಚ ಕಾರ್ನ್ಫ್ಲೋರ್ ಬಳಸಿ)
- ತಾಜಾ ಸ್ಟ್ರಾಬೆರಿ ಪ್ಯೂರಿ (ಮಧ್ಯದ ಲೇಯರ್ಗಾಗಿ): 1/2 ಕಪ್
3. ಸ್ಟ್ರಾಬೆರಿ ಸಿರಪ್ ಮತ್ತು ಅಲಂಕಾರಕ್ಕೆ:
Strawberry Cheesecake Recipe
- ತಾಜಾ ಸ್ಟ್ರಾಬೆರಿ: 1 ಕಪ್ (ಚಿಕ್ಕದಾಗಿ ಹೆಚ್ಚಿದ್ದು)
- ಸಕ್ಕರೆ: 1/4 ಕಪ್
- ನಿಂಬೆ ರಸ: 1 ಟೀಚಮಚ
- ವಿಪ್ಡ್ ಕ್ರೀಮ್ (Whipped Cream): ಅಲಂಕಾರಕ್ಕಾಗಿ
ತಯಾರಿಸುವ ವಿಧಾನ (Step-by-Step Instructions)
ಹಂತ 1: ಕ್ರಸ್ಟ್ ಸಿದ್ಧಪಡಿಸುವುದು
Strawberry Cheesecake Recipe
- ಮೊದಲು ಡೈಜೆಸ್ಟಿವ್ ಬಿಸ್ಕೆಟ್ಗಳನ್ನು ಒಂದು ಜಿಪ್ಲಾಕ್ ಬ್ಯಾಗ್ನಲ್ಲಿ ಹಾಕಿ ಅಥವಾ ಮಿಕ್ಸಿಯಲ್ಲಿ ಹಾಕಿ ಚೆನ್ನಾಗಿ ಪುಡಿ ಮಾಡಿಕೊಳ್ಳಿ. ಪುಡಿ ತೀರಾ ನುಣ್ಣಗಿರಬಾರದು, ಸ್ವಲ್ಪ ರವೆಯಂತಿರಬೇಕು.
- ಈ ಬಿಸ್ಕೆಟ್ ಪುಡಿಗೆ ಕರಗಿಸಿದ ಬೆಣ್ಣೆ ಮತ್ತು ಸಕ್ಕರೆ ಸೇರಿಸಿ ಚೆನ್ನಾಗಿ ಮಿಶ್ರಣ ಮಾಡಿ. ಮಿಶ್ರಣವು ಒದ್ದೆ ಮರಳಿನ ಹದಕ್ಕೆ ಬರಬೇಕು.
- ಈಗ ಒಂದು ಸ್ಪ್ರಿಂಗ್ಫಾರ್ಮ್ ಕೇಕ್ ಪ್ಯಾನ್ (Springform Pan) ತೆಗೆದುಕೊಂಡು, ಅದಕ್ಕೆ ಬೆಣ್ಣೆ ಸವರಿ. ಸಿದ್ಧಪಡಿಸಿದ ಬಿಸ್ಕೆಟ್ ಮಿಶ್ರಣವನ್ನು ಪ್ಯಾನ್ನ ತಳಕ್ಕೆ ಹಾಕಿ, ಲೋಟದ ಹಿಂಭಾಗದಿಂದ ಚೆನ್ನಾಗಿ ಒತ್ತಿ ಸಮತಟ್ಟಾಗಿ ಮಾಡಿ.
- ಇದನ್ನು 10 ನಿಮಿಷಗಳ ಕಾಲ ಫ್ರಿಡ್ಜ್ನಲ್ಲಿ ಇಡಿ. ಇದರಿಂದ ಕ್ರಸ್ಟ್ ಚೆನ್ನಾಗಿ ಸೆಟ್ ಆಗುತ್ತದೆ. ಒವನ್ ಅನ್ನು 160°C ಗೆ ಪ್ರೀ-ಹೀಟ್ ಮಾಡಿ.
ಹಂತ 2: ಕ್ರೀಮಿ ಫಿಲ್ಲಿಂಗ್ ಮಾಡುವುದು
- ಒಂದು ದೊಡ್ಡ ಬೌಲ್ನಲ್ಲಿ ಕೋಣೆಯ ಉಷ್ಣಾಂಶದಲ್ಲಿರುವ ಕ್ರೀಮ್ ಚೀಸ್ ಅನ್ನು ಎಲೆಕ್ಟ್ರಿಕ್ ಬೀಟರ್ ಅಥವಾ ವಿಸ್ಕರ್ ಬಳಸಿ ಮೃದುವಾಗುವವರೆಗೆ (Smooth) ಚೆನ್ನಾಗಿ ಬ್ಲೆಂಡ್ ಮಾಡಿ.
- ಇದಕ್ಕೆ ಸಕ್ಕರೆ ಪುಡಿಯನ್ನು ಸೇರಿಸಿ, ಸಕ್ಕರೆ ಸಂಪೂರ್ಣವಾಗಿ ಕರಗುವವರೆಗೆ ಬೀಟ್ ಮಾಡಿ.
- ನಂತರ ಹುಳಿ ಕ್ರೀಮ್ (ಅಥವಾ ಗಟ್ಟಿ ಮೊಸರು) ಮತ್ತು ವೆನಿಲ್ಲಾ ಎಸೆನ್ಸ್ ಸೇರಿಸಿ ನಿಧಾನವಾಗಿ ಮಿಶ್ರಣ ಮಾಡಿ. ತೀರಾ ಜೋರಾಗಿ ಬೀಟ್ ಮಾಡಬೇಡಿ, ಇದರಿಂದ ಏರ್ ಬಬಲ್ಸ್ ಉಂಟಾಗಿ ಕೇಕ್ ಬಿರುಕು ಬಿಡಬಹುದು.
- ಈಗ ಒಂದೊಂದೇ ಮೊಟ್ಟೆಯನ್ನು ಸೇರಿಸುತ್ತಾ, ಮಿಶ್ರಣವು ಒಂದಾಗುವವರೆಗೆ ಮಾತ್ರ ನಿಧಾನವಾಗಿ ಬೀಟ್ ಮಾಡಿ (Fold ಮಾಡಿ).
ಹಂತ 3: ಲೇಯರಿಂಗ್ ಮತ್ತು ಬೇಕಿಂಗ್
- ಚಿತ್ರ “1000298999.jpg” ನಲ್ಲಿರುವಂತೆ ಮಧ್ಯದಲ್ಲಿ ಸ್ಟ್ರಾಬೆರಿ ಲೇಯರ್ ಬರಬೇಕಾದರೆ, ಮೊದಲು ಸಿದ್ಧಪಡಿಸಿದ ಕ್ರೀಮ್ ಚೀಸ್ ಮಿಶ್ರಣದ ಅರ್ಧ ಭಾಗವನ್ನು ಬಿಸ್ಕೆಟ್ ಕ್ರಸ್ಟ್ ಮೇಲೆ ಹಾಕಿ.
- ಅದರ ಮೇಲೆ ಸ್ವಲ್ಪ ಸ್ಟ್ರಾಬೆರಿ ಪ್ಯೂರಿ ಅಥವಾ ಜ್ಯಾಮ್ ಅನ್ನು ಹರಡಿ. ನಂತರ ಉಳಿದ ಕ್ರೀಮ್ ಚೀಸ್ ಮಿಶ್ರಣವನ್ನು ಮೇಲಿಂದ ಹಾಕಿ ಸಮ ಮಾಡಿ.
- ಚೀಸ್ಕೇಕ್ ಅನ್ನು ‘ವಾಟರ್ ಬಾತ್’ (Water Bath) ವಿಧಾನದಲ್ಲಿ ಬೇಕ್ ಮಾಡುವುದು ಸೂಕ್ತ. ಇದಕ್ಕಾಗಿ ಕೇಕ್ ಪ್ಯಾನ್ನ ಹೊರಭಾಗಕ್ಕೆ ಅಲ್ಯೂಮಿನಿಯಂ ಫಾಯಿಲ್ ಅನ್ನು ಚೆನ್ನಾಗಿ ಸುತ್ತಿ (ನೀರು ಒಳಗೆ ಹೋಗದಂತೆ).
- ಒಂದು ದೊಡ್ಡ ಬೇಕಿಂಗ್ ಟ್ರೇಯೊಳಗೆ ಈ ಕೇಕ್ ಪ್ಯಾನ್ ಇಟ್ಟು, ಟ್ರೇಗೆ ಬಿಸಿ ನೀರನ್ನು ಹಾಕಿ. ಇದನ್ನು 160°C ಉಷ್ಣಾಂಶದಲ್ಲಿ 50 ರಿಂದ 60 ನಿಮಿಷಗಳ ಕಾಲ ಬೇಕ್ ಮಾಡಿ.
- ಬೇಕ್ ಆದ ನಂತರ ಒವನ್ ಆಫ್ ಮಾಡಿ, ಒವನ್ ಬಾಗಿಲನ್ನು ಸ್ವಲ್ಪ ತೆರೆದು 1 ಗಂಟೆ ಕಾಲ ಕೇಕ್ ಅನ್ನು ಒವನ್ ಒಳಗಡೆಯೇ ತಣ್ಣಗಾಗಲು ಬಿಡಿ. ನಂತರ ಹೊರಗೆ ತೆಗೆದು ಕನಿಷ್ಠ 4-6 ಗಂಟೆ ಅಥವಾ ಇಡೀ ರಾತ್ರಿ ಫ್ರಿಡ್ಜ್ನಲ್ಲಿ ಇಟ್ಟು ತಣ್ಣಗಾಗಿಸಿ.
ಹಂತ 4: ಸ್ಟ್ರಾಬೆರಿ ಗ್ಲೇಜ್/ಸಿರಪ್ ತಯಾರಿ
- ಒಂದು ಪಾತ್ರೆಯಲ್ಲಿ ಹೆಚ್ಚಿದ ಸ್ಟ್ರಾಬೆರಿ, ಸಕ್ಕರೆ ಮತ್ತು ನಿಂಬೆ ರಸವನ್ನು ಹಾಕಿ ಮಧ್ಯಮ ಉರಿಯಲ್ಲಿ ಬೇಯಿಸಿ.
- ಸ್ಟ್ರಾಬೆರಿ ಮೃದುವಾಗಿ, ಸಿರಪ್ ಗಟ್ಟಿಯಾಗುವವರೆಗೆ (ಸುಮಾರು 8-10 ನಿಮಿಷ) ಕುದಿಸಿ. ನಂತರ ಇದನ್ನು ಸಂಪೂರ್ಣವಾಗಿ ತಣ್ಣಗಾಗಲು ಬಿಡಿ.
ಸರ್ವಿಂಗ್ ಮಾಡುವ ವಿಧಾನ (How to Serve)
Strawberry Cheesecake Recipe
ಫ್ರಿಡ್ಜ್ನಿಂದ ತಣ್ಣಗಾದ ಚೀಸ್ಕೇಕ್ ಅನ್ನು ಹೊರಗೆ ತೆಗೆಯಿರಿ. ಸ್ಪ್ರಿಂಗ್ಫಾರ್ಮ್ ಪ್ಯಾನ್ನಿಂದ ಕೇಕ್ ಅನ್ನು ನಿಧಾನವಾಗಿ ಬಿಡಿಸಿ. ಚಿತ್ರ “1000298999.jpg” ನಲ್ಲಿ ತೋರಿಸಿರುವಂತೆ:
- ಕೇಕ್ನ ಮೇಲ್ಭಾಗಕ್ಕೆ ಸಿದ್ಧಪಡಿಸಿದ ಸ್ಟ್ರಾಬೆರಿ ಸಿರಪ್ ಅನ್ನು ಸುಂದರವಾಗಿ ಹರಡಿ, ಅದು ಬದಿಗಳಲ್ಲಿ ಹರಿಯುವಂತೆ (Drip) ಮಾಡಿ.
- ಐಸಿಂಗ್ ಬ್ಯಾಗ್ ಬಳಸಿ ವಿಪ್ಡ್ ಕ್ರೀಮ್ನಿಂದ ಸಣ್ಣ ರೋಸೆಟ್ಗಳನ್ನು (ಫ್ಲವರ್ಸ್) ಮಾಡಿ.
- ಅದರ ಮೇಲೆ ತಾಜಾ, ಕೆಂಪು ಸ್ಟ್ರಾಬೆರಿ ಹಣ್ಣುಗಳನ್ನು ಜೋಡಿಸಿ ಅಲಂಕರಿಸಿ.
ಈಗ ಚಾಕುವನ್ನು ಸ್ವಲ್ಪ ಬಿಸಿ ನೀರಿನಲ್ಲಿ ಮುಳುಗಿಸಿ ಒರೆಸಿ, ಕೇಕ್ ಅನ್ನು ಸ್ಲೈಸ್ ಮಾಡಿ ಸರ್ವ್ ಮಾಡಿ.
ಪ್ರಮುಖ ಸಲಹೆಗಳು (Pro-Tips for Perfect Cheesecake)
Strawberry Cheesecake Recipe
- ಕೋಣೆಯ ಉಷ್ಣಾಂಶ (Room Temperature): ಕ್ರೀಮ್ ಚೀಸ್ ಮತ್ತು ಮೊಟ್ಟೆಗಳು ತಣ್ಣಗಿರಬಾರದು. ಇಲ್ಲದಿದ್ದರೆ ಮಿಶ್ರಣದಲ್ಲಿ ಗಂಟುಗಳಾಗುತ್ತವೆ (Lumps).
- ಹೆಚ್ಚು ಬೀಟ್ ಮಾಡಬೇಡಿ: ಮೊಟ್ಟೆಗಳನ್ನು ಸೇರಿಸಿದ ನಂತರ ಅತಿಯಾಗಿ ಮಿಕ್ಸ್ ಮಾಡಬೇಡಿ.
- ತಾಳ್ಮೆ ಮುಖ್ಯ: ಚೀಸ್ಕೇಕ್ ಬಿಸಿಯಾಗಿದ್ದಾಗ ತಿನ್ನಲು ಚೆನ್ನಾಗಿರುವುದಿಲ್ಲ. ಕನಿಷ್ಠ 6 ಗಂಟೆ ಫ್ರಿಡ್ಜ್ನಲ್ಲಿ ಇಟ್ಟಾಗ ಮಾತ್ರ ಅದಕ್ಕೆ ಪರ್ಫೆಕ್ಟ್ ಆದ ಟೆಕ್ಸ್ಚರ್ ಸಿಗುತ್ತದೆ.
ಖಂಡಿತವಾಗಿಯೂ ಈ ರೆಸಿಪಿ ನಿಮ್ಮ ಮನೆಯಲ್ಲಿ ಎಲ್ಲರಿಗೂ ಇಷ್ಟವಾಗುತ್ತದೆ. ನೀವೂ ಇದನ್ನು ಪ್ರಯತ್ನಿಸಿ, ನಿಮ್ಮ ಅನುಭವವನ್ನು ಕಮೆಂಟ್ ಮೂಲಕ ಹಂಚಿಕೊಳ್ಳಿ! ನಿಮ್ಮ ಬ್ಲಾಗ್ ಓದುಗರಿಗೆ ಹ್ಯಾಪಿ ಬೇಕಿಂಗ್
Strawberry Cheesecake https://en.wikipedia.org/wiki/Blueberry Recipe