
Homemade Gourmet Desserts
Welcome to Dessert Kitchen! Today I am sharing an amazing raspberry chocolate tart recipe that is easy and delicious.”
Easy Raspberry Chocolate Tart Recipe: A No-Bake Delight
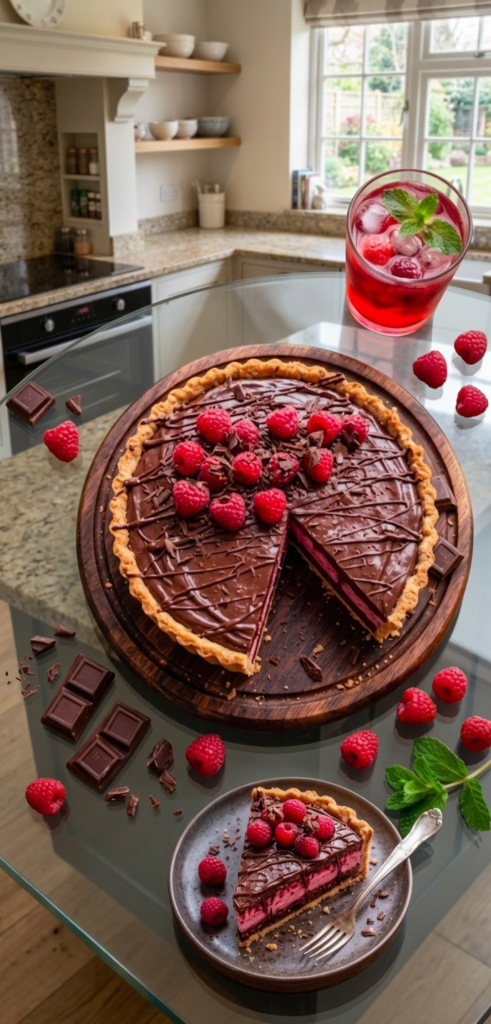
The Ultimate Raspberry Chocolate Tart Recipe: A Perfect Dessert Harmony
Welcome back to Dessert Kitchen! Today, I am sharing a recipe that is as elegant as it is delicious: the Raspberry Chocolate Tart. There is something magical about the combination of silky dark chocolate ganache and the tart, vibrant burst of fresh raspberries.
Whether you are hosting a dinner party or just want to treat yourself, this tart is a showstopper. The best part? It’s a No-Bake recipe, meaning you can achieve bakery-style results without even turning on your oven!
1. Why You’ll Love This Recipe
This Raspberry Chocolate Tart Recipe is designed for simplicity and luxury. Here is why it belongs on your “must-make” list:
- No-Bake Ease: Perfect for hot days or when you don’t want to deal with oven temperatures.
- Contrasting Flavors: The rich, slightly bitter dark chocolate perfectly balances the sweet and acidic raspberries.
- Stunning Presentation: The deep chocolate brown against the bright red berries makes it look like a professional creation.
2. The Essential Ingredients Checklist
For the best results, use high-quality ingredients, especially the chocolate.
Best Raspberry Dessert
A. For the Buttery Biscuit Crust:
- Chocolate Biscuits: 200g (Oreo or any dark chocolate biscuit works great).
- Unsalted Butter: 60-70g (melted). This acts as the “glue” for your base.
B. For the Silky Chocolate Ganache:
- Dark Chocolate: 250g (Look for at least 60% cocoa for a rich flavor).
- Heavy Cream: 150ml (This creates that melt-in-your-mouth texture).
- Vanilla Extract: 1 teaspoon (Adds a beautiful depth of aroma).
C. For the Toppings & Garnish:
- Fresh Raspberries: 1 cup (washed and dried carefully).
- Optional: Fresh mint leaves and chocolate shavings for decoration.
3. Step-by-Step Preparation Guide
Step 1: Preparing the Crust
Pulse your chocolate biscuits in a food processor until they turn into fine crumbs. Pour in the melted butter and mix until it feels like wet sand. Press this mixture firmly into the bottom and up the sides of a 9-inch tart pan. Use the back of a spoon to ensure it’s even. Chill in the refrigerator for at least 20 minutes to set.
Step 2: The Secret Raspberry Layer
Once the crust is firm, you can place a few whole raspberries across the bottom. For an extra punch of flavor, some bakers prefer a thin layer of raspberry jam, but fresh whole berries provide a better texture.
Step 3: Crafting the Perfect Ganache
Chop your chocolate into small, even pieces and place them in a heat-proof bowl. In a small saucepan, heat the heavy cream until it just begins to simmer (do not let it boil). Pour the hot cream over the chocolate and let it sit for 2 minutes. Gently whisk from the center outward until the mixture is glossy and smooth. Stir in the vanilla extract.
Step 4: Assembling the Tart
Pour the warm chocolate ganache over your biscuit base and raspberries. Gently tap the pan on the counter to release any air bubbles. Smooth the top with a spatula.
Step 5: Setting and Decoration
Place the tart in the fridge for at least 4-5 hours (overnight is best). Just before serving, decorate the top with fresh raspberries as seen in the photo. Add a few chocolate shavings or a sprig of mint for that professional touch.
4. Pro-Tips for a Flawless Tart
- Clean Slices: To get a perfect slice, dip your knife in hot water and wipe it dry before each cut.
- Room Temp: Let the tart sit at room temperature for 10-15 minutes before serving so the ganache softens slightly.
- Tart Pan: Use a tart pan with a removable bottom. It makes serving much easier and keeps the crust intact.
5. SEO Optimization for Your Blog
To make sure this recipe reaches more readers, remember to:
- Focus Keyword: Use “Raspberry Chocolate Tart Recipe” in your title and first paragraph.
- Alt Text: Label your main image as Step-by-step Raspberry Chocolate Tart Recipe.
- Internal Link: Link back to your previous popular post, the Chocolate Coconut Dream Cake Recipe.
- Meta Description: “This Easy No-Bake Raspberry Chocolate Tart Recipe is a decadent dessert featuring a chocolate biscuit crust, silky ganache, and fresh berries.”
Conclusion
This Raspberry Chocolate Tart is proof that you don’t need a lot of ingredients to make something spectacular. It’s rich, refreshing, and incredibly satisfying. Give it a try and let me know how it turned out in the comments below!
Happy Baking (or No-Baking!) from the Desse
https://my-dessertkitchen.com/chocolate-coconut-dream-cake-recipe/
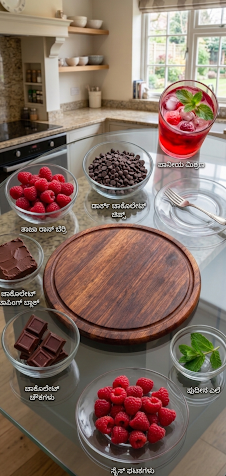
Eggless Tart Recip
The Ultimate Raspberry Chocolate Tart Recipe: A Perfect Dessert Harmony
ನಮಸ್ಕಾರ ಗೆಳೆಯರೇ! ಇಂದು ನಿಮ್ಮ Dessert Kitchen ಬ್ಲಾಗ್ನಲ್ಲಿ ನಾನು ಒಂದು ಅದ್ಭುತವಾದ ಮತ್ತು ಐಷಾರಾಮಿ ಡೆಸರ್ಟ್ ರೆಸಿಪಿಯನ್ನು ತಂದಿದ್ದೇನೆ. ಅದುವೇ “Raspberry Chocolate Tart”. ಡಾರ್ಕ್ ಚಾಕೊಲೇಟ್ನ ಕಹಿ ಮತ್ತು ರಾಸ್ಪ್ಬೆರಿ ಹಣ್ಣಿನ ಹುಳಿ-ಸಿಹಿ ರುಚಿ ಸೇರಿದಾಗ ಸಿಗುವ ಆ ಅನುಭವವೇ ಬೇರೆ. ಈ ಟಾರ್ಟ್ ನೋಡಲು ಎಷ್ಟು ಸುಂದರವೋ, ತಿನ್ನಲು ಅಷ್ಟೇ ರುಚಿಕರ.
ಈ ಲೇಖನದಲ್ಲಿ ನಾನು ನಿಮಗೆ ಹಂತ-ಹಂತವಾಗಿ ಈ ರೆಸಿಪಿಯನ್ನು ಹೇಗೆ ಮಾಡುವುದು ಮತ್ತು ಇದನ್ನು ಬ್ಲಾಗ್ನಲ್ಲಿ ಹಾಕುವಾಗ SEO ಸ್ಕೋರ್ ಹೆಚ್ಚಿಸಲು ಯಾವ ಟಿಪ್ಸ್ ಅನುಸರಿಸಬೇಕು ಎಂದು ತಿಳಿಸಿಕೊಡುತ್ತೇನೆ.
1. Introduction: Why You’ll Love This Recipe
ಈ Raspberry Chocolate Tart Recipe ಕೇವಲ ಹಬ್ಬ ಅಥವಾ ಪಾರ್ಟಿಗಳಿಗೆ ಮಾತ್ರವಲ್ಲ, ಮನೆಯಲ್ಲಿ ಸಣ್ಣ ಆಚರಣೆಗಳಿದ್ದರೂ ಸುಲಭವಾಗಿ ಮಾಡಬಹುದು. ಇದರ ವಿಶೇಷತೆ ಎಂದರೆ ಇದು ನೋಡಲು ಬೇಕರಿ ಸ್ಟೈಲ್ನಲ್ಲಿದ್ದರೂ, ಇದನ್ನು ತಯಾರಿಸಲು ಯಾವುದೇ ಓವನ್ (Oven) ಅಗತ್ಯವಿಲ್ಲ! ಹೌದು, ಇದು ಒಂದು “No-Bake” ಡೆಸರ್ಟ್ ಆಗಿದ್ದು, ಕೇವಲ 30 ನಿಮಿಷಗಳಲ್ಲಿ ಸಿದ್ಧವಾಗುತ್ತದೆ.
ತಾಜಾ ರಾಸ್ಪ್ಬೆರಿಗಳ ಕೆಂಪು ಬಣ್ಣ ಮತ್ತು ಡಾರ್ಕ್ ಚಾಕೊಲೇಟ್ನ ಗಾಢ ಬಣ್ಣದ ಸಂಯೋಜನೆ ನಿಮ್ಮ ಟೇಬಲ್ ಮೇಲೆ ಅದ್ಭುತವಾಗಿ ಕಾಣುತ್ತದೆ.
2. The Essential Ingredients Checklist
ಒಳ್ಳೆಯ ಡೆಸರ್ಟ್ ಮಾಡಬೇಕೆಂದರೆ ಪದಾರ್ಥಗಳ ಅಳತೆ ಸರಿಯಾಗಿರಬೇಕು. ಈ ರೆಸಿಪಿಗೆ ಬೇಕಾಗುವ ಮುಖ್ಯ ಪದಾರ್ಥಗಳು ಇಲ್ಲಿವೆ:
A. For the Buttery Biscuit Crust:
- Chocolate Biscuits: 200 grams (ನೀವು ಓರಿಯೊ ಅಥವಾ ಯಾವುದೇ ಡಾರ್ಕ್ ಚಾಕೊಲೇಟ್ ಬಿಸ್ಕತ್ತು ಬಳಸಬಹುದು).
- Unsalted Butter: 50-70 grams (ಕರಗಿಸಿದ್ದು). ಇದು ಬಿಸ್ಕತ್ತು ಪುಡಿಯನ್ನು ಗಟ್ಟಿಯಾಗಿ ಹಿಡಿದಿಡಲು ಸಹಾಯ ಮಾಡುತ್ತದೆ.
B. For the Silky Chocolate Ganache:
- Dark Chocolate: 250 grams (ಉತ್ತಮ ಗುಣಮಟ್ಟದ ಚಾಕೊಲೇಟ್ ಬಳಸಿ).
- Heavy Cream / Fresh Cream: 150ml (ಇದು ಗನಾಶ್ಗೆ ಮೃದುತ್ವ ನೀಡುತ್ತದೆ).
- Vanilla Extract: 1 teaspoon (ಉತ್ತಮ ಪರಿಮಳಕ್ಕಾಗಿ).
C. For the Fruity Layer & Toppings:
- Fresh Raspberries: 1 cup (ತಾಜಾ ಹಣ್ಣುಗಳು ಉತ್ತಮ ರುಚಿ ನೀಡುತ್ತವೆ).
- Chocolate Shavings: ಅಲಂಕಾರಕ್ಕಾಗಿ ಸ್ವಲ್ಪ ಚಾಕೊಲೇಟ್ ತುರಿ.
3. Step-by-Step Preparation Guide
Step 1: Preparing the Crust
ಮೊದಲಿಗೆ ಚಾಕೊಲೇಟ್ ಬಿಸ್ಕತ್ತುಗಳನ್ನು ಮಿಕ್ಸಿಯಲ್ಲಿ ಹಾಕಿ ನುಣ್ಣಗೆ ಪುಡಿ ಮಾಡಿ. ಈ ಪುಡಿಗೆ ಕರಗಿಸಿದ ಬೆಣ್ಣೆಯನ್ನು ಸೇರಿಸಿ ಚೆನ್ನಾಗಿ ಬೆರೆಸಿ. ಈಗ ಈ ಮಿಶ್ರಣವನ್ನು ಒಂದು ಟಾರ್ಟ್ ಪ್ಯಾನ್ (Tart Pan) ಗೆ ಹಾಕಿ, ಕೈಯಿಂದ ಅಥವಾ ಸ್ಪೂನ್ನಿಂದ ಸಮನಾಗಿ ಒತ್ತಿ ಹರಡಿ. ಸೈಡ್ಗಳಲ್ಲಿ ಕೂಡ ಸರಿಯಾಗಿ ಒತ್ತಿ. ಇದನ್ನು 20 ನಿಮಿಷಗಳ ಕಾಲ ಫ್ರಿಜ್ನಲ್ಲಿ ಇರಿಸಿ ಸೆಟ್ ಆಗಲು ಬಿಡಿ.
Step 2: Making the Raspberry Layer
ಬಿಸ್ಕತ್ತು ಲೇಯರ್ ಸೆಟ್ ಆದ ಮೇಲೆ, ಅದರ ಮೇಲೆ ಕೆಲವು ತಾಜಾ ರಾಸ್ಪ್ಬೆರಿಗಳನ್ನು ಹರಡಿ. ನಿಮಗೆ ಹೆಚ್ಚು ಹಣ್ಣಿನ ರುಚಿ ಬೇಕಿದ್ದರೆ, ರಾಸ್ಪ್ಬೆರಿಗಳನ್ನು ಸ್ವಲ್ಪ ಜೇನುತುಪ್ಪದೊಂದಿಗೆ ಮ್ಯಾಶ್ ಮಾಡಿ ಕೂಡ ಲೇಯರ್ ಮಾಡಬಹುದು.
Step 3: Crafting the Perfect Ganache
ಒಂದು ಪಾತ್ರೆಯಲ್ಲಿ ಫ್ರೆಶ್ ಕ್ರೀಮ್ ಬಿಸಿ ಮಾಡಿ (ಕುದಿಸಬೇಡಿ). ಈಗ ಕತ್ತರಿಸಿದ ಚಾಕೊಲೇಟ್ ಚೂರುಗಳ ಮೇಲೆ ಈ ಬಿಸಿ ಕ್ರೀಮ್ ಸುರಿಯಿರಿ. 2 ನಿಮಿಷ ಬಿಟ್ಟು ನಿಧಾನವಾಗಿ ಕಲಕುತ್ತಾ ಬನ್ನಿ. ಚಾಕೊಲೇಟ್ ಪೂರ್ತಿ ಕರಗಿ ಮೃದುವಾದ ಮಿಶ್ರಣವಾದಾಗ ವೆನಿಲ್ಲಾ ಎಸೆನ್ಸ್ ಸೇರಿಸಿ.
Step 4: Assembling the Tart
ಈಗ ಸಿದ್ಧಪಡಿಸಿದ ಚಾಕೊಲೇಟ್ ಗನಾಶ್ ಅನ್ನು ಬಿಸ್ಕತ್ತು ಬೇಸ್ ಮತ್ತು ರಾಸ್ಪ್ಬೆರಿಗಳ ಮೇಲೆ ನಿಧಾನವಾಗಿ ಸುರಿಯಿರಿ. ಟ್ಯಾಪ್ ಮಾಡುವ ಮೂಲಕ ಗಾಳಿಯ ಗುಳ್ಳೆಗಳನ್ನು ಹೋಗಲಾಡಿಸಿ. ಇದನ್ನು ಕನಿಷ್ಠ 4 ರಿಂದ 5 ಗಂಟೆಗಳ ಕಾಲ (ಅಥವಾ ರಾತ್ರಿ ಪೂರ್ತಿ) ಫ್ರಿಜ್ನಲ್ಲಿ ಇರಿಸಿ.
Step 5: The Final Decoration
ಟಾರ್ಟ್ ಪೂರ್ತಿ ಸೆಟ್ ಆದ ಮೇಲೆ ಫ್ರಿಜ್ನಿಂದ ಹೊರತೆಗೆಯಿರಿ. ಅದರ ಮೇಲೆ ಫೋಟೋದಲ್ಲಿ ತೋರಿಸಿರುವಂತೆ ತಾಜಾ ರಾಸ್ಪ್ಬೆರಿಗಳು, ಪುದೀನಾ ಎಲೆಗಳು ಮತ್ತು ಚಾಕೊಲೇಟ್ ತುಂಡುಗಳಿಂದ ಅಲಂಕರಿಸಿ.
4. Pro-Tips for the Best Results
- Quality Matters: ಉತ್ತಮವಾದ ಡಾರ್ಕ್ ಚಾಕೊಲೇಟ್ ಬಳಸುವುದರಿಂದ ಟಾರ್ಟ್ ರುಚಿ ದುಪ್ಪಟ್ಟಾಗುತ್ತದೆ.
- Remove with Care: ಟಾರ್ಟ್ ಅನ್ನು ಪ್ಯಾನ್ನಿಂದ ಹೊರತೆಗೆಯುವಾಗ ಅದು ಒಡೆಯದಂತೆ ಎಚ್ಚರವಹಿಸಿ. ಪ್ಯಾನ್ನ ತಳಭಾಗವನ್ನು ನಿಧಾನವಾಗಿ ಮೇಲಕ್ಕೆ ತಳ್ಳಿ.
- Alternative Fruits: ಒಂದು ವೇಳೆ ರಾಸ್ಪ್ಬೆರಿ ಸಿಗದಿದ್ದರೆ ನೀವು ಸ್ಟ್ರಾಬೆರಿ (Strawberry) ಕೂಡ ಬಳಸಬಹುದು.
Dessert Kitchen Recipes
If you enjoyed this recipe, don’t forget to check out my previous post on the Chocolate Coconut Dream Cake Recipe.”