
Chocolate Berry Donuts
Looking for an easy dessert? Check out this quick and delicious Chocolate Berry Donuts recipe made with fresh berries and rich marbled chocolate.
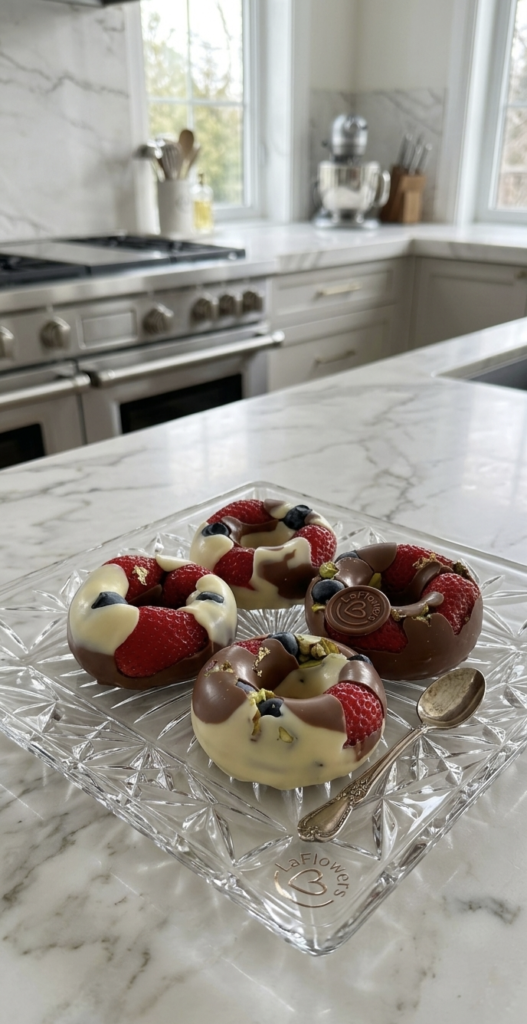
Double Chocolate Berry Donut Treats (No-Bake)
Chocolate Berry Donuts
This is a beautiful, healthy, and premium dessert made by combining fresh berries with melted white and milk chocolate in a donut mould. There is no baking required!
Chocolate https://my-dessertkitchen.com/homemade-raspberry-truffles/ Berry Donuts
Ingredients
1. Main Ingredients:
- Fresh Strawberries: 200g (washed, dried, and chopped into bite-sized pieces)
- Fresh Blueberries: 100g
- Pistachios: 2 tablespoons (finely chopped, for garnish)
2. For the Chocolate Coating:
- White Chocolate Compound: 150g
- Milk or Dark Chocolate Compound: 150g
- Coconut oil or Butter: 1 teaspoon (optional, to help melt the chocolate smoothly)
3. For Decoration (Optional):
- Edible Gold Foil/Leaf: To give it that luxury, cafe-style look.
4. Tools Needed:
- Silicone Donut Mould: Essential, as it allows the chocolate to pop out easily without breaking.
Step-by-Step Instructions
Step 1: Prepare the Berries
Wash the strawberries and blueberries thoroughly. Place them on a clean cotton cloth or paper towel and dry them completely.
Note: If there is any moisture or water left on the berries, the chocolate will not stick properly. Chop the strawberries into small, even pieces.
Step 2: Melt the Chocolate (Double Boiler Method)
Never melt chocolate directly over fire as it will burn. Instead, use the double boiler method:
- Boil some water in a saucepan. Place a heatproof glass or stainless steel bowl on top of the saucepan (the bottom of the bowl should not touch the water, only the steam).
- Add chopped white chocolate to the bowl and stir continuously until it melts completely smooth. Remove and set aside.
- Follow the same process in a separate bowl to melt the milk or dark chocolate. (Alternatively, you can melt them in a microwave in 30-second bursts).
Step 3: Layer the Fruits in the Mould
- Take your clean and dry silicone donut mould.
- To achieve the exact look in the picture, place the chopped strawberries, whole blueberries, and a few chopped pistachios neatly at the bottom of the cavities first.
Step 4: Create the Marble Chocolate Effect
- Take a spoon of melted white chocolate and a spoon of milk chocolate.
- Pour them alternately over the arranged berries to create a beautiful dual-toned, marbled pattern.
- Gently tap the mould on the counter a few times so the chocolate settles into all the gaps between the fruits.
- Smooth the top layer with the back of a spoon.
Step 5: Freeze to Set
- Place the filled silicone mould into the refrigerator (fridge) for 20 to 30 minutes, or until the chocolate is completely frozen and solid.
Step 6: Demould and Garnish
- Once completely set, gently peel back the silicone mould from the edges and push the donut treats out from the bottom. They will pop out effortlessly.
- Carefully apply tiny pieces of edible gold foil on top using a toothpick or tweezers for that final elegant touch. Your premium treats are ready to serve!
Pro-Tips for Success
- The Fruit Balance: The natural tartness/sourness of fresh strawberries cuts perfectly through the sweetness of the chocolate.
- Storage: Since this recipe uses fresh, raw fruit, keep them stored in an airtight container inside the refrigerator. Consume them within 2–3 days.
This dessert is perfect for parties, celebrations, or a quick fancy weekend treat!
ಬೇಕ್-ರಹಿತ ಚಾಕೊಲೇಟ್ ಬೆರ್ರಿ ಡೋನಟ್ಸ್
Chocolate Berry Donuts
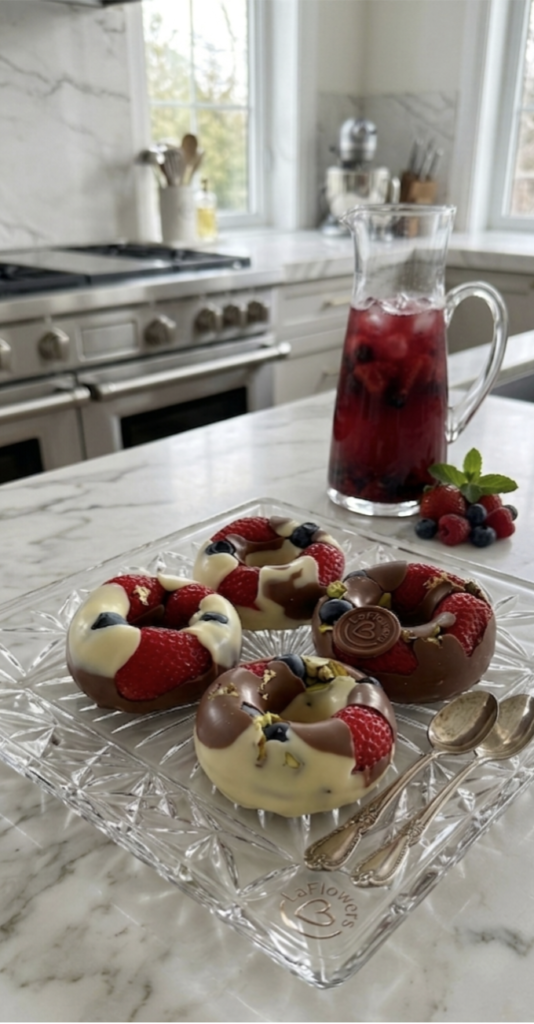
ಡಬಲ್ ಚಾಕೊಲೇಟ್ ಬೆರ್ರಿ ಡೋನಟ್ಸ್” (Chocolate-Coated Berry Ring Treats) ರೆಸಿಪಿಯನ್ನು ಸುಲಭವಾಗಿ ಮನೆಯಲ್ಲೇ ಹೇಗೆ ಮಾಡಬಹುದು ಎಂದು ವಿವರವಾಗಿ ತಿಳಿಸಿಕೊಡುತ್ತೇನೆ.
ಚಿತ್ರದಲ್ಲಿ ಕಾಣುತ್ತಿರುವುದು ಸಾಂಪ್ರದಾಯಿಕವಾಗಿ ಮೈದಾದಿಂದ ಬೇಕ್ ಮಾಡಿದ ಡೋನಟ್ಸ್ ಅಲ್ಲ. ಬದಲಿಗೆ, ತಾಜಾ ಹಣ್ಣುಗಳನ್ನು (ಸ್ಟ್ರಾಬೆರಿ, ಬ್ಲೂಬೆರಿ) ಒಟ್ಟಿಗೆ ಜೋಡಿಸಿ, ಅದರ ಮೇಲೆ ಕರಗಿಸಿದ ವೈಟ್ ಮತ್ತು ಮಿಲ್ಕ್ ಚಾಕೊಲೇಟ್ ಅನ್ನು ಸುರಿದು ಸೆಟ್ ಮಾಡಲಾದ ಒಂದು ಸುಂದರ ಹಾಗೂ ಆರೋಗ್ಯಕರ ಡೆಸರ್ಟ್ ಆಗಿದೆ. ಇದಕ್ಕೆ ಯಾವುದೇ ಬೇಕಿಂಗ್ ಮಾಡುವ ಅಗತ್ಯವಿರುವುದಿಲ್ಲ!
ಈ ಸಿಹಿಯನ್ನು ತಯಾರಿಸಲು ಬೇಕಾಗುವ ಸಾಮಗ್ರಿಗಳು ಮತ್ತು ಹಂತ-ಹಂತವಾದ ವಿವರ ಇಲ್ಲಿದೆ:
ಬೇಕಾಗುವ ಸಾಮಗ್ರಿಗಳು (Ingredients)
Chocolate Berry Donuts
1. ಪ್ರಮುಖ ಸಾಮಗ್ರಿಗಳು:
- ತಾಜಾ ಸ್ಟ್ರಾಬೆರಿಗಳು (Fresh Strawberries): 200 ಗ್ರಾಂ (ತೊಳೆದು, ಸಣ್ಣದಾಗಿ ಕತ್ತರಿಸಿದ್ದು)
- ತಾಜಾ ಬ್ಲೂಬೆರಿಗಳು (Fresh Blueberries): 100 ಗ್ರಾಂ
- ಪಿಸ್ತಾ (Pistachios): 2 ಚಮಚ (ಸಣ್ಣದಾಗಿ ಕತ್ತರಿಸಿದ್ದು, ಅಲಂಕಾರಕ್ಕೆ)
2. ಚಾಕೊಲೇಟ್ ಕೋಟಿಂಗ್ಗಾಗಿ:
- ವೈಟ್ ಚಾಕೊಲೇಟ್ ಕಾಂಪೌಂಡ್ (White Chocolate): 150 ಗ್ರಾಂ
- ಮಿಲ್ಕ್ ಅಥವಾ ಡಾರ್ಕ್ ಚಾಕೊಲೇಟ್ ಕಾಂಪೌಂಡ್ (Milk/Dark Chocolate): 150 ಗ್ರಾಂ
- ಕೊಬ್ಬರಿ ಎಣ್ಣೆ ಅಥವಾ ಬೆಣ್ಣೆ: 1 ಚಮಚ (ಚಾಕೊಲೇಟ್ ಕರಗಿಸುವಾಗ ಬಳಸಲು – ಐಚ್ಛಿಕ)
3. ವಿಶೇಷ ಅಲಂಕಾರಕ್ಕೆ (Optional):
- ತಿನ್ನುವ ಚಿನ್ನದ ವರಖ್ (Edible Gold Foil): ಚಿತ್ರದಲ್ಲಿರುವಂತೆ ರಾಯಲ್ ಲುಕ್ ನೀಡಲು.
4. ಅಗತ್ಯವಿರುವ ಪರಿಕರಗಳು:
Chocolate Berry Donuts
- ಸಿಲಿಕಾನ್ ಡೋನಟ್ ಮೋಲ್ಡ್ (Silicone Donut Mould): ಇದು ಕಡ್ಡಾಯ, ಏಕೆಂದರೆ ಇದರಲ್ಲಿ ಚಾಕೊಲೇಟ್ ಸುಲಭವಾಗಿ ಹೊರಗೆ ಬರುತ್ತದೆ.
ತಯಾರಿಸುವ ವಿಧಾನ (Step-by-Step Instructions)
Chocolate Berry Donuts
ಹಂತ 1: ಹಣ್ಣುಗಳ ಸಿದ್ಧತೆ
ಮೊದಲಿಗೆ ಸ್ಟ್ರಾಬೆರಿ ಮತ್ತು ಬ್ಲೂಬೆರಿಗಳನ್ನು ಚೆನ್ನಾಗಿ ತೊಳೆದುಕೊಳ್ಳಿ. ನಂತರ ಒಂದು ಕಾಟನ್ ಬಟ್ಟೆ ಅಥವಾ ಟಿಶ್ಯೂ ಪೇಪರ್ ಬಳಸಿ ಹಣ್ಣುಗಳಲ್ಲಿರುವ ನೀರನ್ನು ಸಂಪೂರ್ಣವಾಗಿ ಒಣಗಿಸಿ. ಹಣ್ಣುಗಳಲ್ಲಿ ತೇವಾಂಶವಿದ್ದರೆ ಚಾಕೊಲೇಟ್ ಸರಿಯಾಗಿ ಅಂಟಿಕೊಳ್ಳುವುದಿಲ್ಲ. ಸ್ಟ್ರಾಬೆರಿಗಳನ್ನು ಮಧ್ಯಮ ಗಾತ್ರದ ತುಂಡುಗಳಾಗಿ ಕತ್ತರಿಸಿಟ್ಟುಕೊಳ್ಳಿ.
ಹಂತ 2: ಚಾಕೊಲೇಟ್ ಕರಗಿಸುವುದು (Double Boiling Method)
Chocolate Berry Donuts
ಚಾಕೊಲೇಟ್ ಅನ್ನು ನೇರವಾಗಿ ಉರಿಯ ಮೇಲಿಟ್ಟು ಕರಗಿಸಬಾರದು.
- ಒಂದು ಪಾತ್ರೆಯಲ್ಲಿ ನೀರನ್ನು ಕಾಯಲು ಇಡಿ. ಅದರ ಮೇಲೆ ಮತ್ತೊಂದು ಗಾಜಿನ ಅಥವಾ ಸ್ಟೀಲ್ ಪಾತ್ರೆಯನ್ನು ಇಡಿ (ಮೇಲಿನ ಪಾತ್ರೆಗೆ ಕೆಳಗಿನ ನೀರು ತಾಗಬಾರದು, ಕೇವಲ ಹಬೆ ತಾಗಬೇಕು).
- ಮೇಲಿನ ಪಾತ್ರೆಯಲ್ಲಿ ಸಣ್ಣದಾಗಿ ಕತ್ತರಿಸಿದ ವೈಟ್ ಚಾಕೊಲೇಟ್ ಹಾಕಿ, ಅದು ಸಂಪೂರ್ಣವಾಗಿ ಕರಗಿ ನಯವಾಗುವವರೆಗೆ ಕೈಾಡಿಸಿ. ನಂತರ ಅದನ್ನು ಕೆಳಗಿಳಿಸಿ.
- ಇದೇ ರೀತಿ ಮತ್ತೊಂದು ಪಾತ್ರೆಯಲ್ಲಿ ಮಿಲ್ಕ್ ಅಥವಾ ಡಾರ್ಕ್ ಚಾಕೊಲೇಟ್ ಅನ್ನು ಕರಗಿಸಿ ಪಕ್ಕಕ್ಕಿಟ್ಟುಕೊಳ್ಳಿ. (ಗಮನಿಸಿ: ಮೈಕ್ರೋವೇವ್ ಇದ್ದರೆ 30 ಸೆಕೆಂಡುಗಳ ಕಾಲ ಇಟ್ಟು ಸಹ ಕರಗಿಸಬಹುದು).
ಹಂತ 3: ಮೋಲ್ಡ್ನಲ್ಲಿ ಹಣ್ಣುಗಳನ್ನು ಜೋಡಿಸುವುದು
- ಈಗ ಸ್ವಚ್ಛವಾದ ಸಿಲಿಕಾನ್ ಡೋನಟ್ ಮೋಲ್ಡ್ ಅನ್ನು ತೆಗೆದುಕೊಳ್ಳಿ.
- ಚಿತ್ರದಲ್ಲಿ ಕಾಣುವ ವಿನ್ಯಾಸವನ್ನು ಪಡೆಯಲು, ಮೊದಲು ಮೋಲ್ಡ್ನ ತಳಭಾಗದಲ್ಲಿ ಅಲ್ಲಲ್ಲಿ ಕತ್ತರಿಸಿದ ಸ್ಟ್ರಾಬೆರಿ ಚೂರುಗಳು, ಕೆಲವು ಇಡೀ ಬ್ಲೂಬೆರಿಗಳು ಮತ್ತು ಕತ್ತರಿಸಿದ ಪಿಸ್ತಾಗಳನ್ನು ಅಂದವಾಗಿ ಜೋಡಿಸಿ.
ಹಂತ 4: ಮಾರ್ಬಲ್ ಎಫೆಕ್ಟ್ ನೀಡುವುದು
- ಕರಗಿಸಿಟ್ಟ ವೈಟ್ ಚಾಕೊಲೇಟ್ ಮತ್ತು ಮಿಲ್ಕ್ ಚಾಕೊಲೇಟ್ ಅನ್ನು ಚಮಚದ ಸಹಾಯದಿಂದ ಜೋಡಿಸಿದ ಹಣ್ಣುಗಳ ಮೇಲೆ ಅಲ್ಲಲ್ಲಿ ಮಾರ್ಬಲ್ ಡಿಸೈನ್ ಬರುವಂತೆ (ಒಂದು ಚಮಚ ಬಿಳಿ, ಮತ್ತೊಂದು ಚಮಚ ಬ್ರೌನ್) ಸುರಿಯಿರಿ.
- ಹಣ್ಣುಗಳ ನಡುವೆ ಇರುವ ಖಾಲಿ ಜಾಗಗಳಿಗೆ ಚಾಕೊಲೇಟ್ ಚೆನ್ನಾಗಿ ಇಳಿಯುವಂತೆ ಮೋಲ್ಡ್ ಅನ್ನು ನಿಧಾನವಾಗಿ ಟ್ಯಾಪ್ (ನೆಲಕ್ಕೆ ತಟ್ಟಿ) ಮಾಡಿ.
- ಕೊನೆಯಲ್ಲಿ ಮೇಲ್ಭಾಗವನ್ನು ಚಮಚದಿಂದ ಸಮತಟ್ಟಾಗಿಸಿ.
ಹಂತ 5: ಫ್ರೀಜ್ ಮಾಡುವುದು (Setting)
- ಚಾಕೊಲೇಟ್ ತುಂಬಿದ ಮೋಲ್ಡ್ ಅನ್ನು ರೆಫ್ರಿಜರೇಟರ್ನಲ್ಲಿ (ಫ್ರಿಡ್ಜ್) 20 ರಿಂದ 30 ನಿಮಿಷಗಳ ಕಾಲ ಅಥವಾ ಚಾಕೊಲೇಟ್ ಸಂಪೂರ್ಣವಾಗಿ ಗಟ್ಟಿಯಾಗುವವರೆಗೆ ಇಡಿ.
ಹಂತ 6: ಮೋಲ್ಡ್ನಿಂದ ಹೊರತೆಗೆಯುವುದು ಮತ್ತು ಅಲಂಕಾರ
Chocolate Berry Donuts https://en.wikipedia.org/wiki/Blueberry
- ಚಾಕೊಲೇಟ್ ಚೆನ್ನಾಗಿ ಸೆಟ್ ಆದ ನಂತರ, ಫ್ರಿಡ್ಜ್ನಿಂದ ಹೊರತೆಗೆಯಿರಿ. ಸಿಲಿಕಾನ್ ಮೋಲ್ಡ್ ಆಗಿರುವುದರಿಂದ ಅದನ್ನು ಹಿಂದಿನಿಂದ ನಿಧಾನವಾಗಿ ಒತ್ತಿದರೆ ಸುಂದರವಾದ ಡೋನಟ್ ಆಕಾರದ ಹಣ್ಣಿನ ಚಾಕೊಲೇಟ್ಗಳು ಸುಲಭವಾಗಿ ಹೊರಬರುತ್ತವೆ.
- ಈಗ ಅದರ ಮೇಲೆ ಚಿತ್ರದಲ್ಲಿರುವಂತೆ ಸ್ವಲ್ಪ ಎಡಿಬಲ್ ಗೋಲ್ಡ್ ಫಾಯಿಲ್ (ಚಿನ್ನದ ವರಖ್) ಹಚ್ಚಿ ಅಲಂಕರಿಸಿದರೆ, ನಿಮ್ಮ ಪ್ರೀಮಿಯಂ ಲುಕಿಂಗ್ “ಡಬಲ್ ಚಾಕೊಲೇಟ್ ಬೆರ್ರಿ treats” ಸವಿಯಲು ಸಿದ್ಧ!
ಪ್ರಮುಖ ಸಲಹೆಗಳು (Chef Tips)
Chocolate Berry Donuts
- ಹಣ್ಣುಗಳ ಆಯ್ಕೆ: ಸ್ಟ್ರಾಬೆರಿ ಸ್ವಲ್ಪ ಹುಳಿಯಾಗಿದ್ದರೆ, ಮಿಲ್ಕ್ ಚಾಕೊಲೇಟ್ನ ಸಿಹಿ ಅದರೊಂದಿಗೆ ಅದ್ಭುತವಾಗಿ ಹೊಂದಿಕೆಯಾಗುತ್ತದೆ. ನೀವು ಹಣ್ಣುಗಳ ಬದಲಿಗೆ ಒಣ ದ್ರಾಕ್ಷಿ, ಬಾದಾಮಿ ಚೂರುಗಳನ್ನು ಕೂಡ ಬಳಸಬಹುದು.
- ಶೇಖರಣೆ: ಇದನ್ನು ಫ್ರಿಡ್ಜ್ನಲ್ಲಿ ಗಾಳಿಯಾಡದ ಡಬ್ಬದಲ್ಲಿ (Air-tight container) ಇಟ್ಟರೆ 2-3 ದಿನಗಳ ಕಾಲ ತಾಜಾವಾಗಿರುತ್ತದೆ. ಹಣ್ಣುಗಳನ್ನು ಬಳಸಿರುವುದರಿಂದ ಹೆಚ್ಚು ದಿನ ಇಡಬೇಡಿ.
ಇದು ನೋಡಲು ಎಷ್ಟು ಆಕರ್ಷಕವಾಗಿದೆಯೋ, ತಿನ್ನಲು ಅಷ್ಟೇ ರುಚಿಯಾಗಿರುತ್ತದೆ. ಕಿಡ್ಸ್ ಪಾರ್ಟಿಗಳಿಗೆ ಅಥವಾ ವಿಶೇಷ ಸಂದರ್ಭಗಳಲ್ಲಿ ಮಾಡಿಕೊಡಲು ಇದು ಅತ್ಯುತ್ತಮ ಡೆಸರ್ಟ್. ಇದನ್ನು ಒಮ್ಮೆ ಪ್ರಯತ್ನಿಸಿ ನೋಡಿ!
Chocolate Berry Https://my-dessertkitchen.com/3-layer-chocolate-mousse-cake-recipe/ Donuts
Chocolate Berry Donuts
ಈ ರೆಸಿಪಿ ಇಷ್ಟವಾದಲ್ಲಿ ನಿಮ್ಮ ಫ್ರೆಂಡ್ಸ್ ಫ್ಯಾಮಿಲಿಗೆ ಶೇರ್ ಮಾಡಿ ಸಪೋರ್ಟ್ ಮಾಡಿ ಮನೆಯಲ್ಲಿ ಒಮ್ಮೆ ನೀವು ಟ್ರೈ ಮಾಡಿ ಟೆಸ್ಟ್ಮಾಡಿ 😊ಥ್ಯಾಂಕ್ಸ್ ಯು