
milk-pudding-recipe
“Here is a creamy and attractive Milk Pudding Recipe that can be made very easily at home. Let’s learn how to make it step-by-step in this article.”
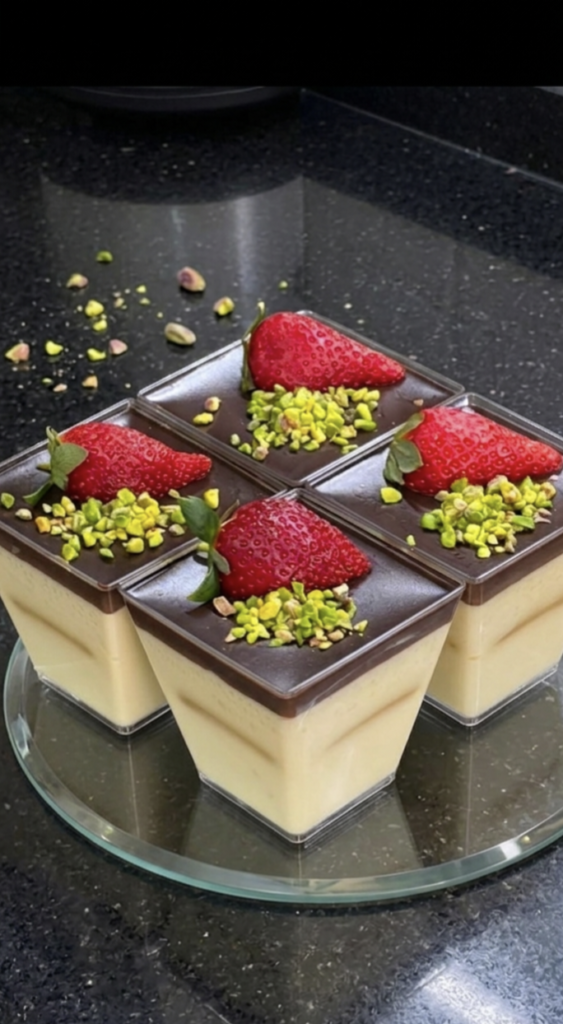
. Ingredients
This elegant dessert is made in three simple parts: the bottom vanilla layer, the top chocolate layer, and the fresh fruit garnishing.
A) For the Bottom Layer (Vanilla Pudding):
Milk Pudding https://my-dessertkitchen.com/stuffed-dates-recipe/ Recipe
- Milk: 1 Litre (Full-fat milk works best)
- Sugar: 1 Cup (Adjust according to your taste)
- All-Purpose Flour (Maida) or Cornstarch: 3 to 4 tbsp
- Rice Flour: 1 tbsp (Gives a smooth, traditional texture)
- Vanilla Essence: 1 tsp
- Butter: 1 tbsp
- Fresh Cream: 1/2 Cup (Optional, makes the pudding extra velvety)
B) For the Top Layer (Chocolate Ganache):
- Dark or Milk Chocolate: 150 grams (Finely chopped)
- Fresh Cream: 100 ml (About 1/2 cup) (Alternative: You can also use ready-made chocolate syrup or make a quick sauce using cocoa powder, milk, and sugar).
C) For Garnishing:
- Fresh Strawberries: Cut into halves (as shown in the image)
- Pistachios: Finely chopped or crushed
2. Step-by-Step Instructions
Milk Pudding Recipe
Step 1: Preparing the Vanilla Pudding
- In a deep, heavy-bottomed saucepan, add the milk, sugar, all-purpose flour (or cornstarch), and rice flour.
- Before turning on the stove, whisk the mixture thoroughly until completely smooth and free of lumps.
- Place the saucepan over medium heat. Stir continuously with a spatula or whisk to prevent the mixture from sticking to the bottom.
- Cook until the mixture starts to boil and thickens into a smooth, creamy, custard-like consistency.
- Turn off the heat. Immediately add the butter, vanilla essence, and fresh cream. Whisk vigorously until the butter is completely melted and integrated.
Step 2: Layering in the Cups
- Take transparent, square or round dessert cups (similar to the ones in the image).
- Pour the hot vanilla pudding into the cups, filling them up to 3/4th capacity.
- Let them cool down to room temperature, then place them in the refrigerator for 15–20 minutes to set slightly before adding the next layer.
Step 3: Preparing the Chocolate ಗಣಚೆ
Milk Pudding Recipe
- Heat the fresh cream in a small saucepan over low heat until it is hot (do not let it boil).
- Remove from heat, add the chopped chocolate pieces, and let it sit undisturbed for 2 minutes.
- Stir gently until the chocolate melts completely into a glossy, smooth, rich sauce.
Step 4: Final Layer & Decoration
- Take the dessert cups out of the fridge (the top surface of the vanilla layer should now be firm).
- Gently pour a thin layer of the warm chocolate ganache over the vanilla pudding in each cup.
- Place one half of a fresh strawberry right in the center of each cup.
- Sprinkle the finely chopped pistachios around the strawberry to create a beautiful green contrast, exactly like the image.
3. Chilling & Serving
- Once all the cups are decorated, place them back in the refrigerator for at least 3 to 4 hours.
- This dessert is best served completely chilled, as freezing/chilling beautifully sets the layers and enhances the overall texture.
💡 Quick Tips:
Milk Pudding Recipe
- Lump-Free Texture: If you notice any lumps while cooking the pudding, quickly run the mixture through a fine sieve before pouring it into the cups.
- Fruit Alternatives: If strawberries are out of season, you can easily substitute them with fresh cherries, raspberries, or a sprinkle of chocolate curls.
ಸ್ಟ್ರಾಬೆರಿ ಮತ್ತು ಪಿಸ್ತಾ ಅಲಂಕೃತ ಕ್ರೀಮಿ ಪುಡಿಂಗ್ 4. ಮೃದುವಾದ ಚಾಕೊಲೇಟ್ ಮಾನ್ಸೂನ್ ಡೆಸರ್ಟ್
Milk Pudding Recipe
ಮನೆಯಲ್ಲೇ ಅತ್ಯಂತ ಸುಲಭವಾಗಿ ಮತ್ತು ಆಕರ್ಷಕವಾಗಿ ಮಾಡಬಹುದಾದ ಒಂದು ಕ್ರೀಮಿ Milk Pudding Recipe ಇಲ್ಲಿದೆ. ಇದನ್ನು ಹಂತ ಹಂತವಾಗಿ ಮಾಡುವುದು ಹೇಗೆ ಎಂದು ಈ ಲೇಖನದಲ್ಲಿ ತಿಳಿಯೋಣ.”
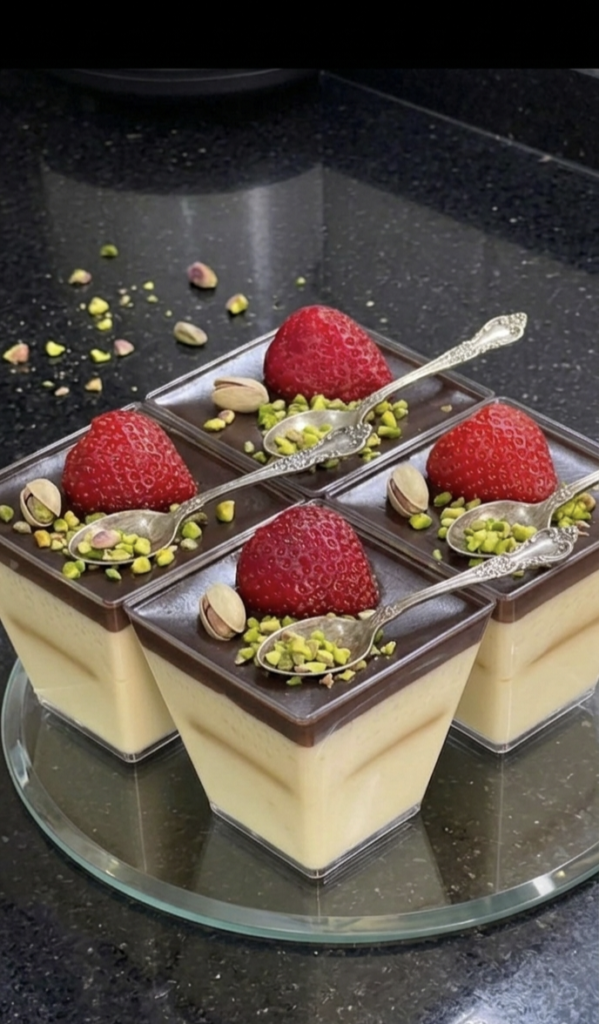
ರುಚಿಕರವಾದ ಚಾಕೊಲೇಟ್ ಮತ್ತು ವೆನಿಲ್ಲಾ ಲೇಯರ್ಡ್ ಹಾಲಿನ ಸಿಹಿ ತಿಂಡಿ (Layered Milk Pudding) ಮಾಡುವ ಸಂಪೂರ್ಣ ವಿವರವಾದ ರೆಸಿಪಿ ಇಲ್ಲಿದೆ. ಇದು ನೋಡಲು ಎಷ್ಟು ಸುಂದರವಾಗಿದೆಯೋ, ತಿನ್ನಲು ಅಷ್ಟೇ ಮೃದುವಾಗಿ ಮತ್ತು ರುಚಿಯಾಗಿರುತ್ತದೆ. ವಿಶೇಷವಾಗಿ ಬೇಸಿಗೆಯ ದಿನಗಳಲ್ಲಿ ತಂಪಾಗಿ ಸವಿಯಲು ಇದು ಅದ್ಭುತವಾದ ಆಯ್ಕೆ.
1. ಬೇಕಾಗುವ ಪದಾರ್ಥಗಳು (Ingredients)
Milk Pudding Recipe
ಈ ಸಿಹಿ ತಿಂಡಿಯನ್ನು ಮೂರು ಹಂತಗಳಲ್ಲಿ ಸಿದ್ಧಪಡಿಸಲಾಗುತ್ತದೆ: ಕೆಳಗಿನ ಬಿಳಿ ಲೇಯರ್ (ವೆನಿಲ್ಲಾ ಪುಡಿಂಗ್), ಮೇಲಿನ ಚಾಕೊಲೇಟ್ ಲೇಯರ್ (ಗನಾಶ್/ಸಾಸ್), ಮತ್ತು ಅಲಂಕಾರಕ್ಕೆ ಬೇಕಾಗುವ ಪದಾರ್ಥಗಳು.
ಎ) ಕೆಳಗಿನ ಲೇಯರ್ (ವೆನಿಲ್ಲಾ ಪುಡಿಂಗ್):
- ಹಾಲು: 1 ಲೀಟರ್ (ಪೂರ್ಣ ಕೆನೆಭರಿತ ಹಾಲು ಉತ್ತಮ)
- ಸಕ್ಕರೆ: 1 ಕಪ್ (ನಿಮ್ಮ ಸಿಹಿಗೆ ತಕ್ಕಂತೆ ಹೆಚ್ಚು-ಕಡಿಮೆ ಮಾಡಿಕೊಳ್ಳಬಹುದು)
- ಮೈದಾ ಹಿಟ್ಟು ಅಥವಾ ಜೋಳದ ಹಿಟ್ಟು (Cornstarch): 3 ರಿಂದ 4 ದೊಡ್ಡ ಚಮಚ
- ಅಕ್ಕಿ ಹಿಟ್ಟು: 1 ದೊಡ್ಡ ಚಮಚ (ಇದು ಪುಡಿಂಗ್ಗೆ ಒಳ್ಳೆಯ ಸಾಂದ್ರತೆ ನೀಡುತ್ತದೆ)
- ವೆನಿಲ್ಲಾ ಎಸೆನ್ಸ್: 1 ಸಣ್ಣ ಚಮಚ
- ಬೆಣ್ಣೆ: 1 ದೊಡ್ಡ ಚಮಚ
- ಫ್ರೆಶ್ ಕ್ರೀಮ್ (ತಾಜಾ ಕೆನೆ): 1/2 ಕಪ್ (ಇದು ಪುಡಿಂಗ್ ಅನ್ನು ಹೆಚ್ಚು ಸಾಫ್ಟ್ ಮಾಡುತ್ತದೆ – ಐಚ್ಛಿಕ)
ಬಿ) ಮೇಲಿನ ಲೇಯರ್ (ಚಾಕೊಲೇಟ್ ಗನಾಶ್):
Milk Pudding Recipe”
- ಡಾರ್ಕ್ ಅಥವಾ ಮಿಲ್ಕ್ ಚಾಕೊಲೇಟ್: 150 ಗ್ರಾಂ (ಸಣ್ಣದಾಗಿ ಹೆಚ್ಚಿದ್ದು)
- ಫ್ರೆಶ್ ಕ್ರೀಮ್: 100 ಎಂ.ಎಲ್ (ಅರ್ಧ ಕಪ್) (ಅಥವಾ ಸರಳವಾದ ಚಾಕೊಲೇಟ್ ಸಾಸ್ ಮಾಡಲು: 2 ಕಪ್ ಹಾಲು, 2 ಚಮಚ ಕೋಕೋ ಪೌಡರ್, 2 ಚಮಚ ಕಾರ್ನ್ಫ್ಲೋರ್ ಮತ್ತು 4 ಚಮಚ ಸಕ್ಕರೆ ಬಳಸಬಹುದು).
ಸಿ) ಅಲಂಕಾರಕ್ಕಾಗಿ (Garnishing):
- ತಾಜಾ ಸ್ಟ್ರಾಬೆರಿಗಳು (Strawberries): ಮಧ್ಯಕ್ಕೆ ಕತ್ತರಿಸಿದ್ದು (ಚಿತ್ರದಲ್ಲಿರುವಂತೆ)
- ಪಿಸ್ತಾ ನಟ್ಸ್: ಸಣ್ಣದಾಗಿ ಕತ್ತರಿಸಿದ್ದು ಅಥವಾ ಪುಡಿ ಮಾಡಿದ್ದು
2. ತಯಾರಿ ವಿಧಾನ (Step-by-Step Instructions)
ಹಂತ 1: ವೆನಿಲ್ಲಾ ಪುಡಿಂಗ್ (ಕೆಳಗಿನ ಲೇಯರ್) ತಯಾರಿಕೆ
Milk Pudding Recipe
- ಮೊದಲು ಒಂದು ದಪ್ಪ ತಳದ ಪಾತ್ರೆಗೆ 1 ಲೀಟರ್ ಹಾಲು, ಸಕ್ಕರೆ, ಮೈದಾ ಹಿಟ್ಟು (ಅಥವಾ ಕಾರ್ನ್ಫ್ಲೋರ್) ಮತ್ತು ಅಕ್ಕಿ ಹಿಟ್ಟನ್ನು ಹಾಕಿ.
- ಒಲೆಯ ಮೇಲೆ ಇಡುವ ಮುನ್ನವೇ, ಹಿಟ್ಟು ಗಂಟುಕಟ್ಟದಂತೆ ಹಾಲಿನಲ್ಲಿ ಚೆನ್ನಾಗಿ ಕೈಯಾಡಿಸಿ ಮಿಶ್ರಣ ಮಾಡಿ.
- ಈಗ ಪಾತ್ರೆಯನ್ನು ಮಧ್ಯಮ ಉರಿಯಲ್ಲಿ ಒಲೆಯ ಮೇಲಿಟ್ಟು, ಸೌಟಿನಿಂದ ಸತತವಾಗಿ ಕೈಯಾಡಿಸುತ್ತಾ ಇರಿ. ಕೈ ಬಿಟ್ಟರೆ ತಳ ಹಿಡಿಯುವ ಸಾಧ್ಯತೆ ಇರುತ್ತದೆ.
- ಮಿಶ್ರಣವು ಕುದಿಯಲು ಆರಂಭವಾಗಿ, ದಪ್ಪನೆಯ ಕ್ರೀಮ್ ತರಹದ (Condense milk ಹದಕ್ಕೆ) ಬರುವವರೆಗೆ ಬೇಯಿಸಿ.
- ಈ ಹಂತದಲ್ಲಿ ಒಲೆಯನ್ನು ಆಫ್ ಮಾಡಿ. ನಂತರ ಅದಕ್ಕೆ ಬೆಣ್ಣೆ, ವೆನಿಲ್ಲಾ ಎಸೆನ್ಸ್ ಮತ್ತು ಫ್ರೆಶ್ ಕ್ರೀಮ್ ಸೇರಿಸಿ ಚೆನ್ನಾಗಿ ಮಿಕ್ಸ್ ಮಾಡಿ. ನಿಮ್ಮ ಮೃದುವಾದ ವೆನಿಲ್ಲಾ ಪುಡಿಂಗ್ ಸಿದ್ಧವಾಗಿದೆ.
ಹಂತ 2: ಗ್ಲಾಸ್ ಅಥವಾ ಕಪ್ಗಳಲ್ಲಿ ಜೋಡಿಸುವುದು
- ಚಿತ್ರದಲ್ಲಿರುವಂತೆ ಪಾರದರ್ಶಕವಾದ ಸಣ್ಣ ಚೌಕಾಕಾರದ ಅಥವಾ ದುಂಡಗಿನ ಗ್ಲಾಸ್/ಕಪ್ಗಳನ್ನು ತೆಗೆದುಕೊಳ್ಳಿ.
- ಸಿದ್ಧಪಡಿಸಿದ ಬಿಸಿ ವೆನಿಲ್ಲಾ ಪುಡಿಂಗ್ ಅನ್ನು ಈ ಕಪ್ಗಳ ಮುಕ್ಕಾಲು ಭಾಗದಷ್ಟು (3/4th) ಸಮನಾಗಿ ತುಂಬಿಸಿ.
- ಇವುಗಳನ್ನು ಕೋಣೆಯ ತಾಪಮಾನಕ್ಕೆ ಬರಲು ಬಿಡಿ, ನಂತರ ಚಾಕೊಲೇಟ್ ಲೇಯರ್ ಹಾಕುವ ಮುನ್ನ ಇದು ಸ್ವಲ್ಪ ಸೆಟ್ ಆಗಲು 15-20 ನಿಮಿಷಗಳ ಕಾಲ ಫ್ರಿಡ್ಜ್ನಲ್ಲಿಡಿ.
ಹಂತ 3: ಚಾಕೊಲೇಟ್ ಲೇಯರ್ ತಯಾರಿಕೆ
- ಒಂದು ಪಾತ್ರೆಯಲ್ಲಿ ಫ್ರೆಶ್ ಕ್ರೀಮ್ ಅನ್ನು ಹದವಾಗಿ ಬಿಸಿ ಮಾಡಿ (ಕುದಿಸಬೇಡಿ).
- ಬಿಸಿಯಾದ ಕ್ರೀಮ್ಗೆ ಹೆಚ್ಚಿದ ಚಾಕೊಲೇಟ್ ತುಂಡುಗಳನ್ನು ಹಾಕಿ 2 ನಿಮಿಷ ಹಾಗೇ ಬಿಡಿ. ನಂತರ ಚಾಕೊಲೇಟ್ ಪೂರ್ತಿಯಾಗಿ ಕರಗಿ ಹೊಳೆಯುವ ಕಪ್ಪು ಬಣ್ಣ ಬರುವವರೆಗೆ ಚೆನ್ನಾಗಿ ಮಿಕ್ಸ್ ಮಾಡಿ. (ಇದನ್ನು ಚಾಕೊಲೇಟ್ ಗನಾಶ್ ಎನ್ನಲಾಗುತ್ತದೆ).
- ಒಂದು ವೇಳೆ ನೀವು ಕೋಕೋ ಪೌಡರ್ ಬಳಸುತ್ತಿದ್ದರೆ: ಹಾಲು, ಸಕ್ಕರೆ, ಕೋಕೋ ಪೌಡರ್ ಮತ್ತು ಕಾರ್ನ್ಫ್ಲೋರ್ ಅನ್ನು ಒಟ್ಟಿಗೆ ಸೇರಿಸಿ ಕುದಿಸಿ ದಪ್ಪ ಸಾಸ್ ಮಾಡಿಕೊಳ್ಳಿ.
ಹಂತ 4: ಅಂತಿಮ ಲೇಯರ್ ಮತ್ತು ಅಲಂಕಾರ
Milk Pudding Recipe
- ಫ್ರಿಡ್ಜ್ನಿಂದ ಪುಡಿಂಗ್ ಕಪ್ಗಳನ್ನು ಹೊರಗೆ ತೆಗೆಯಿರಿ. ಈಗ ಕೆಳಗಿನ ಲೇಯರ್ ಸ್ವಲ್ಪ ಗಟ್ಟಿಯಾಗಿರುತ್ತದೆ.
- ಇದರ ಮೇಲ್ಭಾಗಕ್ಕೆ ಸಿದ್ಧಪಡಿಸಿದ ಚಾಕೊಲೇಟ್ ಗನಾಶ್ ಅನ್ನು ಸಮನಾಗಿ ಹರಡಿ (ಚಿತ್ರದಲ್ಲಿರುವಂತೆ ತೆಳುವಾದ ಕಪ್ಪು ಲೇಯರ್ ಬರಬೇಕು).
- ಈಗ ಪ್ರತಿ ಕಪ್ನ ಮಧ್ಯದಲ್ಲಿ ಅರ್ಧ ಕತ್ತರಿಸಿದ ಒಂದು ತಾಜಾ ಸ್ಟ್ರಾಬೆರಿಯನ್ನು ಇಡಿ.
- ಅದರ ಸುತ್ತಲೂ ಸಣ್ಣದಾಗಿ ಕತ್ತರಿಸಿದ ಹಸಿರು ಪಿಸ್ತಾ ಪುಡಿಯನ್ನು ಉದುರಿಸಿ ಅಲಂಕರಿಸಿ.
3. ಸೆಟ್ ಮಾಡುವುದು ಮತ್ತು ಸರ್ವ್ ಮಾಡುವುದು (Cooling & Serving)
Milk Pudding Recipe
- ಎಲ್ಲಾ ಕಪ್ಗಳನ್ನು ಅಲಂಕರಿಸಿದ ನಂತರ, ಅವುಗಳನ್ನು ಕನಿಷ್ಠ 3 ರಿಂದ 4 ಗಂಟೆಗಳ ಕಾಲ ಫ್ರಿಡ್ಜ್ನಲ್ಲಿ (Refrigerator) ಇಟ್ಟು ಚೆನ್ನಾಗಿ ತಂಪಾಗಿಸಿ.
- ಈ ಸಿಹಿ ತಿಂಡಿ ಎಷ್ಟು ತಣ್ಣಗಾಗುತ್ತದೆಯೋ, ಅಷ್ಟು ಚೆನ್ನಾಗಿ ಲೇಯರ್ಗಳು ಸೆಟ್ ಆಗುತ್ತವೆ ಮತ್ತು ತಿನ್ನಲು ಅದ್ಭುತ ರುಚಿ ನೀಡುತ್ತವೆ.
- ಪಾರ್ಟಿಗಳು, ಹುಟ್ಟುಹಬ್ಬದ ಆಚರಣೆಗಳು ಅಥವಾ ಅತಿಥಿಗಳು ಮನೆಗೆ ಬಂದಾಗ ನೀಡಲು ಇದು ಅತ್ಯುತ್ತಮ ಮತ್ತು ಐಷಾರಾಮಿ ಲುಕ್ ನೀಡುವ ಡೆಸರ್ಟ್ ಆಗಿದೆ.
💡 ಕೆಲವು ಪ್ರಮುಖ ಸಲಹೆಗಳು (Tips for Perfection):
Milk Pudding Recipe”
- ಗಂಟುಗಳಿಲ್ಲದಂತೆ ನೋಡಿಕೊಳ್ಳಿ: ಹಾಲಿಗೆ ಹಿಟ್ಟನ್ನು ಮಿಶ್ರಣ ಮಾಡುವಾಗ ಯಾವುದೇ ಗಂಟುಗಳು ಇರಬಾರದು. ಬೇಕಿದ್ದರೆ ಒಲೆಗೆ ಇಡುವ ಮುನ್ನ ಮಿಶ್ರಣವನ್ನು ಒಮ್ಮೆ ಶೋಧಿಸಿಕೊಳ್ಳಬಹುದು (strain).
- ಪರ್ಯಾಯ ಹಣ್ಣುಗಳು: ಸ್ಟ್ರಾಬೆರಿ ಸಿಗದಿದ್ದರೆ, ನೀವು ಅಲಂಕಾರಕ್ಕಾಗಿ ಚೆರ್ರಿ ಹಣ್ಣುಗಳು, ರಾಸ್ಪ್ಬೆರಿ ಅಥವಾ ಕೇವಲ ಚಾಕೊಲೇಟ್ ಚಿಪ್ಸ್ ಬಳಸಬಹುದು.
- ಮೃದುತ್ವಕ್ಕಾಗಿ: ಪುಡಿಂಗ್ ಮೃದುವಾಗಿ ಐಸ್ ಕ್ರೀಮ್ ತರಹ ಕರಗಬೇಕೆಂದರೆ ಫ್ರೆಶ್ ಕ್ರೀಮ್ ಅನ್ನು ಮಿಸ್ ಮಾಡದೆ ಬಳಸಿ.
Milk Pudding https://en.wikipedia.org/wiki/Blueberry Recipe
ಈ ರೆಸಿಪಿ ನಿಮಗೆ ಇಷ್ಟವಾದರೆ ಒಮ್ಮೆ ನಿಮ್ಮ ಮನೆಯಲ್ಲೂ ಟ್ರೈ ಮಾಡಿ ನೋಡಿ ಅಂದರೆ ನಿಮ್ಮ ಫ್ರೆಂಡ್ಸ್ ಅಂಡ್ ಫ್ಯಾಮಿಲಿಗೆ ಶೇರ್ ಮಾಡಿ ಥ್ಯಾಂಕ್ಯು 😊