
Making this layered Apricot Pistachio Cheesecake at home is easier than you think, and it looks absolutely professional.”
Apricot Pistachio Cheesecake
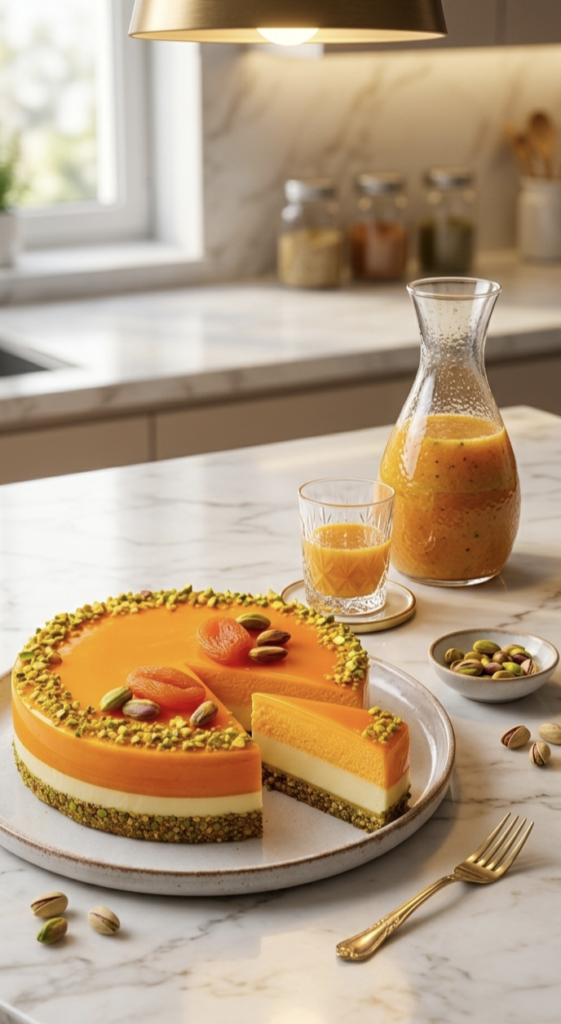
The Ultimate Apricot & Pistachio Layered Cheesecake
Apricot Pistachio Https://my-dessertkitchen.com/strawberry-shooters-recipe/ Cheesecake
A cheesecake is more than just a dessert; it is a masterpiece of textures and balanced flavors. As seen in the image 1000287542.png, this specific creation features three distinct layers: a crunchy pistachio-biscuit base, a velvety cream cheese center, and a vibrant, tangy apricot glaze.
1. Ingredients
Apricot Pistachio Cheesecake
The Pistachio Crust (Base):
- Pistachios: 150g (unsalted, raw is preferred for color).
- Digestive Biscuits: 150g (or Graham crackers).
- Unsalted Butter: 80g (melted).
- Cardamom Powder: A pinch (to enhance the nutty aroma).
The Creamy Filling (Middle Layer):
- Full-Fat Cream Cheese: 500g (must be at room temperature to avoid lumps).
- Heavy Whipping Cream: 250ml (chilled).
- Powdered Sugar: 150g.
- Apricot Pulp: 1/2 cup (made from fresh or poached apricots).
- Vanilla Extract: 1 tsp.
- Gelatine or Agar-Agar Powder: 15g.
The Apricot Glaze (Top Layer):
- Apricot Puree: 1 cup (strained for a smooth finish).
- Sugar: 3 tbsp.
- Lemon Juice: 1 tsp (keeps the color bright and prevents oxidation).
- Gelatine/Agar-Agar: 1 tbsp.
2. Detailed Preparation Steps
Apricot Pistachio Cheesecake
Step 1: Constructing the Pistachio Base
The foundation defines the structural integrity of the cake. Looking at 1000287542.png, the base has a beautiful greenish-brown hue.
- Place the pistachios and biscuits in a food processor. Pulse until you have a coarse, sandy texture. Avoid over-processing into a fine powder; you want a slight crunch.
- Transfer the crumbs to a bowl and stir in the melted butter and cardamom.
- Take an 8-inch springform pan and pour the mixture in.
- Use the back of a spoon or a flat-bottomed glass to press the crumbs down firmly and evenly.
- Refrigerate for 30 minutes. This “locking” process prevents the crust from crumbling when the cream is added.
Step 2: The Cream Cheese Synthesis
This is where the “velvet” texture is born.
- In a large mixing bowl, beat the room-temperature cream cheese and powdered sugar until the mixture is light and airy.
- In a separate chilled bowl, whisk the whipping cream until it reaches stiff peaks.
- Dissolve your gelatine/agar-agar in a small amount of warm water, ensuring there are no clumps.
- Gently fold the whipped cream and the gelatine into the cream cheese mixture using a spatula. Do not over-mix, as you want to keep the air inside.
Step 3: Creating the Ombre Effect
To replicate the visual depth seen in 1000287542.png, we split the filling.
- Divide the cream mixture into two halves.
- Keep one half plain white. To the second half, add 2-3 tablespoons of apricot pulp and fold gently. This creates a soft, peach-colored transition layer.
- Pour the white mixture over the set base and smooth it out. Carefully pour the light-orange mixture on top of that.
- Return to the freezer for about 2 hours to let these layers stabilize.
Step 4: The Mirror Apricot Glaze
The glossy finish on top provides the “wow” factor.
- Simmer the apricot puree and sugar in a small saucepan over low heat.
- Once the sugar dissolves, stir in the prepared gelatine and lemon juice.
- Crucial: Let the glaze cool until it is lukewarm. If it is too hot, it will melt the cream layer.
- Pour the glaze over the back of a spoon onto the cake to ensure it spreads evenly without creating craters.
3. Setting and Artistic Garnishing
This cheesecake requires patience. It must be refrigerated for at least 8 hours, though 24 hours is ideal for the flavors to mature.
To Garnish (Referencing 1000287542.png):
- The Border: Carefully press finely crushed pistachios around the outer edge of the top layer.
- The Centerpiece: Arrange 2-3 dried apricot halves in the center.
- The Contrast: Place whole, bright green pistachios around the apricots to add texture and a pop of color.
4. Why This Recipe Works
- Flavor Profile: Apricots offer a sophisticated tanginess that cuts through the heavy richness of the cream cheese.
- Texture: You move from a glassy glaze to a cloud-like cream, ending with a crunchy, nutty finish.
- Health Note: Pistachios are rich in antioxidants, and apricots provide high levels of Vitamin A, making this a slightly more “refined” indulgence.
Pro Tips for Success:
- Gelatine Substitute: If you are vegetarian, use Agar-Agar in the same proportions, but remember it sets faster and at room temperature.
- Using Dried Apricots: If fresh apricots are out of season, soak dried ones in hot water for 2 hours, then blend them to create your own puree.
- The Perfect Cut: To get the sharp, clean slice shown in 1000287542.png, use a thin knife dipped in hot water and wiped dry before every single cut.
This Apricot Pistachio Cheesecake is a showstopper that tastes as incredible as it looks. Happy baking!
”If you loved this recipe, please share it with your friends and family! Don’t forget to leave a comment below to let me know how it turned out.”
ಪರಿಪೂರ್ಣ ಆಪ್ರಿಕಾಟ್ ಮತ್ತು ಪಿಸ್ತಾ ಲೇಯರ್ಡ್ ಚೀಸ್ಕೇಕ್
Apricot Pistachio Cheesecake
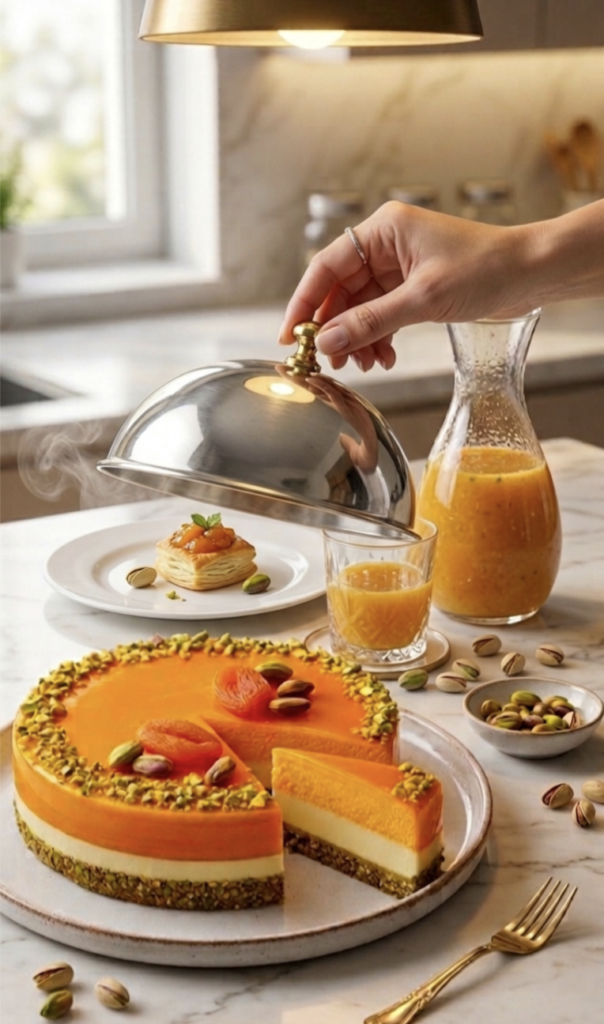
ಚೀಸ್ಕೇಕ್ ಎಂಬುದು ಕೇವಲ ಸಿಹಿಯಲ್ಲ, ಅದು ಒಂದು ಕಲೆ. ಚಿತ್ರ 1000287542.png ನಲ್ಲಿ ನೀವು ನೋಡುತ್ತಿರುವಂತೆ, ಇದು ಮೂರು ಸ್ಪಷ್ಟ ಲೇಯರ್ಗಳನ್ನು ಹೊಂದಿದೆ: ಗರಿಗರಿಯಾದ ಪಿಸ್ತಾ ಬೇಸ್, ಮೃದುವಾದ ಕ್ರೀಮ್ ಲೇಯರ್ ಮತ್ತು ಹೊಳೆಯುವ ಆಪ್ರಿಕಾಟ್ ಗ್ಲೇಜ್. ಇದನ್ನು ಹಂತ ಹಂತವಾಗಿ ಹೇಗೆ ಮಾಡುವುದೆಂದು ತಿಳಿಯೋಣ.
Apricot Pistachio Cheesecake
1. ಬೇಕಾಗುವ ಸಾಮಗ್ರಿಗಳು (Ingredients)
Apricot Pistachio Cheesecake
ತಳಭಾಗದ ಪದರಕ್ಕೆ (Pistachio Crust):
- ಪಿಸ್ತಾ: 150 ಗ್ರಾಂ (ಉಪ್ಪು ರಹಿತ, ಹಸಿಯಾಗಿರುವುದು ಉತ್ತಮ).
- ಡೈಜೆಸ್ಟಿವ್ ಅಥವಾ ಓಟ್ಸ್ ಬಿಸ್ಕತ್ತುಗಳು: 150 ಗ್ರಾಂ.
- ಅನ್ಸಾಲ್ಟೆಡ್ ಬೆಣ್ಣೆ: 80 ಗ್ರಾಂ (ಕರಗಿಸಿದ್ದು).
- ಏಲಕ್ಕಿ ಪುಡಿ: ಒಂದು ಚಿಟಿಕೆ (ಹೆಚ್ಚುವರಿ ಪರಿಮಳಕ್ಕೆ).
ಮಧ್ಯದ ಕ್ರೀಮ್ ಪದರಕ್ಕೆ (Cream Cheese Filling):
- ಫುಲ್ ಫ್ಯಾಟ್ ಕ್ರೀಮ್ ಚೀಸ್: 500 ಗ್ರಾಂ (ಇದು ಕೋಣೆಯ ತಾಪಮಾನದಲ್ಲಿರಬೇಕು).
- ಹೈ ಫ್ಯಾಟ್ ಕ್ರೀಮ್ ಅಥವಾ ವಿಪ್ಪಿಂಗ್ ಕ್ರೀಮ್: 250 ಮಿ.ಲೀ.
- ಸಕ್ಕರೆ ಪುಡಿ: 150 ಗ್ರಾಂ (ನಿಮ್ಮ ರುಚಿಗೆ ತಕ್ಕಂತೆ).
- ಆಪ್ರಿಕಾಟ್ ಪಲ್ಪ್: 1/2 ಕಪ್ (ತಾಜಾ ಅಥವಾ ಟಿನ್ ಮಾಡಿದ ಆಪ್ರಿಕಾಟ್ನಿಂದ ತಯಾರಿಸಿದ್ದು).
- ವೆನಿಲ್ಲಾ ಎಕ್ಸ್ಟ್ರಾಕ್ಟ್: 1 ಚಮಚ.
- ಜೆಲಾಟಿನ್ ಅಥವಾ ಅಗರ್ ಅಗರ್ ಪುಡಿ: 15 ಗ್ರಾಂ.
ಮೇಲ್ಭಾಗದ ಆಪ್ರಿಕಾಟ್ ಗ್ಲೇಜ್ಗೆ (Apricot Glaze):
- ಆಪ್ರಿಕಾಟ್ ಪ್ಯೂರಿ: 1 ಕಪ್.
- ಸಕ್ಕರೆ: 2-3 ದೊಡ್ಡ ಚಮಚ.
- ಲಿಂಬೆ ರಸ: 1 ಚಮಚ (ಬಣ್ಣ ಕಪ್ಪಾಗದಂತೆ ತಡೆಯಲು).
- ಜೆಲಾಟಿನ್/ಅಗರ್ ಅಗರ್: 1 ಚಮಚ.
2. ತಯಾರಿಸುವ ಸವಿಸ್ತಾರ ಹಂತಗಳು
Apricot Pistachio Cheesecake
ಹಂತ 1: ಪಿಸ್ತಾ ಮತ್ತು ಬಿಸ್ಕತ್ತು ಬೇಸ್ ತಯಾರಿ
ಯಾವುದೇ ಚೀಸ್ಕೇಕ್ನ ಅಡಿಪಾಯ ಅದರ ಕ್ರಸ್ಟ್. ಚಿತ್ರ 1000287542.png ನಲ್ಲಿ ನೀವು ನೋಡುವಂತೆ, ತಳಭಾಗವು ಹಸಿರು ಮಿಶ್ರಿತ ಬಿಸ್ಕತ್ತು ಬಣ್ಣವನ್ನು ಹೊಂದಿದೆ.
- ಪಿಸ್ತಾ ಮತ್ತು ಬಿಸ್ಕತ್ತುಗಳನ್ನು ಫುಡ್ ಪ್ರೊಸೆಸರ್ನಲ್ಲಿ ಹಾಕಿ ತರಿತರಿಯಾಗಿ ಪುಡಿ ಮಾಡಿ. ತುಂಬಾ ನುಣ್ಣಗೆ ಪುಡಿ ಮಾಡಬೇಡಿ, ಸ್ವಲ್ಪ ಕಚ್ಚುವಂತಿರಲಿ.
- ಇದಕ್ಕೆ ಕರಗಿದ ಬೆಣ್ಣೆಯನ್ನು ಸೇರಿಸಿ ಚೆನ್ನಾಗಿ ಬೆರೆಸಿ.
- ಒಂದು 8 ಇಂಚಿನ ಸ್ಪ್ರಿಂಗ್ಫಾರ್ಮ್ ಪ್ಯಾನ್ (ತೆಗೆಯಬಹುದಾದ ತಳವಿರುವ ಪಾತ್ರೆ) ತೆಗೆದುಕೊಂಡು ಈ ಮಿಶ್ರಣವನ್ನು ಹಾಕಿ.
- ಒಂದು ಲೋಟ ಅಥವಾ ಚಮಚದ ಸಹಾಯದಿಂದ ಮಿಶ್ರಣವನ್ನು ಗಟ್ಟಿಯಾಗಿ ಒತ್ತಿ ಸಮತಟ್ಟಾಗಿ ಮಾಡಿ.
- ಇದನ್ನು 30 ನಿಮಿಷಗಳ ಕಾಲ ಫ್ರಿಡ್ಜ್ನಲ್ಲಿಡಿ. ಇದು ಕ್ರೀಮ್ ಹಾಕುವಾಗ ಬೇಸ್ ಒಡೆಯದಂತೆ ತಡೆಯುತ್ತದೆ.
ಹಂತ 2: ಕ್ರೀಮ್ ಚೀಸ್ ಮಿಶ್ರಣದ ಹದ
ಇದು ಕೇಕ್ನ ಅತ್ಯಂತ ಪ್ರಮುಖ ಭಾಗ.
- ಒಂದು ದೊಡ್ಡ ಬೌಲ್ನಲ್ಲಿ ಕ್ರೀಮ್ ಚೀಸ್ ಮತ್ತು ಸಕ್ಕರೆ ಪುಡಿಯನ್ನು ಹಾಕಿ ಎಲೆಕ್ಟ್ರಿಕ್ ಬೀಟರ್ ಅಥವಾ ವಿಸ್ಕರ್ ಬಳಸಿ ಮೃದುವಾಗಿ ಫೆಣ ಬರುವಂತೆ ಅನಿರಿ.
- ಮತ್ತೊಂದು ಪಾತ್ರೆಯಲ್ಲಿ ತಣ್ಣಗಿರುವ ವಿಪ್ಪಿಂಗ್ ಕ್ರೀಮ್ ಅನ್ನು ಗಟ್ಟಿಯಾಗುವವರೆಗೆ (stiff peaks) ಬೀಟ್ ಮಾಡಿ.
- ಈಗ ಕ್ರೀಮ್ ಚೀಸ್ ಮಿಶ್ರಣಕ್ಕೆ ವಿಪ್ಪಿಂಗ್ ಕ್ರೀಮ್ ಅನ್ನು ನಿಧಾನವಾಗಿ ಫೋಲ್ಡ್ ಮಾಡಿ (ಜೋರಾಗಿ ಕಲಕಬೇಡಿ).
- ಜೆಲಾಟಿನ್ ಅನ್ನು ಸ್ವಲ್ಪ ಬಿಸಿ ನೀರಿನಲ್ಲಿ ಕರಗಿಸಿ, ಈ ಮಿಶ್ರಣಕ್ಕೆ ಸೇರಿಸಿ.
ಹಂತ 3: ಲೇಯರ್ಗಳನ್ನು ಸೃಷ್ಟಿಸುವುದು
ಚಿತ್ರದಲ್ಲಿರುವಂತೆ ಆಕರ್ಷಕವಾಗಿ ಕಾಣಲು ನಾವು ಎರಡು ಬಣ್ಣದ ಕ್ರೀಮ್ ಬಳಸುತ್ತೇವೆ.
- ತಯಾರಿಸಿದ ಕ್ರೀಮ್ ಮಿಶ್ರಣವನ್ನು ಎರಡು ಭಾಗ ಮಾಡಿ.
- ಒಂದು ಭಾಗಕ್ಕೆ 2 ಚಮಚ ಆಪ್ರಿಕಾಟ್ ಪಲ್ಪ್ ಸೇರಿಸಿ ಮಿಕ್ಸ್ ಮಾಡಿ. ಇದು ತಿಳಿ ಕಿತ್ತಳೆ ಬಣ್ಣವನ್ನು ನೀಡುತ್ತದೆ.
- ಫ್ರಿಡ್ಜ್ನಿಂದ ಬೇಸ್ ಹೊರತೆಗೆದು, ಮೊದಲು ಬಿಳಿ ಬಣ್ಣದ ಕ್ರೀಮ್ ಅನ್ನು ಹಾಕಿ ಹರಡಿ. ಅದರ ಮೇಲೆ ಆಪ್ರಿಕಾಟ್ ಮಿಶ್ರಿತ ಕ್ರೀಮ್ ಅನ್ನು ಹಾಕಿ ಸಮ ಮಾಡಿ.
- ಇದನ್ನು 2 ಗಂಟೆಗಳ ಕಾಲ ಫ್ರೀಜರ್ ಅಥವಾ ಫ್ರಿಡ್ಜ್ನಲ್ಲಿ ಸೆಟ್ ಆಗಲು ಬಿಡಿ.
ಹಂತ 4: ಹೊಳೆಯುವ ಆಪ್ರಿಕಾಟ್ ಗ್ಲೇಜ್
ಕೇಕ್ನ ಮೇಲ್ಭಾಗದಲ್ಲಿರುವ ಆ ಕನ್ನಡಿಯಂತಹ ಹೊಳಪಿಗೆ ಈ ಗ್ಲೇಜ್ ಕಾರಣ.
- ಆಪ್ರಿಕಾಟ್ ಪ್ಯೂರಿಯನ್ನು ಸಣ್ಣ ಉರಿಯಲ್ಲಿ ಸಕ್ಕರೆಯೊಂದಿಗೆ ಬಿಸಿ ಮಾಡಿ.
- ಸಕ್ಕರೆ ಕರಗಿದ ನಂತರ, ಕರಗಿಸಿದ ಜೆಲಾಟಿನ್ ಮತ್ತು ಲಿಂಬೆ ರಸ ಸೇರಿಸಿ.
- ಮಿಶ್ರಣವು ಉಗುರು ಬೆಚ್ಚಗಾದಾಗ (ತುಂಬಾ ಬಿಸಿ ಇರಬಾರದು), ಕೇಕ್ನ ಮೇಲ್ಭಾಗಕ್ಕೆ ಸುರಿಯಿರಿ.
- ಪ್ಯಾನ್ ಅನ್ನು ಸ್ವಲ್ಪ ಅಲುಗಾಡಿಸಿ ಗ್ಲೇಜ್ ಎಲ್ಲ ಕಡೆ ಸಮವಾಗಿ ಹರಡುವಂತೆ ಮಾಡಿ.
3. ಸೆಟ್ ಮಾಡುವುದು ಮತ್ತು ಅಲಂಕಾರ (Garnish)
Apricot Pistachio Cheesecake
ಈ ಚೀಸ್ಕೇಕ್ ಪೂರ್ಣವಾಗಿ ಸೆಟ್ ಆಗಲು ಕನಿಷ್ಠ 8 ಗಂಟೆಗಳ ಕಾಲ ಫ್ರಿಡ್ಜ್ನಲ್ಲಿ ಇಡಬೇಕು. ರಾತ್ರಿಯಿಡೀ ಇಟ್ಟರೆ ಇನ್ನೂ ಉತ್ತಮ.
ಅಲಂಕಾರಕ್ಕಾಗಿ:
ಚಿತ್ರ 1000287542.png ನಲ್ಲಿರುವಂತೆ ಸೌಂದರ್ಯ ಹೆಚ್ಚಿಸಲು:
- ಕೇಕ್ನ ಅಂಚುಗಳಿಗೆ ಸಣ್ಣದಾಗಿ ಹೆಚ್ಚಿದ ಪಿಸ್ತಾ ಪುಡಿಯನ್ನು ಹರಡಿ.
- ಮಧ್ಯಭಾಗದಲ್ಲಿ ಎರಡು ಅಥವಾ ಮೂರು ಒಣಗಿದ ಆಪ್ರಿಕಾಟ್ (Dried Apricots) ತುಂಡುಗಳನ್ನು ಇರಿಸಿ.
- ಅದರ ಪಕ್ಕದಲ್ಲಿ ಕೆಲವು ಇಡೀ ಪಿಸ್ತಾಗಳನ್ನು ಜೋಡಿಸಿ.
4. ಆಪ್ರಿಕಾಟ್ ಚೀಸ್ಕೇಕ್ನ ವಿಶೇಷತೆಗಳು
- ರುಚಿಯ ಸಮತೋಲನ: ಆಪ್ರಿಕಾಟ್ನಲ್ಲಿರುವ ಲಘುವಾದ ಹುಳಿ ಅಂಶವು ಕ್ರೀಮ್ ಚೀಸ್ನ ಜಿಡ್ಡಿನಂಶವನ್ನು ಸಮತೋಲನಗೊಳಿಸುತ್ತದೆ.
- ಆರೋಗ್ಯದ ದೃಷ್ಟಿಯಿಂದ: ಪಿಸ್ತಾಗಳು ಉತ್ತಮ ಪ್ರೋಟೀನ್ ಮತ್ತು ಫೈಬರ್ ನೀಡಿದರೆ, ಆಪ್ರಿಕಾಟ್ ವಿಟಮಿನ್ ಎ ಮತ್ತು ಸಿ ಯಿಂದ ಸಮೃದ್ಧವಾಗಿದೆ.
- ನೋಟ: ಇದು ನೋಡಲು ಅತ್ಯಂತ ಐಷಾರಾಮಿಯಾಗಿ ಕಾಣುವುದರಿಂದ ಹಬ್ಬಗಳು ಅಥವಾ ಹುಟ್ಟುಹಬ್ಬದ ಪಾರ್ಟಿಗಳಿಗೆ ಇದು ಅತ್ಯುತ್ತಮ ಡೆಸರ್ಟ್.
ಗಮನಿಸಬೇಕಾದ ಅಂಶಗಳು:
Apricot Pistachio Cheesecake
- ಜೆಲಾಟಿನ್ ಪರ್ಯಾಯ: ನೀವು ಸಸ್ಯಾಹಾರಿಗಳಾಗಿದ್ದರೆ ಜೆಲಾಟಿನ್ ಬದಲು ‘ಅಗರ್ ಅಗರ್’ (Agar-Agar) ಬಳಸಬಹುದು.
- ತಾಜಾ ಹಣ್ಣು: ತಾಜಾ ಆಪ್ರಿಕಾಟ್ ಸಿಗದಿದ್ದರೆ, ಒಣಗಿದ ಆಪ್ರಿಕಾಟ್ಗಳನ್ನು ಬಿಸಿ ನೀರಿನಲ್ಲಿ ನೆನೆಸಿ ರುಬ್ಬಿ ಕೂಡ ಪ್ಯೂರಿ ಮಾಡಿಕೊಳ್ಳಬಹುದು.
ಈ ರೆಸಿಪಿಯನ್ನು ಅನುಸರಿಸಿ ನೀವು ಚಿತ್ರದಲ್ಲಿರುವಂತೆಯೇ ಅದ್ಭುತವಾದ ಕೇಕ್ ತಯಾರಿಸಬಹುದು. ಇದನ್ನು ಸವಿಯುವ ಮೊದಲು ಅರ್ಧ ಗಂಟೆ ಫ್ರಿಡ್ಜ್ನಿಂದ ಹೊರಗಿಟ್ಟರೆ ಅದು ಸರಿಯಾದ ಹದಕ್ಕೆ ಬರುತ್ತದೆ.
ಆಪ್ರಿಕಾಟ್ನ ಈ ವಿಶಿಷ್ಟ ರುಚಿ ನಿಮಗೆ ಇಷ್ಟವಾಗುತ್ತದೆ ಎಂದು ನಂಬಿದ್ದೇನೆ!
Apricot Pistachio https://en.wikipedia.org/wiki/Blueberry Cheesecake
t
ಈ ಆಪ್ರಿಕಾಟ್ ಮತ್ತು ಪಿಸ್ತಾ ಲೇಯರ್ಡ್ ಚೀಸ್ಕೇಕ್ ರೆಸಿಪಿ ನಿಮಗೆ ಇಷ್ಟವಾದಲ್ಲಿ, ಇದನ್ನು ನಿಮ್ಮ ಸ್ನೇಹಿತರು ಮತ್ತು ಕುಟುಂಬದವರೊಂದಿಗೆ ಶೇರ್ ಮಾಡಲು ಮರೆಯಬೇಡಿ! ನಿಮ್ಮ ಅನಿಸಿಕೆಗಳನ್ನು ಕೆಳಗಿನ ಕಾಮೆಂಟ್ ಬಾಕ್ಸ್ನಲ್ಲಿ ಹಂಚಿಕೊಳ್ಳಿ.”