
This cherry pistachio cheesecake recipe is the best no-bake dessert for any occasion!
Homemade Gourmet Desserts
Pistachio Cheesecake Without Oven
“I hope you love this cherry pistachio cheesecake recipe as much as I do!”
Exquisite No-Bake Cherry Pistachio Cheesecake: A Dreamy Dessert Guide
Welcome back to Dessert Kitchen! Today, I am thrilled to share a recipe that is a true feast for both the eyes and the palate: the Cherry Pistachio Cheesecake.
Many people feel intimidated by the word “cheesecake,” thinking it requires complex baking techniques and water baths. However, this version is completely No-Bake, incredibly creamy, and surprisingly simple to put together. With the crunch of pistachios and the sweet-tart burst of fresh cherries, this dessert is pure elegance on a plate.
Best Eggless Cheesecake
1. Why You Will Love This Recipe
Everyone loves this cherry pistachio cheesecake recipe.”
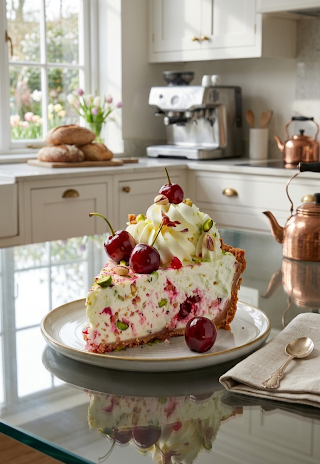
This isn’t just any cheesecake; it’s a sophisticated blend of flavors and textures. As you can see in the photo, the vibrant red cherries against the snowy white cream and the flecks of green pistachios create a stunning visual.
- No Oven Needed: Keep your kitchen cool while making a gourmet dessert.
- Perfect Balance: The richness of the cream cheese is perfectly cut by the acidity of the cherries.
- Crowd Pleaser: Its professional appearance makes it perfect for birthdays, anniversaries, or any special celebration.
2. The Essential Ingredients Checklist
For a flawless cheesecake, ensure your ingredients (especially the cream cheese) are at room temperature.
A. For the Crunchy Pistachio Crust:
- Digestive Biscuits or Graham Crackers: 200g (finely crushed).
- Unsalted Butter: 70g (melted).
- Roasted Pistachios: 2 tablespoons (finely chopped for an extra nutty base).
B. For the Velvety Filling:
- Full-Fat Cream Cheese: 400g (softened).
- Heavy Whipping Cream: 250ml (chilled).
- Powdered Sugar: 1 cup (adjust according to your sweet tooth).
- Fresh Cherries: 1 cup (pitted and chopped).
- Pistachio Paste or Crushed Pistachios: 3 tablespoons.
- Vanilla Extract: 1 teaspoon.
- Lemon Zest: A pinch (for a refreshing citrus note).
- Whole Fresh Cherries: For that beautiful topping.
- Extra Pistachios: Crushed or slivered.
- Whipped Cream: For decorative swirls.
No-Bake Cheesecake Recipe
3. Step-by-Step Preparation Guide
Step 1: Setting the Foundation
Mix the biscuit crumbs, melted butter, and chopped pistachios in a bowl until the mixture resembles wet sand. Press this firmly into the bottom of a 7 or 8-inch springform pan. Use the bottom of a glass to make it perfectly even. Place it in the fridge for 30 minutes to firm up.
Step 2: Preparing the Fruit
Wash and pit your cherries. Roughly chop half of them to fold into the batter. This ensures that every bite has a juicy cherry surprise.
Step 3: Creating the Creamy Filling
In a large mixing bowl, beat the softened cream cheese and powdered sugar until smooth and lump-free. In a separate chilled bowl, whip the heavy cream until stiff peaks form. Gently fold the whipped cream into the cream cheese mixture using a spatula. Add the vanilla extract and lemon zest.
Step 4: The Pistachio & Cherry Swirl
Divide your cream mixture. Fold the chopped cherries and the pistachio paste into the batter. Do not overmix; you want to see those beautiful flecks of green and red.
Step 5: The Final Chill
Pour the filling over the chilled biscuit base. Smooth the top with an offset spatula. Cover with plastic wrap and refrigerate for at least 6 to 8 hours, though overnight is highly recommended for the best texture.
4. Professional Decoration Tips
To achieve the look in the picture:
- The Swirls: Use a piping bag with a star tip to create elegant whipped cream dollops around the edges.
- The Fruit: Place a glossy, whole cherry on top of each whipped cream swirl.
- The Texture: Sprinkle toasted pistachio slivers and a few more cherry bits in the center for a gourmet finish.
5. Pro-Tips for Success
- Avoid Lumps: Always ensure your cream cheese is at room temperature before mixing.
- The Right Cream: Use heavy cream with at least 35% fat content to ensure the cheesecake sets properly without gelatin.
- Clean Slices: Wipe your knife with a warm, damp cloth between every slice to get those sharp, clean edges.
6. SEO Optimization for Your Post
- Focus Keyword: Easy Cherry Pistachio Cheesecake Recipe
- Internal Linking: Mention your previous Raspberry Chocolate Tart for readers who love fruit-based desserts.
- Alt Text: For your images, use: No-Bake Cherry Pistachio Cheesecake with whipped cream and fresh cherries.
Best Eggless Cheesecake
Conclusion
This Cherry Pistachio Cheesecake is a testament to how simple ingredients can create a masterpiece. It’s light, refreshing, and incredibly decadent. Try it out this weekend and let me know in the comments how your family liked it!
Don’t forget to subscribe to Dessert Kitchen for more weekly sweet inspirations!
This cherry pistachio cheesecake recipe is sure to impress your guests.”
Easy Cherry Dessert
Exquisite Cherry Pistachio Cheesecake: A Dreamy No-Bake Recipe
cherry pistachio cheesecake recipe
ನಮಸ್ಕಾರ ಸ್ನೇಹಿತರೇ!
ನಿಮ್ಮ ಮೆಚ್ಚಿನ Dessert Kitchen ಬ್ಲಾಗ್ಗೆ ಸ್ವಾಗತ. ಇಂದು ನಾನು ನಿಮಗಾಗಿ ಒಂದು ವಿಶೇಷವಾದ ಮತ್ತು ನೋಡುವುದಕ್ಕೆ ಬಹಳ ಆಕರ್ಷಕವಾದ ಡೆಸರ್ಟ್ ರೆಸಿಪಿಯನ್ನು ತಂದಿದ್ದೇನೆ. ಅದೇ “Cherry Pistachio Cheesecake”. ಸಾಮಾನ್ಯವಾಗಿ ಚೀಸ್ಕೇಕ್ ಅಂದ ಕೂಡಲೇ ಅದು ತುಂಬಾ ಕಷ್ಟದ ಕೆಲಸ ಎಂದು ಹಲವರು ಭಾವಿಸುತ್ತಾರೆ. ಆದರೆ ಇಂದು ನಾನು ನಿಮಗೆ ಯಾವುದೇ ಓವನ್ ಇಲ್ಲದೆ, ಬಹಳ ಸುಲಭವಾಗಿ ತಯಾರಿಸಬಹುದಾದ ಹಂತ-ಹಂತದ ವಿಧಾನವನ್ನು ತಿಳಿಸಿಕೊಡುತ್ತೇನೆ.
ಈ ಚೀಸ್ಕೇಕ್ನ ಪ್ರತಿ ಕಚ್ಚಿನಲ್ಲೂ ನಿಮಗೆ ಪಿಸ್ತಾದ ಗರಿಗರಿ ಮತ್ತು ಚೆರ್ರಿ ಹಣ್ಣಿನ ಸಿಹಿ-ಹುಳಿ ರುಚಿಯ ಅದ್ಭುತ ಸಂಗಮ ಸಿಗಲಿದೆ.
cherry pistachio cheesecakehttps://www.healthline.com/nutrition/9-benefits-of-pistachiosrecipe”
Introduction: Why This Cheesecake is Special?
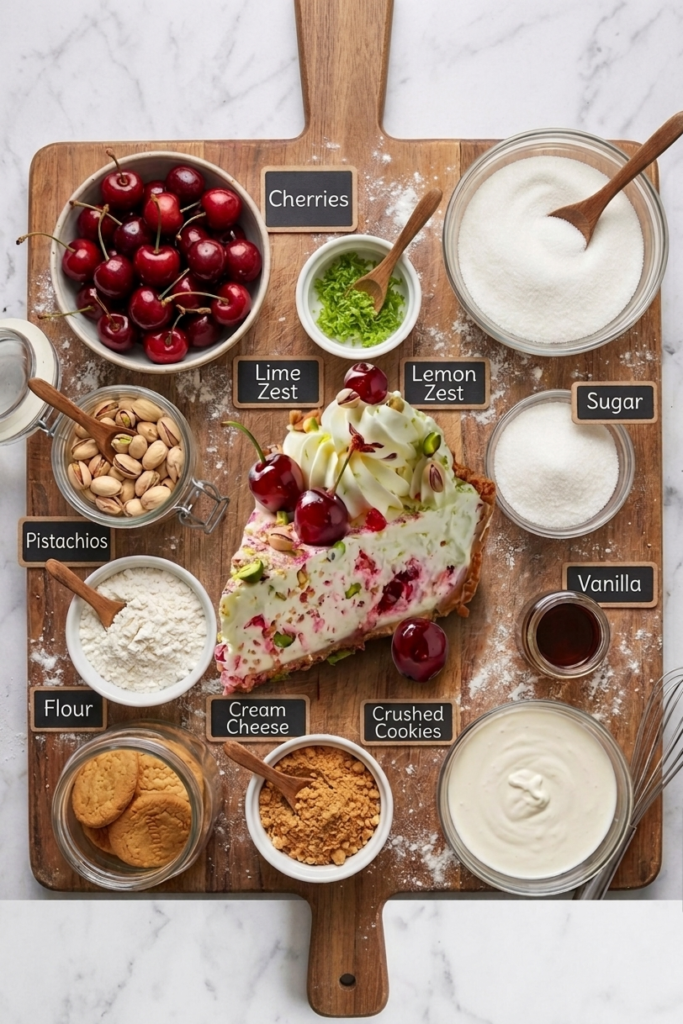
ಈ ಚೀಸ್ಕೇಕ್ ಕೇವಲ ರುಚಿಯಾದ ಡೆಸರ್ಟ್ ಮಾತ್ರವಲ್ಲ, ಇದು ನಿಮ್ಮ ಡೈನಿಂಗ್ ಟೇಬಲ್ನ ಅಂದವನ್ನೂ ಹೆಚ್ಚಿಸುತ್ತದೆ. ಚಿತ್ರದಲ್ಲಿ ನೋಡುತ್ತಿರುವಂತೆ, ಬಿಳಿ ಬಣ್ಣದ ಕೆನೆಭರಿತ ಚೀಸ್ಕೇಕ್ ಮೇಲೆ ಗಾಢ ಕೆಂಪು ಬಣ್ಣದ ಚೆರ್ರಿಗಳು ಮತ್ತು ಹಸಿರು ಪಿಸ್ತಾಗಳು ಒಂದು ಸುಂದರವಾದ ನೋಟವನ್ನು ನೀಡುತ್ತವೆ. ಇದು ಯಾವುದೇ ಬರ್ತ್ಡೇ ಪಾರ್ಟಿ ಅಥವಾ ಹಬ್ಬದ ಸಂಭ್ರಮಕ್ಕೆ ಹೇಳಿ ಮಾಡಿಸಿದಂತಹ ತಿಂಡಿಯಾಗಿದೆ.
This cherry pistachio cheesecake recipe is very creamy.”
cherry pistachio cheesecake recipe
2. Ingredients Checklist (ಬೇಕಾಗುವ ಪದಾರ್ಥಗಳು)
ಪರಿಪೂರ್ಣವಾದ ಚೀಸ್ಕೇಕ್ ಮಾಡಲು ಸರಿಯಾದ ಪದಾರ್ಥಗಳ ಅಳತೆ ಮುಖ್ಯ.
Everyone loves this cherry pistachio cheesecake recipe.”
A. For the Crust (ಬೇಸ್ ಲೇಯರ್):
- Digestive Biscuits / Graham Crackers: 200 grams (ಚೆನ್ನಾಗಿ ಪುಡಿ ಮಾಡಿದ್ದು).
- Unsalted Butter: 70 grams (ಕರಗಿಸಿದ್ದು).
- Pistachios: 2 ಚಮಚ (ಸಣ್ಣದಾಗಿ ಕತ್ತರಿಸಿದ್ದು, ಇದು ಬೇಸ್ಗೆ ಒಳ್ಳೆಯ ಗರಿಗರಿ ರುಚಿ ನೀಡುತ್ತದೆ).
B. For the Creamy Cheesecake Filling:
- Cream Cheese: 400 grams (ಕೊಠಡಿಯ ತಾಪಮಾನದಲ್ಲಿರಲಿ).
- Heavy Whipping Cream: 250 ml.
- Powdered Sugar: 1 cup.
- Fresh Cherries: 1 cup (ಬೀಜ ತೆಗೆದಿದ್ದು ಮತ್ತು ಸಣ್ಣಗೆ ಕತ್ತರಿಸಿದ್ದು).
- Pistachio Paste or Crushed Pistachios: 3 ಚಮಚ.
- Vanilla Extract: 1 teaspoon.
- Lemon Zest: ಸ್ವಲ್ಪ (ಇದರಿಂದ ಒಂದು ತಾಜಾತನ ಸಿಗುತ್ತದೆ).
C. For Garnish (ಅಲಂಕಾರಕ್ಕಾಗಿ):
- Whole Cherries: 4-5 ಹಣ್ಣುಗಳು.
- Whipped Cream Swirls: ಡಿಸೈನ್ ಮಾಡಲು.
- Roasted Pistachios: ತುರಿ ಮಾಡಿದ ಹಸಿರು ಪಿಸ್ತಾಗಳು.
No-Bake Cheesecake RecipeHttps://my-dessertkitchen.com/raspberry-chocolate-tart-recipe/
Raspberry Chocolate Tart Recipe
3. Step-by-Step Preparation Guide
Step 1: The Crunchy Foundation
ಮೊದಲು ಬಿಸ್ಕತ್ತುಗಳನ್ನು ಪುಡಿ ಮಾಡಿ ಒಂದು ಬೌಲ್ಗೆ ಹಾಕಿ. ಅದಕ್ಕೆ ಕರಗಿಸಿದ ಬೆಣ್ಣೆ ಮತ್ತು ಸ್ವಲ್ಪ ಪಿಸ್ತಾ ಚೂರುಗಳನ್ನು ಸೇರಿಸಿ ಚೆನ್ನಾಗಿ ಬೆರೆಸಿ. ಈಗ ಈ ಮಿಶ್ರಣವನ್ನು ಒಂದು ಸ್ಪ್ರಿಂಗ್-ಫಾರ್ಮ್ ಪ್ಯಾನ್ಗೆ ಹಾಕಿ, ಕೆಳಭಾಗದಲ್ಲಿ ಸಮನಾಗಿ ಹರಡಿ ಗಟ್ಟಿಯಾಗಿ ಒತ್ತಿ. ಇದನ್ನು 30 ನಿಮಿಷಗಳ ಕಾಲ ಫ್ರಿಜ್ನಲ್ಲಿ ಇರಿಸಿ.
Step 2: Preparing the Cherries
ಚೆರ್ರಿ ಹಣ್ಣುಗಳನ್ನು ತೊಳೆದು ಅದರ ಒಳಗಿನ ಬೀಜಗಳನ್ನು ತೆಗೆಯಿರಿ. ಅರ್ಧದಷ್ಟು ಹಣ್ಣುಗಳನ್ನು ಲಘುವಾಗಿ ಸ್ಮ್ಯಾಶ್ ಮಾಡಿ ಅಥವಾ ಸಣ್ಣದಾಗಿ ಹೆಚ್ಚಿಟ್ಟುಕೊಳ್ಳಿ. ಇದು ಕೇಕ್ ಒಳಗಡೆ ಚೆರ್ರಿ ಲೇಯರ್ ನೀಡಲು ಸಹಾಯ ಮಾಡುತ್ತದೆ.
Step 3: Making the Cream Cheese Filling
ಒಂದು ದೊಡ್ಡ ಬೌಲ್ನಲ್ಲಿ ಕ್ರೀಮ್ ಚೀಸ್ ಮತ್ತು ಸಕ್ಕರೆ ಪುಡಿಯನ್ನು ಹಾಕಿ ಮೃದುವಾಗುವವರೆಗೆ ಚೆನ್ನಾಗಿ ಬೀಟ್ ಮಾಡಿ. ಇನ್ನೊಂದು ಬೌಲ್ನಲ್ಲಿ ಹೆವಿ ಕ್ರೀಮ್ ಅನ್ನು ಗಟ್ಟಿಯಾಗುವವರೆಗೆ ವಿಪ್ ಮಾಡಿ. ಈಗ ಇವೆರಡನ್ನೂ ನಿಧಾನವಾಗಿ ಬೆರೆಸಿ. ಇದಕ್ಕೆ ವೆನಿಲ್ಲಾ ಎಸೆನ್ಸ್ ಮತ್ತು ಸ್ವಲ್ಪ ಲೆಮನ್ ಜೆಸ್ಟ್ ಸೇರಿಸಿ.
Step 4: Adding the Pistachio & Cherry Twists
ಈ ತಯಾರಾದ ಕ್ರೀಮ್ ಮಿಶ್ರಣಕ್ಕೆ ಕತ್ತರಿಸಿದ ಚೆರ್ರಿ ಹಣ್ಣುಗಳು ಮತ್ತು ಪಿಸ್ತಾ ಪುಡಿಯನ್ನು ಸೇರಿಸಿ. ಲಘುವಾಗಿ ಮಿಕ್ಸ್ ಮಾಡಿ, ಇದರಿಂದ ಕೇಕ್ ಮೇಲೆ ಸುಂದರವಾದ ಕೆಂಪು ಮತ್ತು ಹಸಿರು ಬಣ್ಣದ ಛಾಯೆ ಮೂಡಿಬರುತ್ತದೆ.
Step 5: Assembling the Cake
ಫ್ರಿಜ್ನಿಂದ ಬಿಸ್ಕತ್ತು ಬೇಸ್ ಅನ್ನು ಹೊರತೆಗೆಯಿರಿ. ಅದರ ಮೇಲೆ ಈ ಕ್ರೀಮ್ ಚೀಸ್ ಮಿಶ್ರಣವನ್ನು ಸುರಿಯಿರಿ. ಮೇಲ್ಭಾಗವನ್ನು ಸ್ಪಾಟುಲಾದಿಂದ ಸಮನಾಗಿ ಮಾಡಿ. ಇದನ್ನು ಕನಿಷ್ಠ 6 ರಿಂದ 8 ಗಂಟೆಗಳ ಕಾಲ ಅಥವಾ ರಾತ್ರಿ ಪೂರ್ತಿ ಫ್ರಿಜ್ನಲ್ಲಿ ಸೆಟ್ ಆಗಲು ಬಿಡಿ.
4. Final Decoration (The Professional Touch)
ಕೇಕ್ ಪೂರ್ತಿ ಸೆಟ್ ಆದ ಮೇಲೆ ಪ್ಯಾನ್ನಿಂದ ಹೊರತೆಗೆಯಿರಿ. ಚಿತ್ರದಲ್ಲಿ ಇರುವಂತೆ, ಮೇಲೆ ವಿಪ್ಪಡ್ ಕ್ರೀಮ್ನಿಂದ ಸುಂದರವಾದ ಹೂವುಗಳನ್ನು ಮಾಡಿ. ಪ್ರತಿಯೊಂದು ಹೂವಿನ ಮೇಲೆ ಒಂದು ತಾಜಾ ಚೆರ್ರಿ ಹಣ್ಣನ್ನು ಇರಿಸಿ. ಕೊನೆಯದಾಗಿ ಮೇಲೆ ರೋಸ್ಟೆಡ್ ಪಿಸ್ತಾ ತುರಿಯನ್ನು ಸಿಂಪಡಿಸಿ.
5. Pro-Tips for Perfect Results
- Temperature: ಕ್ರೀಮ್ ಚೀಸ್ ಯಾವಾಗಲೂ ಕೊಠಡಿಯ ತಾಪಮಾನದಲ್ಲಿರಲಿ, ಇಲ್ಲದಿದ್ದರೆ ಕೇಕ್ನಲ್ಲಿ ಗಂಟುಗಳು ಉಂಟಾಗಬಹುದು.
- Patience is Key: ಕೇಕ್ ಸರಿಯಾಗಿ ಸೆಟ್ ಆಗಲು ಸಾಕಷ್ಟು ಸಮಯ ನೀಡಿ. ಫ್ರೀಜರ್ನಲ್ಲಿ ಇಡುವ ಬದಲು ಫ್ರಿಜ್ನಲ್ಲಿ ಇಡುವುದು ಸೂಕ್ತ.
- Freshness: ಸಾಧ್ಯವಾದಷ್ಟು ತಾಜಾ ಚೆರ್ರಿಗಳನ್ನು ಬಳಸಿ. ಲಭ್ಯವಿಲ್ಲದಿದ್ದರೆ ಟಿನ್ ಮಾಡಿದ ಚೆರ್ರಿಗಳನ್ನು ಬಳಸಬಹುದು, ಆದರೆ ಅವುಗಳ ರಸವನ್ನು ಪೂರ್ತಿ ಬಸಿದು ಬಳಸಿ.
Pistachio Cheesecake Without
My Other Recipe”https://my-dessertkitchen.com/
- Discover how to make a stunning cherry pistachio cheesecake recipe at home. This no-bake dessert is creamy, nutty, and perfect for any celebration!”
“I hope you love this cherry pistachio cheesecake recipe as much as I do!”
- Try this cherry pistachio cheesecake recipe today!”